隨著 Parse 及依託於其上的數據庫的停運,眾多 Parse 用戶紛紛將行動 App 轉移到 Firebase 和 Realm 上面來。由於便捷快讀的原因,Firebase 當下已成為最為流行的雲端數據庫之一。它同時支持了 iOS、Android 和 Web,這對大型項目非常有利,因為可以在所有主流設備上獲得數據庫的支持。Firebase 的所有者是 Google,意味著服務器極其可靠,能夠隨時獲得幫助。Firebase 已被一些超大型企業所採用,比如 PicCollage、Shazam、Wattpad、Skyscanner 等,可想而知 Firebase 是非常值得信賴的。
隨著 Firebase 最新的一次升級,它變得前所未有的強壯和強大。你可以通過 AdMob 從這個平台上獲利,通過通知保持用戶粘滯性, 或者用於訊息(Cloud Messaging) 又或利用雲端存儲(Cloud Hosting)來製作一個無比強大的 app。Firebase 絕對值得一試。
在本教學中,我們將介紹 Firebase 的一個重要功能,即登入和註冊。我們還會介紹用戶密碼重置功能。我們將使用 Firebase 和 Xcode 的最新版本以及 Swift 3。要閱讀本教學,你需要熟悉 Swift 和 Xcode。
設計UI界面
首先我們需要創建一個新的 Xcode 專案,我會使用 Single View Application 模板,當然它也適用於任何類型的 app,從 Tab-Bar Application 到 Master-Detail Application。你可以隨便命名專案名稱,但我會命名為 FirebaseTutorial1。語言選擇 Swift,設備無所謂,使用 universal 即可。
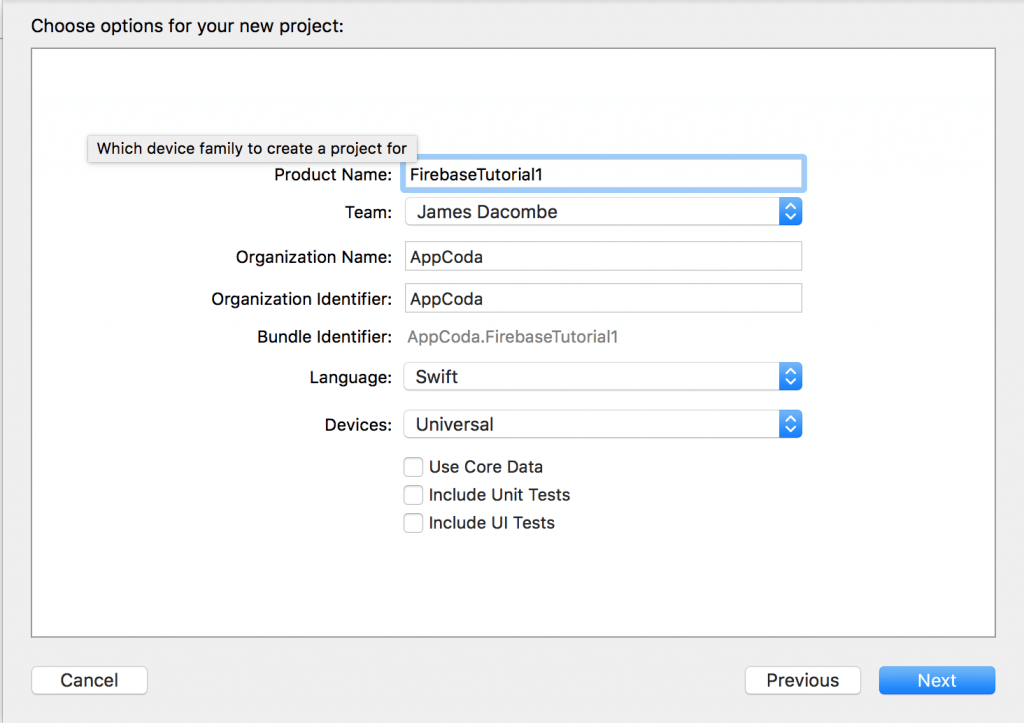
然後打開 Main.storyboard,創建如下界面:
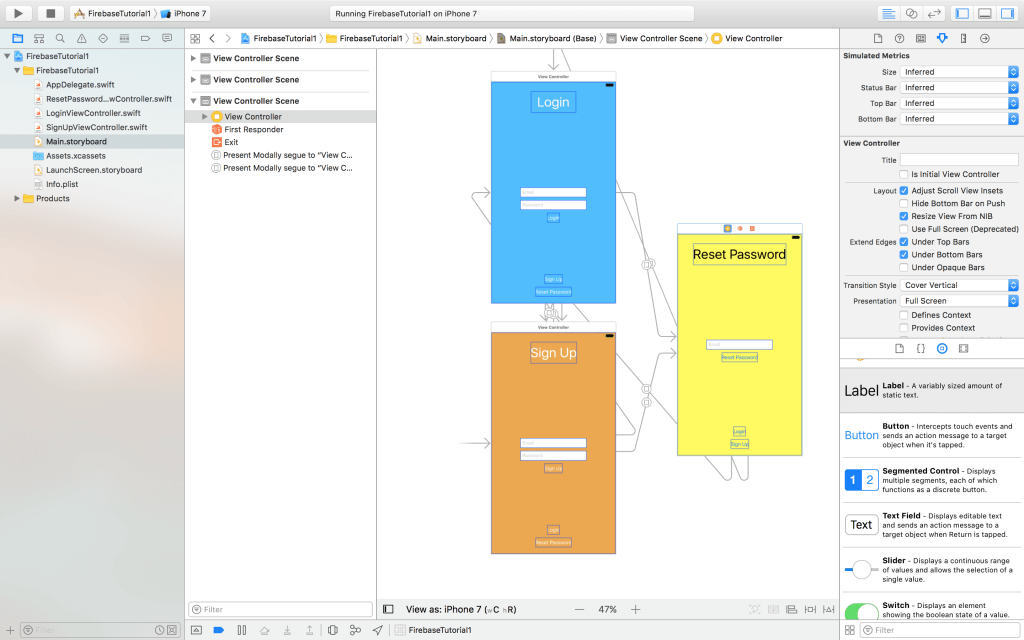
為了節省時間,將注意力集中在 Firebase 上,你也可以 下載開始專案, 這個專案中的故事板已經完成,上圖顯示的正是它的故事板以及文件。
邊注: 從零開始創建 UI
如果你想從頭開始創建項目,你可以遵循以下步驟:
1. 首先,拖 3 個 view controller 到故事板中,在每個 view controller 上添加 2 個按鈕,用於在不同的 view controller 之間進行導航。例如,假設你在登入頁,你可以去到重設密碼頁和註冊頁。
2. 在前兩個 view controller 中,加入兩個 text field 和一個按鈕。text field 用於輸入 Email 地址和密碼。按鈕用於登入或者註冊。將 placeholder 屬性分別設置為 email 和 password 以便提示用戶輸入 email 和密碼。為了好看,你可以修改背景色,然後加一個 label 到頭部。
3. 在第三個 view controller(重置密碼)中,加入 3 個按鈕,一個 text field 和一個 label。text field 用於輸入郵箱以便重設密碼。
4. 設計完 UI 之後,將按鈕連接到其他 view controller,以便用戶能夠切換到不同視圖。這裡,我建議將 segue 類型設置為 “present modally”。
使用 Firebase
UI 完成後,我們將 Firebase 整合到專案中。首先訪問 https://firebase.google.com/,在 Firebase 中創建專案。
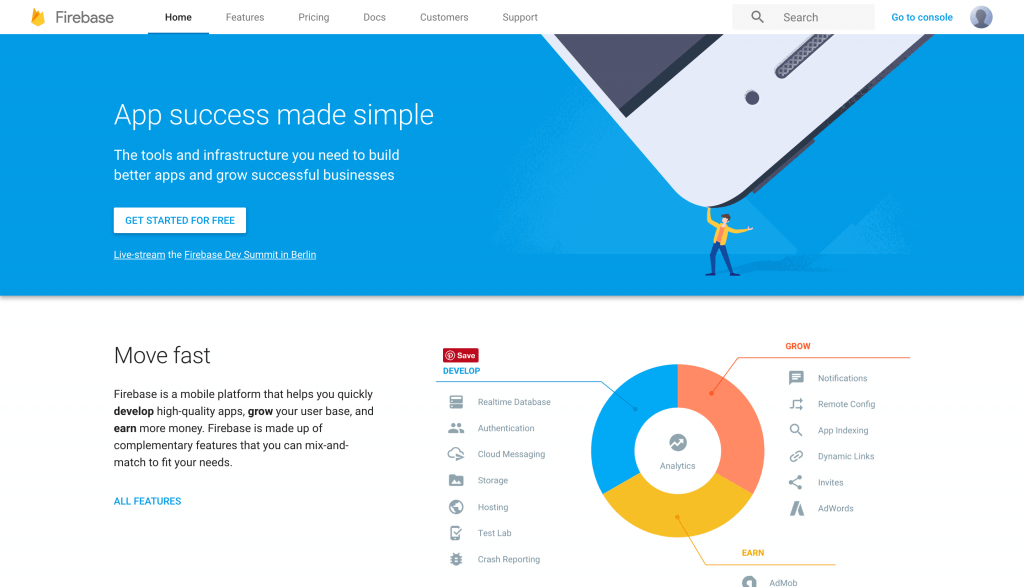
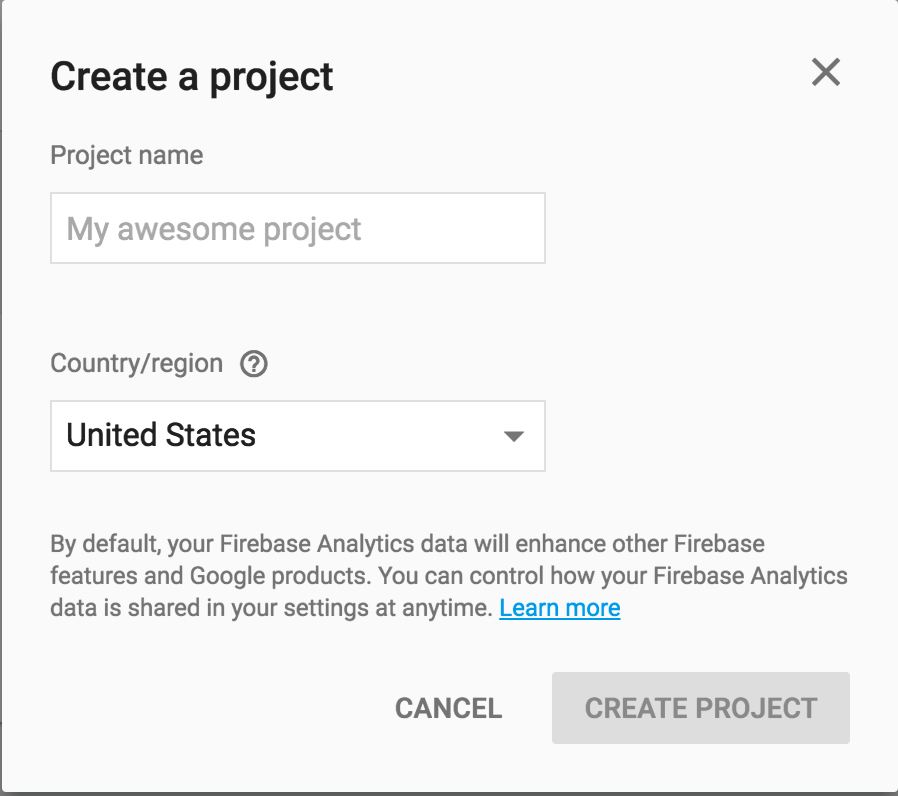
假設你已經登入了你的 Firebase 賬號,點擊 Get started for free 並選擇 Create new project。會顯示一個頁面讓你輸入專案名稱。根據你的想法自行為專案命名,然後選擇你所在的地區。
當 Firebase 為你創建好專案後,它會轉入預覽頁面。在這裡你可以選定你的 app 的平台類型,它是 Web、Android 還是 iOS app。你也可以在這裡查看文檔,以及使用授權、存儲、數據庫等功能。
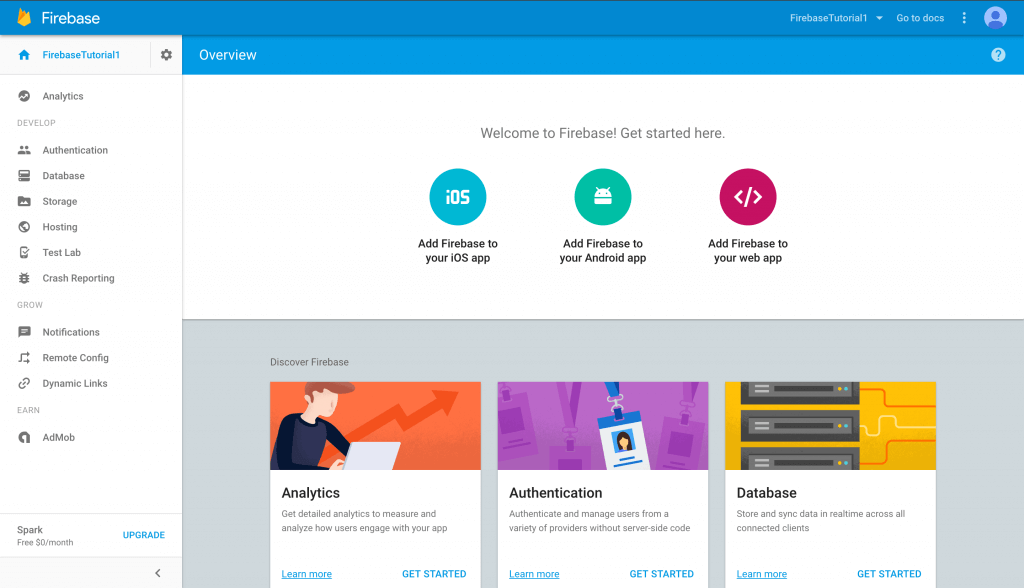
現在選擇 Add Firebase to your iOS app,會提示你輸入 iOS Bundle ID。這會是你的 Xcode 專案的 bundle identifier(注意,你的 bundle ID 和這裡的可能是不同的)。
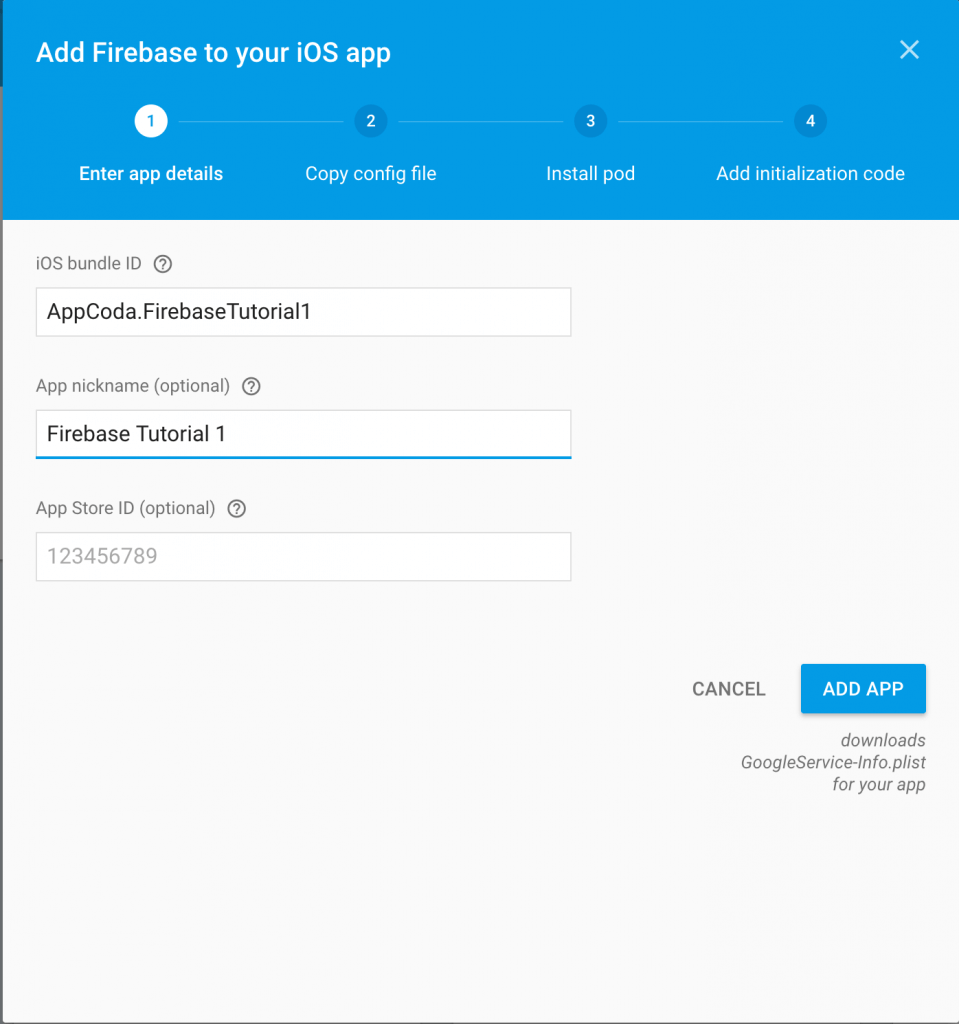
正確輸入你的 bundleID,此外你還可以為 app 設定一個別名。如果你的 app 已經放在 App Store 中正在銷售,則可以輸入你的 App Store ID。當然這僅僅是一個示範 app,你不用輸入商店 ID。填完後,點擊 Add App 繼續,Firebase 會生成一個GoogleService-Info.plist 文件給你。它會自動下載到你的 Mac 上。
這會進入另一個環節。按照下圖所示,將 GoogleService-Info.plist 拖到你的 Xcode 專案的根目錄下。
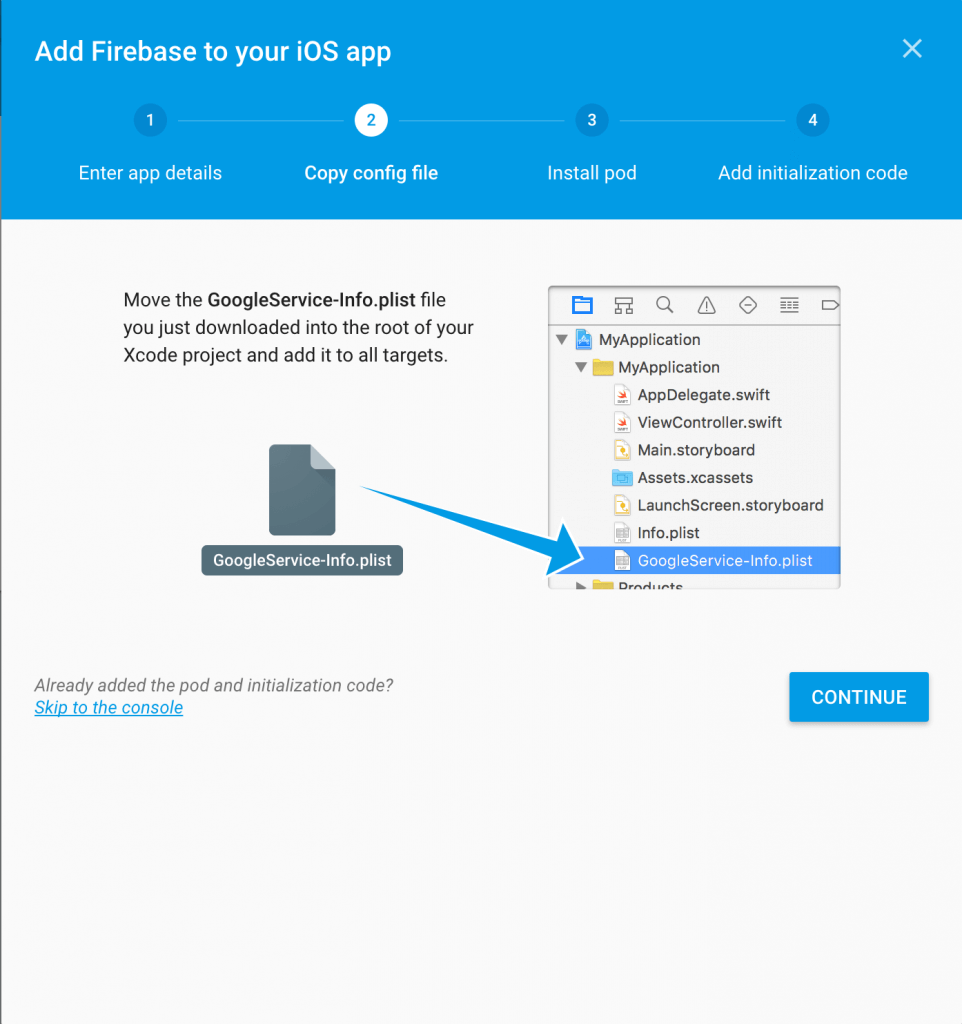
然後,點擊 continue 繼續。
如 Firebase 所提示的,Google 利用 CocoaPods 來按照和管理依賴。你需要用 CocoaPods 來安裝 Firebase 庫。如果你沒有 CocoaPods,請參考 this tutorial 以安裝它。
在安裝 podfile 之前,確認你已經關閉 Xcode 專案。打開終端,切換到 Xcode 專案目錄。輸入一下命令創建一個 podfile 檔案:
pod init
創建好 Podfile 之後,打開它並加入兩個依賴:
# Uncomment the next line to define a global platform for your project
# platform :ios, '9.0'

target 'FirebaseTutorial1' do
  # Comment the next line if you're not using Swift and don't want to use dynamic frameworks
  use_frameworks!

  # Pods for FirebaseTutorial1
  pod 'Firebase/Core'
  pod 'Firebase/Auth'
end
你在登入和註冊中需要用到這兩個。如果在寫一個類似 Instagram 的 app,則可能還會用到 Firebase Storage 和 Database 等其它庫。
保存 Podfile,在終端中輸入以下命令:
pod install
CocoaPods 會開始安裝這些依賴庫和 pods 到專案中。
當 pods 安裝結束,你會發現多了一個名為 FirebaseTutorial1.xcworkspace 的檔案。請用這個 workspace 檔案來打開 Xcode 而不是 FirebaseTutorial1.xcodeproj 檔案。
用 Firebase 實作登入和註冊
我們已經配置好專案的 Firebase,接下來要寫一些程式碼了。在 project navigator 中,打開 AppDelegate.swift。要使用 Firebase API,首先需要 import Firebase。在文件的開始部分,插入以下敘述:
import Firebase
接著,修改 application(_:didFinishLaunchingWithOptions:) 方法為:
func application(_ application: UIApplication, didFinishLaunchingWithOptions launchOptions: [UIApplicationLaunchOptionsKey: Any]?) -> Bool {
    // Override point for customization after application launch.
    FIRApp.configure()

    return true
}
這裡,我們呼叫了 FIRApp.configure() 函式,以宣告和配置 Firebase。這句程式碼會在 app 一啟動就連接 Firebase。
實作註冊
現在我們用 Firebase 實作註冊。在書寫程式碼之前,首先來到 Firebase console。在 Firebase console,選擇 Authentication 然後選擇 Sign-In Method。默認,Email/Password 選項是未啟用的。點擊這個選項,將它切換到 ON 以啟用它。這裡,你還可以啟用 Facebook、Twitter 和 Google 登入,但這超出了本文的範疇。
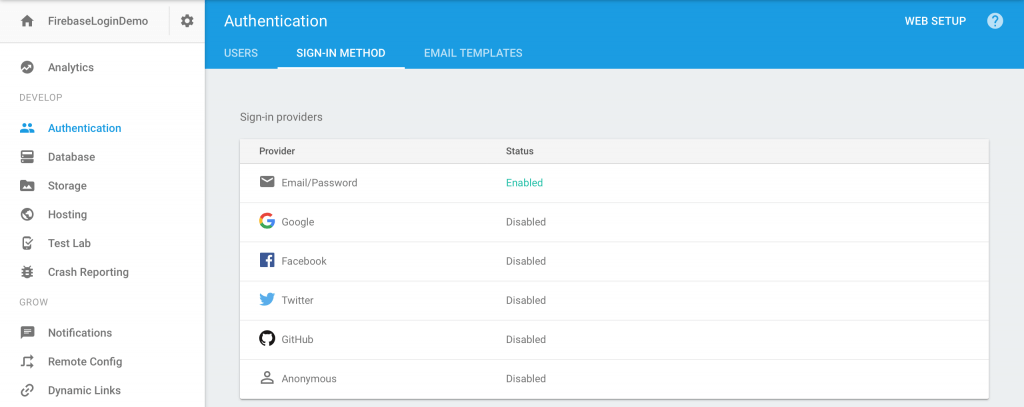
啟用這個選項之後,你就可以實現註冊和授權功能了。類似於 AppDelegate.swift,在 SignUpViewController.swift 檔案中加入:
import Firebase
import FirebaseAuth
如果你使用了我們的開始專案,它已經將郵箱和密碼 text fields 連接到這兩個 outlet 了:
@IBOutlet weak var emailTextField: UITextField!
@IBOutlet weak var passwordTextField: UITextField!
在註冊頁面,當用戶點擊 Sign Up,它會呼叫 action 方法 createAccountAction。我已經將 Sign Up 按鈕連接到這個 action 方法了。因此你只需要修改這個 action 方法就可以了:
@IBAction func createAccountAction(_ sender: AnyObject) {

    if emailTextField.text == "" {
        let alertController = UIAlertController(title: "Error", message: "Please enter your email and password", preferredStyle: .alert)

        let defaultAction = UIAlertAction(title: "OK", style: .cancel, handler: nil)
        alertController.addAction(defaultAction)

        present(alertController, animated: true, completion: nil)

    } else {
        FIRAuth.auth()?.createUser(withEmail: emailTextField.text!, password: passwordTextField.text!) { (user, error) in

            if error == nil {
                print("You have successfully signed up")
                //Goes to the Setup page which lets the user take a photo for their profile picture and also chose a username

                let vc = self.storyboard?.instantiateViewController(withIdentifier: "Home")
                self.present(vc!, animated: true, completion: nil)

            } else {
                let alertController = UIAlertController(title: "Error", message: error?.localizedDescription, preferredStyle: .alert)

                let defaultAction = UIAlertAction(title: "OK", style: .cancel, handler: nil)
                alertController.addAction(defaultAction)

                self.present(alertController, animated: true, completion: nil)
            }
        }
    }
}
讓我們逐行解釋上面的程式碼。首先,我們檢查用戶有沒有填寫郵箱 text field。如果沒有,我們顯示一個警告訊息。
如果用戶已經填寫了郵箱欄位,我們呼叫 FIRAuth.auth() 函式獲得默認的 auth 物件。然後呼叫 createUser 函式創建一個 Firebase 用戶賬號。當註冊完成,完成塊會被呼叫。在這個塊中,我們檢查註冊過程中是否出現錯誤。如果沒有,我們讓 app 跳回主頁面。否則,我們顯示錯誤訊息。
現在你可以快速試驗一下註冊功能。app 運行正常。當你用自己的郵箱和密碼註冊後,你會直接回到主頁面,同時你的賬號已經添加到 Firebase了。如果你試圖再次註冊同一個賬號,Firebase 會返回一個錯誤,因為郵箱地址重複了。
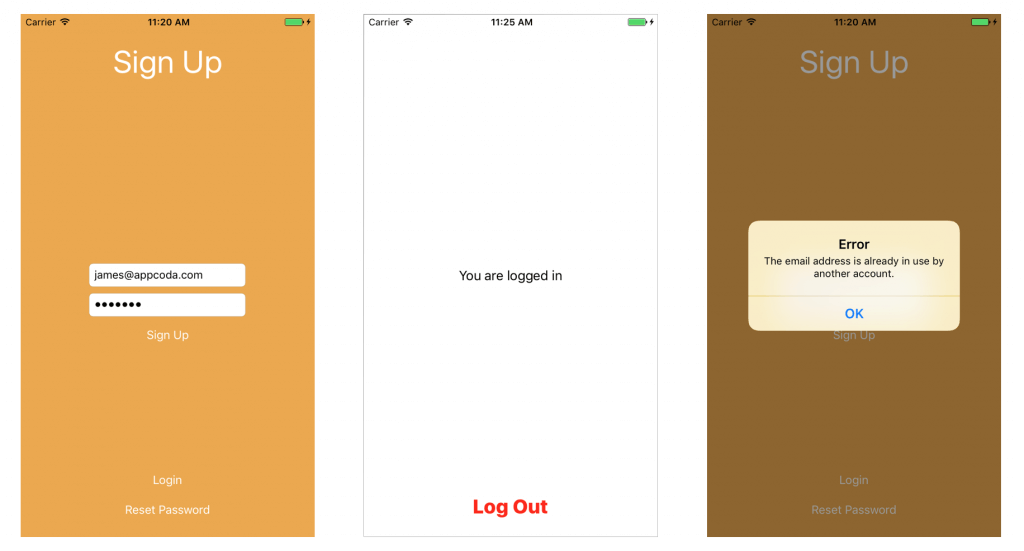
如果你回到 Firebase console,你會在 Authentication 節的 Users 欄下面看到已註冊的郵箱。

實作登入
註冊功能已經好了,但登入功能呢?本節就來將建立登入這個功能。首先,打開 LoginViewController.swift。在能夠使用 Firebase API 之前你仍然需要 import Firebase 和 FirebaseAuth。因此在這個檔案頭部加入:
import Firebase
import FirebaseAuth
我已經為登入按鈕連接了 loginAction 函式。當用戶點擊該按鈕,loginAction 函式會被呼叫。當前這個函式還是空的。為此,你需要在這個方法中加入程式碼:
@IBAction func loginAction(_ sender: AnyObject) {

    if self.emailTextField.text == "" || self.passwordTextField.text == "" {

        // 提示用戶是不是忘記輸入 textfield ?

        let alertController = UIAlertController(title: "Error", message: "Please enter an email and password.", preferredStyle: .alert)

        let defaultAction = UIAlertAction(title: "OK", style: .cancel, handler: nil)
        alertController.addAction(defaultAction)

        self.present(alertController, animated: true, completion: nil)

    } else {

        FIRAuth.auth()?.signIn(withEmail: self.emailTextField.text!, password: self.passwordTextField.text!) { (user, error) in

            if error == nil {

                // 登入成功,打印 ("You have successfully logged in")

                //Go to the HomeViewController if the login is sucessful
                let vc = self.storyboard?.instantiateViewController(withIdentifier: "Home")
                self.present(vc!, animated: true, completion: nil)

            } else {

                // 提示用戶從 firebase 返回了一個錯誤。
                let alertController = UIAlertController(title: "Error", message: error?.localizedDescription, preferredStyle: .alert)

                let defaultAction = UIAlertAction(title: "OK", style: .cancel, handler: nil)
                alertController.addAction(defaultAction)

                self.present(alertController, animated: true, completion: nil)
            }
        }
    }
}
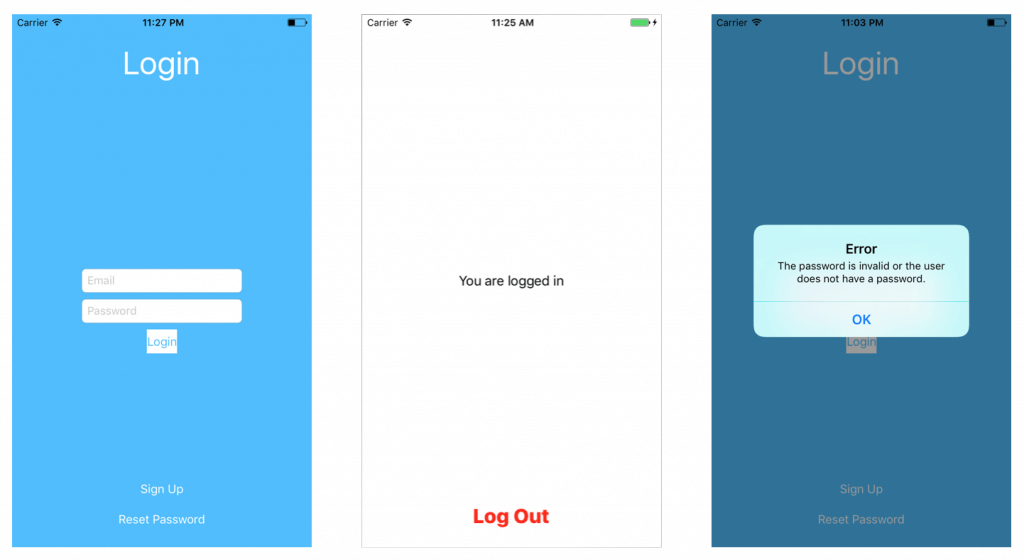
上述代碼非常簡單。和註冊用戶差不多,我們判斷用戶是否填寫了必要的 text field。如果密碼和郵箱有效,我們呼叫 Firebase API 的 signIn 方法並傳入郵箱號和密碼。Firebase 會對用戶信息進行驗證並通過 completion 塊返回結果。
現在來運行app,用你先前註冊的賬號進行登入。根據你輸入的賬號信息,app 要麼登入成功,要麼顯示一個錯誤。
實作登出
你已經能夠登入 app 了,但還不能登出。要實現這個,請打開 HomeViewController.swift 並 import 要用到的模塊:
import Firebase
import FirebaseAuth
如果你使用了開始專案,那麼登出按鈕已經連接了 logOutAction 方法。為了能夠登出,Firebase 提供了一個 signOut() 的 API。你需要做的僅僅是獲得當前的 auth 物件並呼叫這個方法。因此請修改 logOutAction 方法為:
@IBAction func logOutAction(sender: AnyObject) {
    if FIRAuth.auth()?.currentUser != nil {
        do {
            try FIRAuth.auth()?.signOut()
            let vc = UIStoryboard(name: "Main", bundle: nil).instantiateViewController(withIdentifier: "SignUp")
            present(vc, animated: true, completion: nil)

        } catch let error as NSError {
            print(error.localizedDescription)
        }
    }
}
在開始專案中,我将 Sign up view controller 的故事板 ID 設置為 SignUp。當用戶登出後,我们會通過這個 ID 讓用戶返回註冊頁面。
如果你運行 app 並進行登入,當你點擊 Log out 按鈕,它又會讓你回到註冊頁面。
實作密碼重設
最後,讓我們實現密碼重設功能並完成這個 app。打開 ResetPasswordViewController.swift 檔案,添加下列 import 敘述:
import Firebase
import FirebaseAuth
用 Firebase 實現重設密碼功能是在是太簡單了。你需要做的僅僅是呼叫 sendPasswordReset 函式,並傳入指定的郵箱號作為參數。將 submitAction 方法修改為:
@IBAction func submitAction(_ sender: AnyObject) {

    if self.emailTextField.text == "" {
        let alertController = UIAlertController(title: "Oops!", message: "Please enter an email.", preferredStyle: .alert)

        let defaultAction = UIAlertAction(title: "OK", style: .cancel, handler: nil)
        alertController.addAction(defaultAction)

        present(alertController, animated: true, completion: nil)

    } else {
        FIRAuth.auth()?.sendPasswordReset(withEmail: self.emailTextField.text!, completion: { (error) in

            var title = ""
            var message = ""

            if error != nil {
                title = "Error!"
                message = (error?.localizedDescription)!
            } else {
                title = "Success!"
                message = "Password reset email sent."
                self.emailTextField.text = ""
            }

            let alertController = UIAlertController(title: title, message: message, preferredStyle: .alert)

            let defaultAction = UIAlertAction(title: "OK", style: .cancel, handler: nil)
            alertController.addAction(defaultAction)

            self.present(alertController, animated: true, completion: nil)
        })
    }
}
如果函式執行正確,Firebase 會發送一封密碼重設郵件到指定的郵箱號。用戶可以點擊上面的連結來重設密碼。
總結
在本教學中,我帶你大致了解了 Firebase。現在你已經知道怎樣用 Firebase 去建立註冊、登入、密碼重設和登出等功能。感謝你閱讀本文,如果有任何疑問或建議,請在下面留言。
作為參考,你可以從 GitHub 上下載這個 Xcode 專案。

