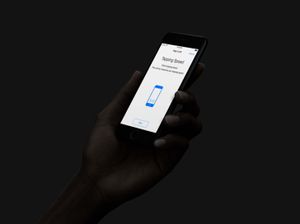
某些醫學相關研究通常會需要受測者填寫問卷回答相關問題,目前也會應用一些電子化的感測方式更容易了解受測者的生活習慣,但這些受測試驗每天都得進行的話,會一件枯燥乏味的事情。那麼,現在有沒有更好更簡易的方式來執行某些醫學研究呢?
現在,讓我們歡迎ResearchKit。
ResearchKit功能就像是它的名字一樣,是做為研究(Research)應用的。Apple將ResearchKit設定為開放原始碼,其目的就是給予相關開發者能建立醫學研究應用程式開發,並設計可讓患者參與,在患者們參與開發者所設計的醫學研究中,ResearchKit的框架(Framework)元素可協助開發者來開發臨床研究用的程式開發。
若設計的程式加入ResearchKit,不論參與者是從世界哪個角落,皆可對研究提供一定的幫助,所以現在市面上已有一些APP可以協助研究人員了解對如哮喘、帕金斯症、乳癌和糖尿病等醫學病症研究。ResearchKit提供了應對的框架,將收集相關的數據資料傳至你的伺服器上,你需自行管理它,不僅如此,ResearchKit和Apple的另一套HealthKit框架可共同協作(work seamlessly),所以可以輕鬆的從HealthKit得到如步數和心率等資訊。
ResearchKit主要提供三個模組:
- 同意(Consent) – 提供一簡易機制詢問參與者的意願。
- 調查(Survey) – 提供受測者回答所設定之問題
- 活動任務(Active Task) – 為了研究需求,建置一個讓受測者執行的特定活動(如手指觸碰螢幕)
在本篇教學中,我們將進一步討論每個模組功能,也為此,我們將建立一個Demo APP來教你如何學會使用同意、調查與活動任務等功能模組。
建立一個Demo App
為了教學需求,我們將建立一個簡單的App,請開啟Xcode和建立一個新的專案,使用Single View Application的範例檔,請幫你的專案命名為SampleResearchKit,接著設定你的組織辨識名稱(Organization Identifier),和設定Device為iPhone,再自行選擇你要存檔的位置。

要將ResearchKit加入在iOS專案內最簡單的方式就是使用CocoaPods,假設你已經裝好了CocoaPods了,請依照下列步驟將ResearchKit安裝至你的Xcode專案中:
- 打開Terminal並執行以下的指令來建立一個Pod file在你的專案檔案夾位置內
   cd~ [你的檔案位置]
   pod init
- 一旦建立了Podfile後,打開並編輯Pod檔案內的資料,加入一行命令
'ResearchKit', '~> 1.0',如下列所示,加入完後,存檔關閉Pod檔案
   # Uncomment the next line to define a global platform for your project
   # platform :ios, '9.0'

   target 'SampleResearchKit' do
     # Comment the next line if you're not using Swift and don't want to use dynamic frameworks
     use_frameworks!

     # Pods for SampleResearchKit
     pod 'ResearchKit', '~> 1.0'
   end
- 最後,回到Terminal內輸入
Pod install,此時就應該會開始下載並安裝ResearchKit資料庫,並會自動產生一個SampleResearchKit.xcworkspace 檔,請到專案資料夾打開它。
在App內加入UI
再來,嘗試在App內加入UI(User Interface),請在Xcode內左方的導覽欄中找到Main.storyboard,並點選它。然後加入三個按鈕至它的ViewController上。
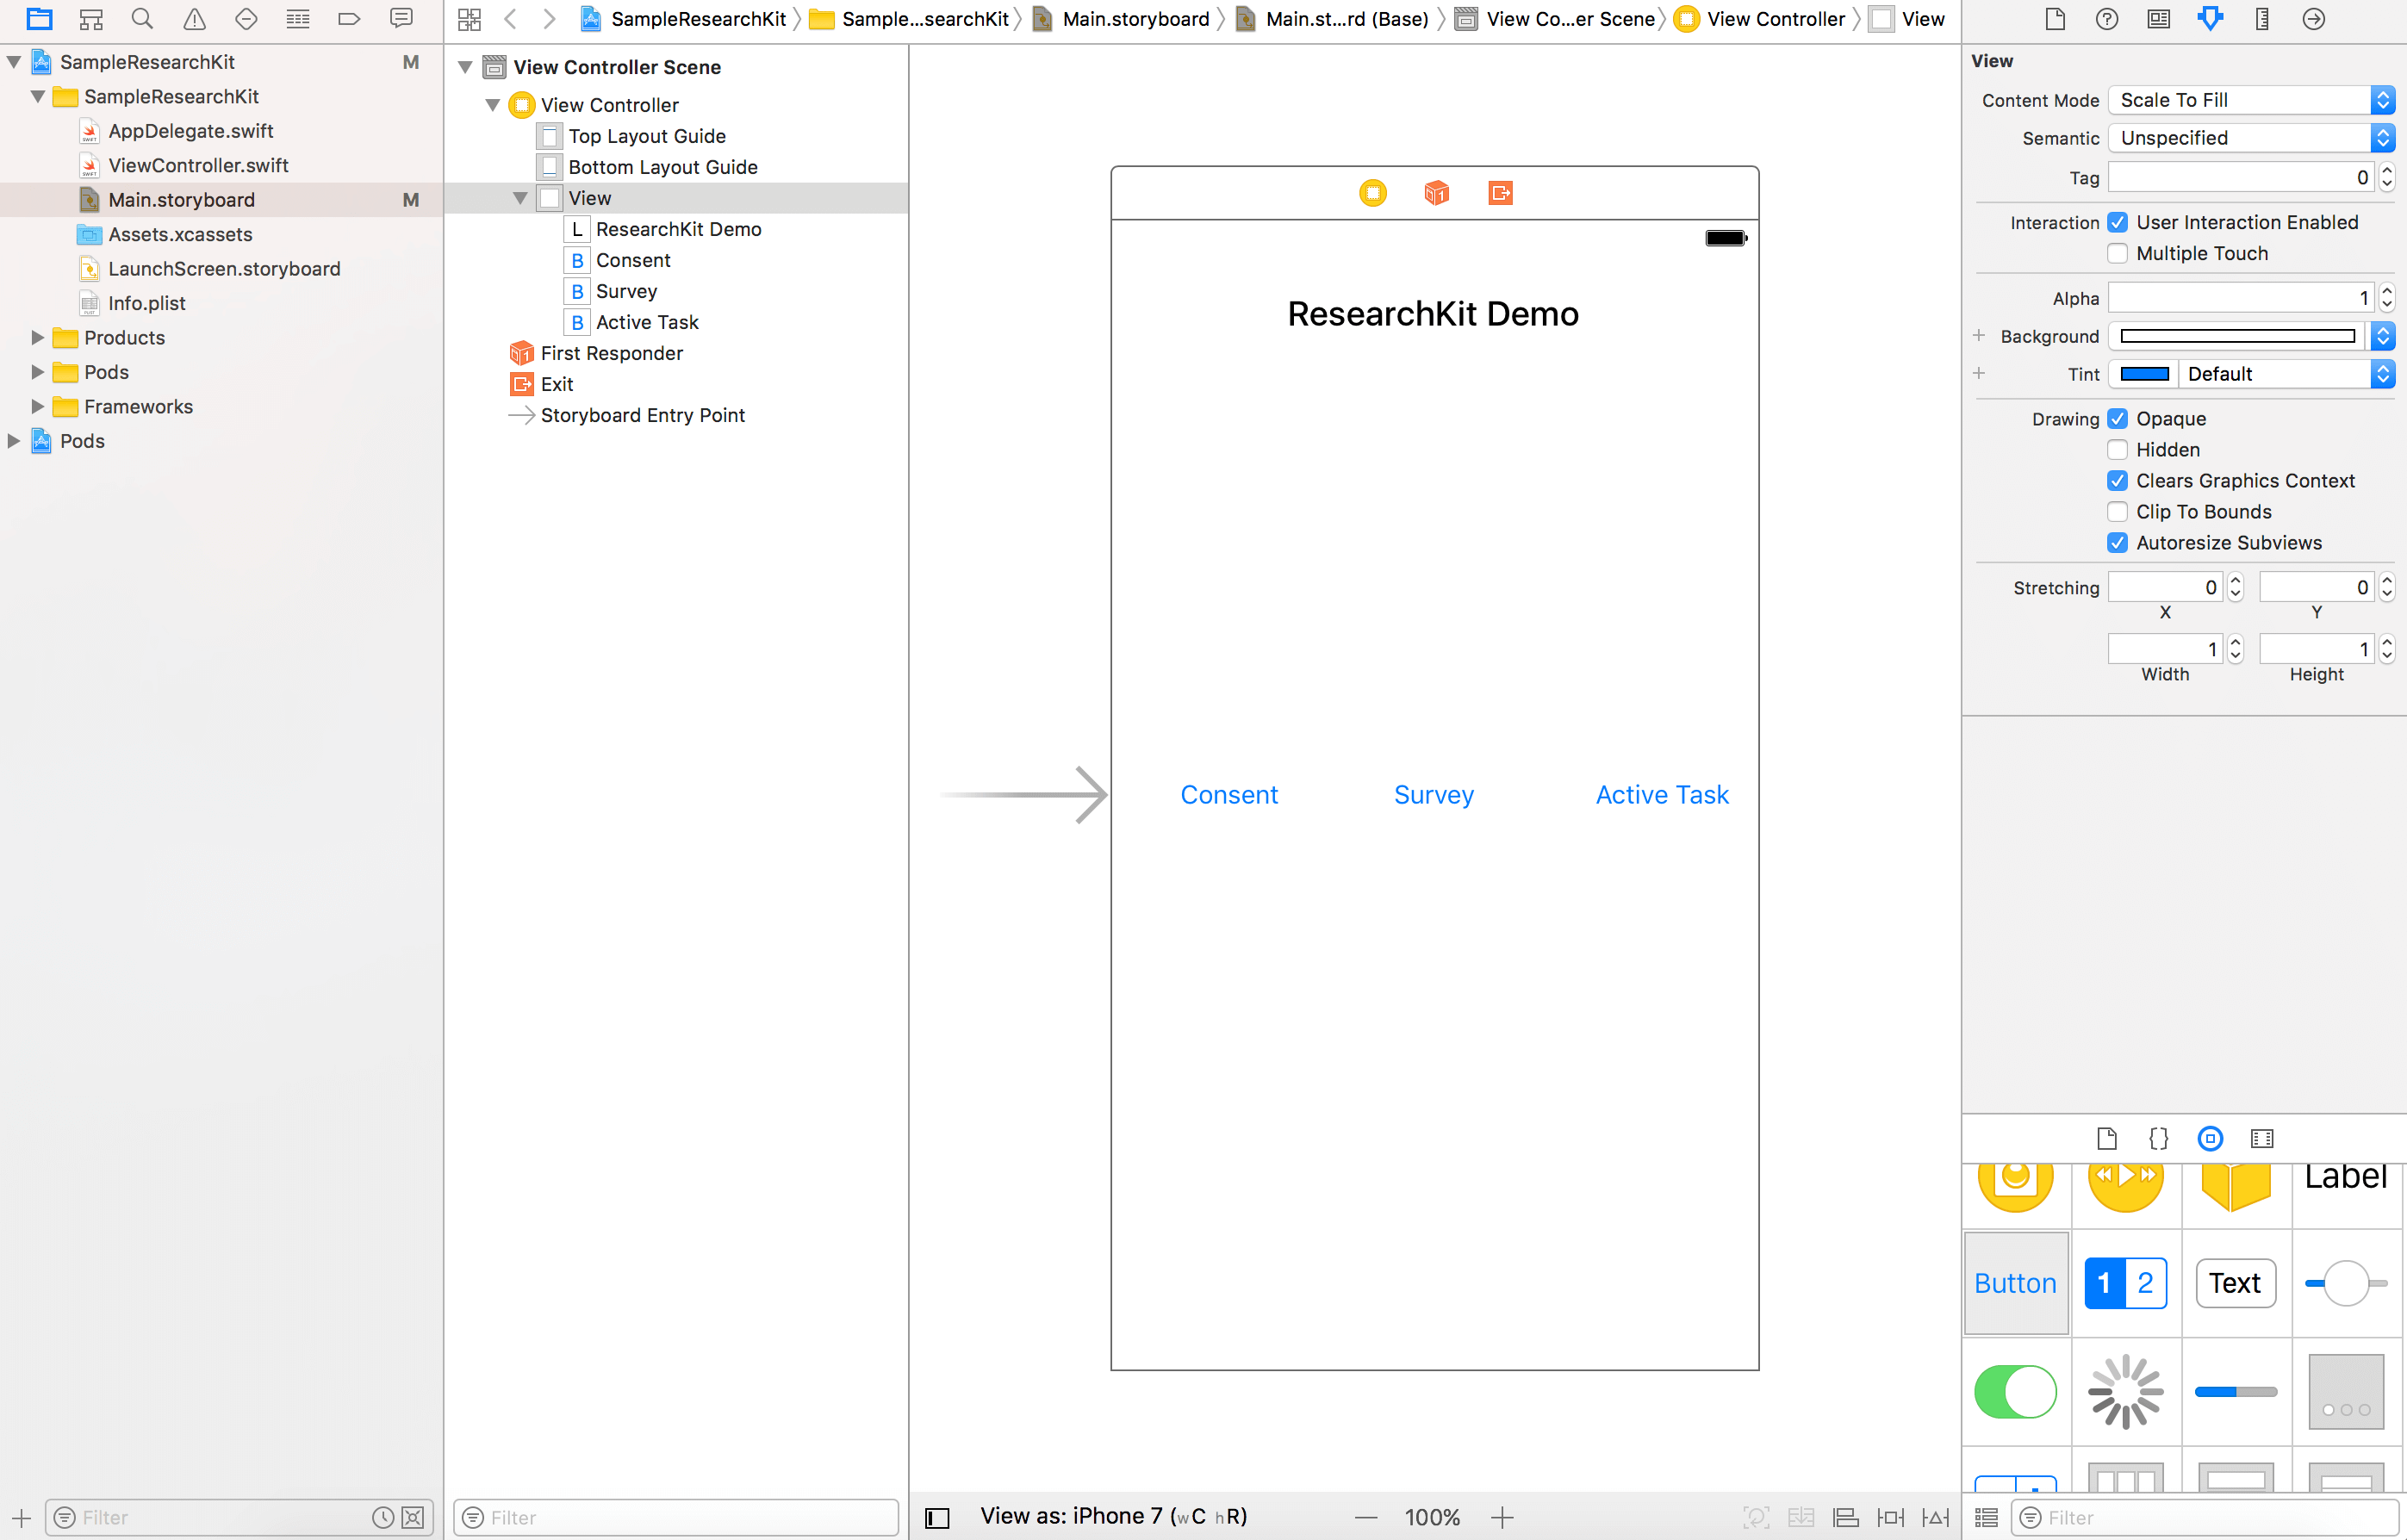
建立相對動作給予Consent(consentClicked),survey(surveyClicked)和Active task(activeTaskClicked)三組按鈕,請確認你有建立按鈕和動作方法(Action Method)相對應的連結,所謂動作方法的名稱可像是下列所示:
- Consent button –
consentClicked - Survey button –
surveyClicked - Active Task button –
activeTaskClicked
當你建立按鈕與動作方法的連結後,你的ViewController.swift的程式碼內容應會像是下列:
import UIKit

class ViewController: UIViewController {

    override func viewDidLoad() {
        super.viewDidLoad()
        // Do any additional setup after loading the view, typically from a nib.
    }

    override func didReceiveMemoryWarning() {
        super.didReceiveMemoryWarning()
        // Dispose of any resources that can be recreated.
    }

    @IBAction func consentClicked(sender : AnyObject) {
    }

    @IBAction func surveyClicked(sender : AnyObject) {
    }

    @IBAction func activeTaskClicked(sender : AnyObject) {
    }

}
獲得同意(Consent)
在進行研究時,研究人員通常需要為了某種研究需求來申請相關許可,假如目前進行的醫學研究有涉及人身穩私資訊,也可說是個資問題時,為了取得某種程度的資訊之前,你得以合法的方式得到受測者的同意。所以ResearchKit提供了一個簡易資訊擷取的同意方式,並可讓你取得受測者的同意簽名。
我們將在示範專案中,首先說明如何實現consent按鈕。現在請先建立一個全新的swift檔,並命名它一個專案名字,我將它命名為ConsentTask.swift,打開檔案並匯入ResearchKit的框架:
import ResearchKit
接著再加入以下的程式碼在ConsentTask.swift內
public var ConsentTask: ORKOrderedTask {

    let Document = ORKConsentDocument()
    Document.title = "Test Consent"
}
這裡我們來建立一個ORKConsentDocument的物件來讓受測者了解為了要取得受測資訊,必須先獲得他們的允許同意。
ORKConsentDocument包含了名為ORKConsentSectionType的單元,ORKConsentSectionType已預設的允許資訊項目,你可以以你的研究來選擇所要允許資訊項目,倘若你的研究並不需相關允許資訊項目,你也可以選擇移除它們,現在回到Demo App完成所加入的選擇項目。
public var ConsentTask: ORKOrderedTask {

    let Document = ORKConsentDocument()
    Document.title = "Test Consent"

    let sectionTypes: [ORKConsentSectionType] = [
        .overview,
        .dataGathering,
        .privacy,
        .dataUse,
        .timeCommitment,
        .studySurvey,
        .studyTasks,
        .withdrawing
    ]

    let consentSections: [ORKConsentSection] = sectionTypes.map { contentSectionType in
        let consentSection = ORKConsentSection(type: contentSectionType)
        consentSection.summary = "Complete the study"
        consentSection.content = "This survey will ask you three questions and you will also measure your tapping speed by performing a small activity."
        return consentSection
    }
}
ORKConsentSection類別代表著一個應用在允許文件中的單元,在這裡我們把所有的包含總結與相關內容的序列都加入到允許需求項目中,我們將使相同的總結與內容放在每一個單元內,但你也可以依照單元類型來自行設計。
現在我們將加入簽名功能到我們的允許文件中,ResearchKit將這個功能變得相當的簡單,請繼續增加下列的程式碼:
Document.sections = consentSections
Document.addSignature(ORKConsentSignature(forPersonWithTitle: nil, dateFormatString: nil, identifier: "UserSignature"))
上面表示ORKConsentSignature類別代表一個在ORKConsentDocument的物件,你也可以預設定名字日期等,也可以辨別文件上不同的簽名。
現在我們已經建立一個文件了,再來就是準備好現在所要執行任務的步驟,然後我們可以呈現給受測者知道,那我們將繼續加入下列的程式碼:
var steps = [ORKStep]()

//Visual Consent
let visualConsentStep = ORKVisualConsentStep(identifier: "VisualConsent", document: Document)
steps += [visualConsentStep]

//Signature
let signature = Document.signatures!.first! as ORKConsentSignature
let reviewConsentStep = ORKConsentReviewStep(identifier: "Review", signature: signature, in: Document)
reviewConsentStep.text = "Review the consent"
reviewConsentStep.reasonForConsent = "Consent to join the Research Study."

steps += [reviewConsentStep]

//Completion
let completionStep = ORKCompletionStep(identifier: "CompletionStep")
completionStep.title = "Welcome"
completionStep.text = "Thank you for joining this study."
steps += [completionStep]
所謂的步驟就是代表著ORKStep,它可以代表為提問問題、動作任務或是簡單的指示行為,因為我們要進行多個步驟,所以要創建一個空的ORKStep序列。,在此我們將加入三個任務。
- 一個可視化的同意步驟(
ORKVisualConsentStep) –ORKVisualConsentStep是用來表示一系列的簡單圖形來協助受測者了解同意文件的內容。 - 一個同意的確認步驟(
ORKConsentReviewStep) –ORKConsentReviewStep是用來讓受測者確認同意的文件,受測者會被要求輸入名字與親簽,當然可設定是否需要名字和簽名的要求。 - 完成步驟(
ORKCompletionStep) – 這個步驟是代表受測者已完成任務。
最後,我們必須回到ORKOrderedTask物件,加入一些Return所需的敘述程式碼如下:
return ORKOrderedTask(identifier: "ConsentTask", steps: steps)
如果你皆有依照上述教學所說,你的ConsentTask程式碼目前應該是:
public var ConsentTask: ORKOrderedTask {

    let Document = ORKConsentDocument()
    Document.title = "Test Consent"

    let sectionTypes: [ORKConsentSectionType] = [
        .overview,
        .dataGathering,
        .privacy,
        .dataUse,
        .timeCommitment,
        .studySurvey,
        .studyTasks,
        .withdrawing
    ]

    let consentSections: [ORKConsentSection] = sectionTypes.map { contentSectionType in
        let consentSection = ORKConsentSection(type: contentSectionType)
        consentSection.summary = "Complete the study"
        consentSection.content = "This survey will ask you three questions and you will also measure your tapping speed by performing a small activity."
        return consentSection
    }

    Document.sections = consentSections
    Document.addSignature(ORKConsentSignature(forPersonWithTitle: nil, dateFormatString: nil, identifier: "UserSignature"))

    var steps = [ORKStep]()

    //Visual Consent
    let visualConsentStep = ORKVisualConsentStep(identifier: "VisualConsent", document: Document)
    steps += [visualConsentStep]

    //Signature
    let signature = Document.signatures!.first! as ORKConsentSignature
    let reviewConsentStep = ORKConsentReviewStep(identifier: "Review", signature: signature, in: Document)
    reviewConsentStep.text = "Review the consent"
    reviewConsentStep.reasonForConsent = "Consent to join the Research Study."

    steps += [reviewConsentStep]

    //Completion
    let completionStep = ORKCompletionStep(identifier: "CompletionStep")
    completionStep.title = "Welcome"
    completionStep.text = "Thank you for joining this study."
    steps += [completionStep]

    return ORKOrderedTask(identifier: "ConsentTask", steps: steps)
}
當完成同意的任務,是時候要將它呈現給使用者,現在回到ViewController.Swift,接著第一步是匯入下列敘述在程式碼的開頭。
import ResearchKit
The View Controller 必須處理同意動作結果,所以採用了ORKTaskViewControllerDelegate的協定。
class ViewController: UIViewController, ORKTaskViewControllerDelegate {
當Consent同意按鈕被按後,我們將呈現同意任務作業,因此,我們也要實作consentClicked的方法如下:
@IBAction func consentClicked(sender : AnyObject) {

    let taskViewController = ORKTaskViewController(task: ConsentTask, taskRun: nil)
    taskViewController.delegate = self
    present(taskViewController, animated: true, completion: nil)

}
為了能確認允許作業後的結果,我們將實作在ORKTaskViewControllerDelegate下的一個方法:
func taskViewController(_ taskViewController: ORKTaskViewController, didFinishWith reason: ORKTaskViewControllerFinishReason, error: Error?) {
        taskViewController.dismiss(animated: true, completion: nil)
}
你也可以利用取得任務結果來提供一個特定的Handling(taskViewController.result)。在這個示範案例,我們將略過這個任務視圖控制器。
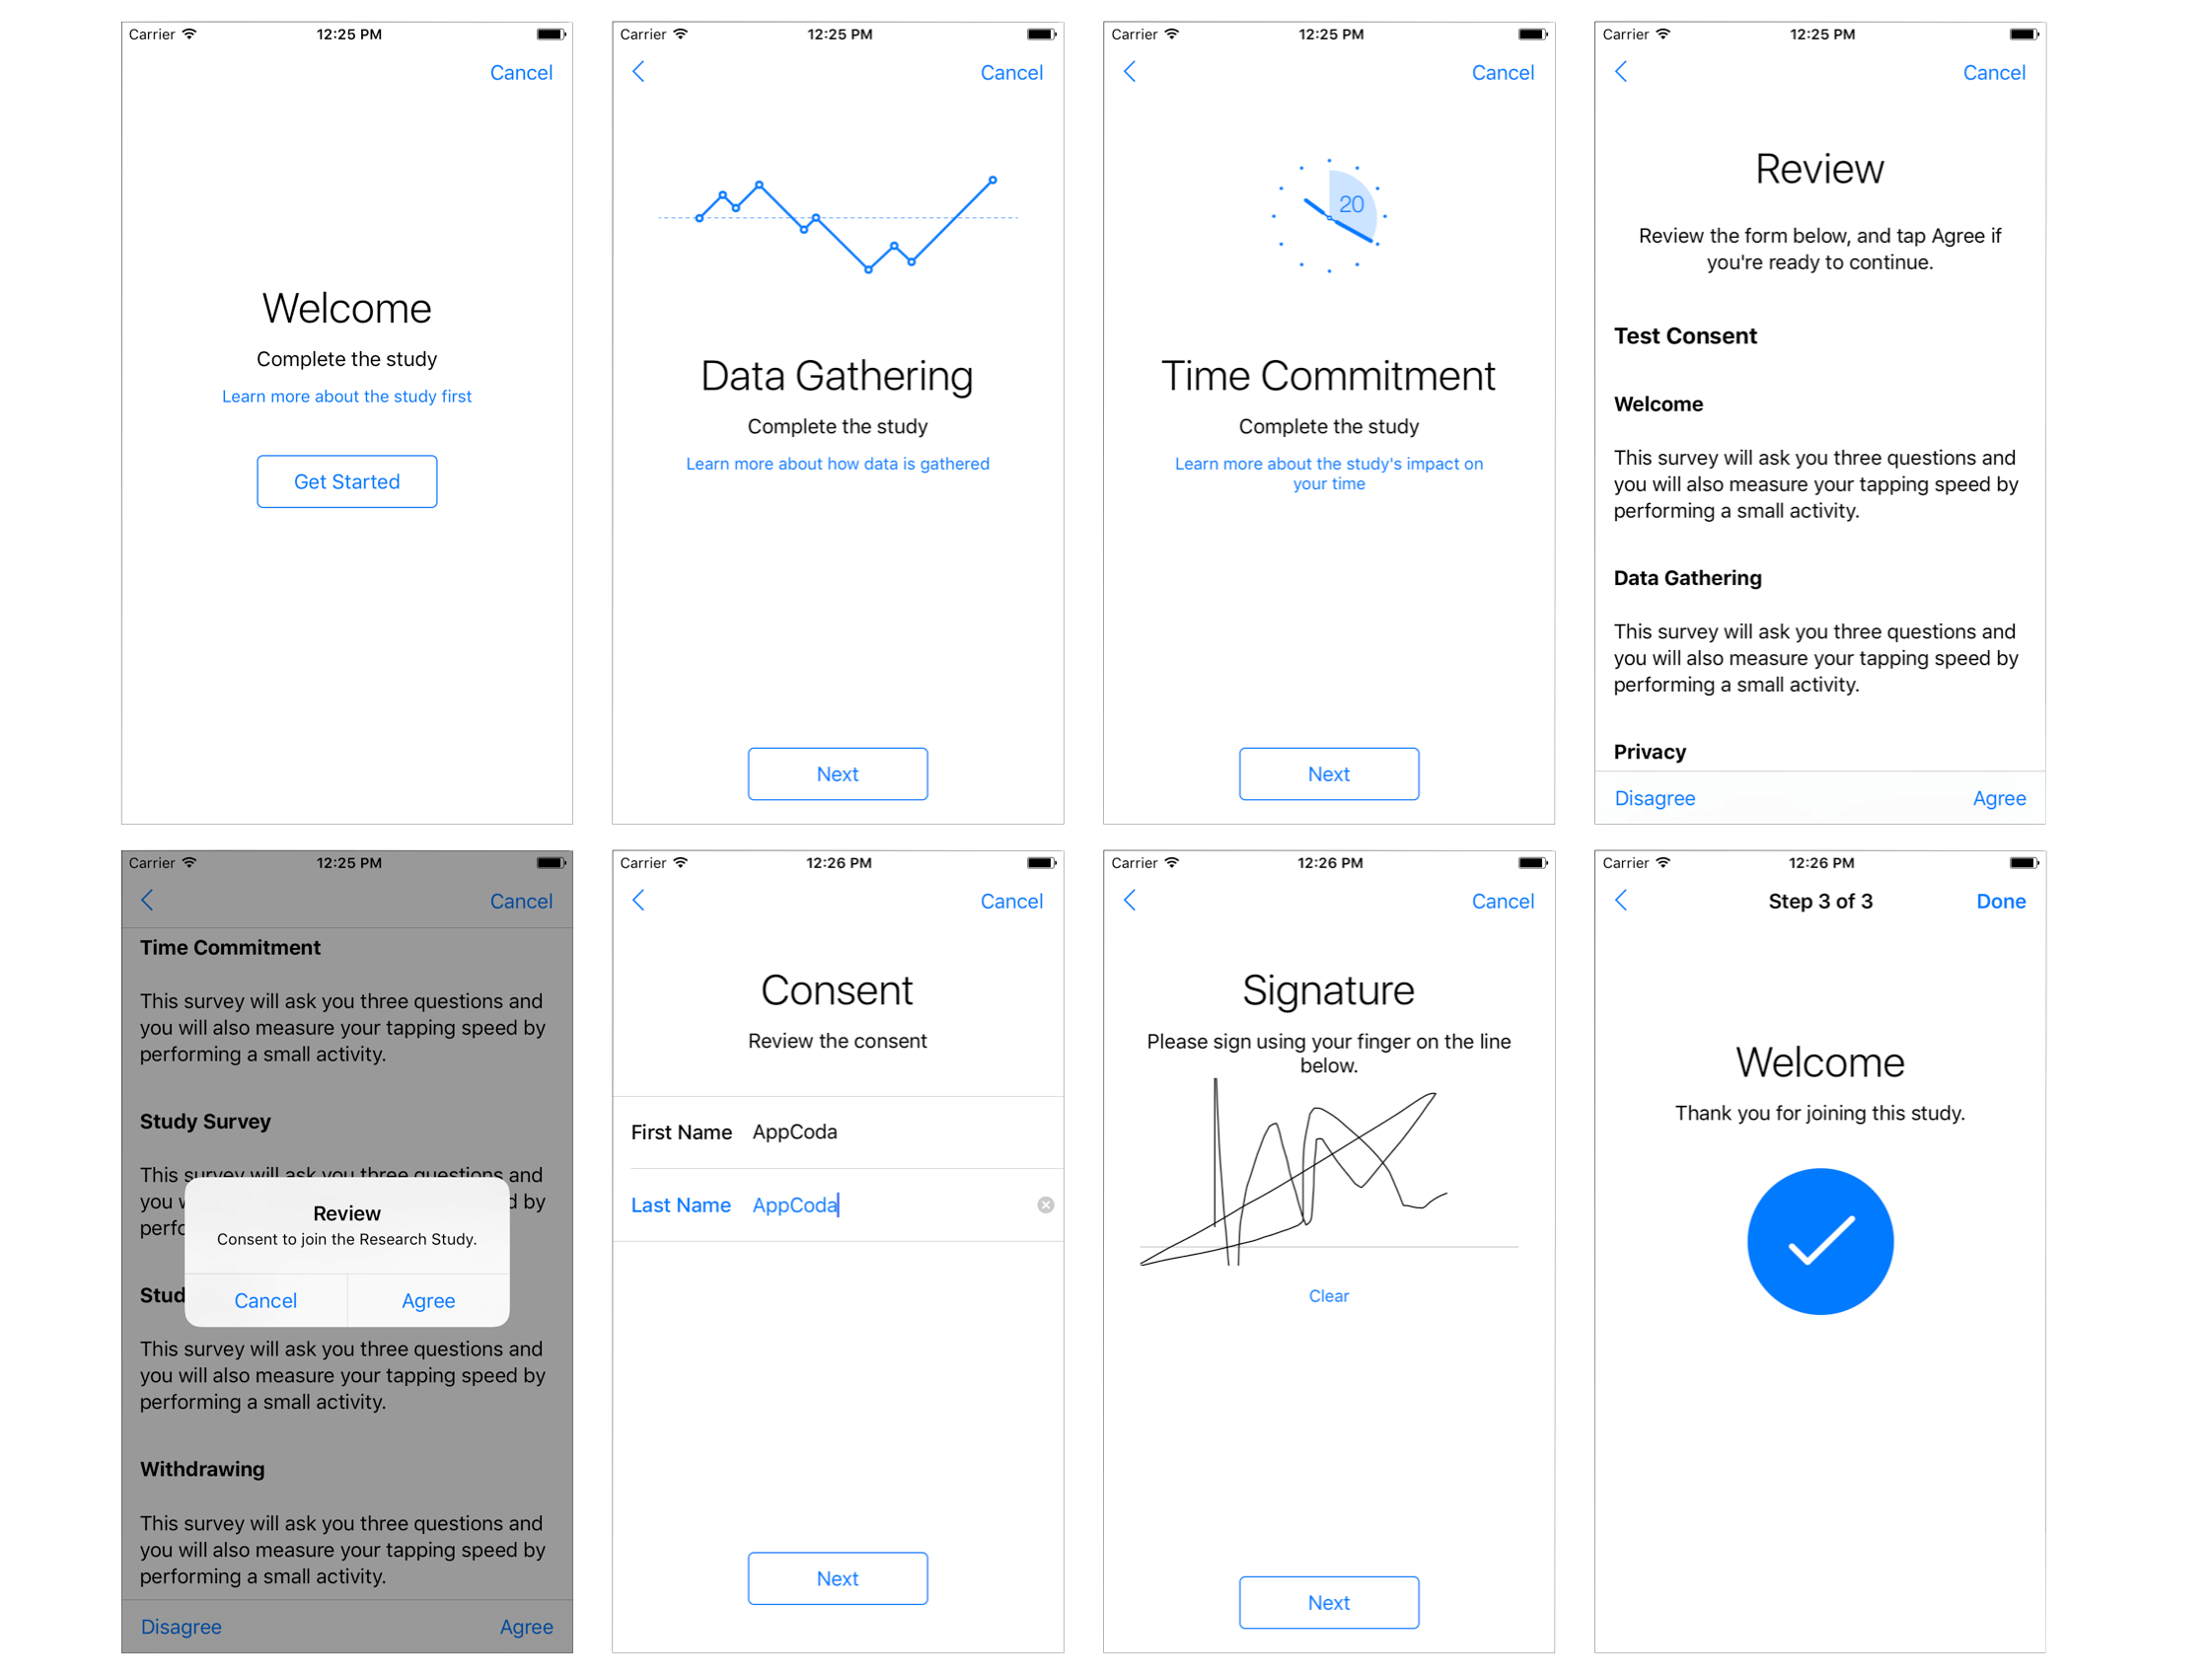
現在是時候來啟動這個APP與了解它的一些特色,你將會看到你所增加文件內容配合絕妙的動畫在所有的單元內,當完成這個單元,你將會看到確認(Review)頁面和一個同意(Consent)畫面。你將會被要求輸入姓名與登入來參與此研究。
建立調查(Surveys)
調查(Surveys)是你從使用者回答相關系列的問題後所得到的資料,這兒有由ResearchKit框架所提供的兩種類型調查任務:
ORKOrderedTask– 代表步驟順序保持不變。-
ORKNavigableOrderedTask– 表示步驟的順序會依照使用者在前一步驟中回答問題的狀況而變動。現在我們將建立一個調查在我們的教學APP,為了要做到此步,我們需要建立一個全新的swift檔,並命合它為
SurveyTask.swift,並加入下列程式碼於SurveyTask.swift內。
import ResearchKit

public var SurveyTask: ORKOrderedTask {

    var steps = [ORKStep]()
    return ORKOrderedTask(identifier: "SurveyTask", steps: steps)
}
這裡我們再建立一個任務,但我們需要增加一些問題在這個任務中,ResearchKit的框架提供一個類別名為ORKInstructionStep,它可以為了這個任務給一個參與指示,你可以在這任務中使用這些指示步驟來呈現不同型態的內容。再來,我們建立一個ORKInstructionStep 的物件可讓參與者了解這研究的目的。插入下列程式碼於var steps = [ORKStep]()的下方。
//Introduction
let instructionStep = ORKInstructionStep(identifier: "IntroStep")
instructionStep.title = "Test Survey"
instructionStep.text = "Answer three questions to complete the survey."
steps += [instructionStep]
接著,我們將加入一個需要文字輸入來回答的問題型態:
//Text Input Question
let nameAnswerFormat = ORKTextAnswerFormat(maximumLength: 20)
nameAnswerFormat.multipleLines = false
let nameQuestionStepTitle = "What is your name?"
let nameQuestionStep = ORKQuestionStep(identifier: "NameStep", title: nameQuestionStepTitle, answer: nameAnswerFormat)
steps += [nameQuestionStep]
ORKQuestionStep物件是用來呈現一個問題給使用者,這裡我們詢問使用者的名字,且我們希望能得到從使用者的文字輸入回饋,所以我們建立了ORKTextAnswerFormat的物件來鏈結完成這個問題需求。這也就是你如何為調查來建立問題的方式了。
現在我們將為我們的調查來增加更多的問題,請繼續增加下列的程式碼:
//Image Input Question
let moodQuestion = "How do you feel today?"
let moodImages = [
    (UIImage(named: "Happy")!, "Happy"),
    (UIImage(named: "Angry")!, "Angry"),
    (UIImage(named: "Sad")!, "Sad"),
    ]
let moodChoice : [ORKImageChoice] = moodImages.map {
    return ORKImageChoice(normalImage: $0.0, selectedImage: nil, text: $0.1, value: $0.1 as NSCoding & NSCopying & NSObjectProtocol)
}
let answerFormat: ORKImageChoiceAnswerFormat = ORKAnswerFormat.choiceAnswerFormat(with: moodChoice)
let moodQuestionStep = ORKQuestionStep(identifier: "MoodStep", title: moodQuestion, answer: answerFormat)
steps += [moodQuestionStep]
這裡我們增加了另一個問題,唯一不同的地方是我們選擇利用圖片來做為答案的回應方式,我們會問使用者”How do yo feel today?”(你今天感覺如何)來做為問題,接著利用一序列的圖片來做為回答方式。ORKImageChoice是用來將圖片呈現給予使用者,基本上,圖片的選擇模式會以橫向方式顯示。
接續,我們來建立一個需要以數字來回答的問題。
//Numeric Input Question
let ageQuestion = "How old are you?"
let ageAnswer = ORKNumericAnswerFormat.integerAnswerFormat(withUnit: "years")
ageAnswer.minimum = 18
ageAnswer.maximum = 85
let ageQuestionStep = ORKQuestionStep(identifier: "AgeStep", title: ageQuestion, answer: ageAnswer)
steps += [ageQuestionStep]
這個問題類型是我們要來問使用者他/她的年齡,我們將用ORKNumberAnswerFormat定義以一個數字格式的答案做為輸入,同時,我們也會設定年齡數值的上下限制。
現在我們已經定義完成所有的答案,最後一步就是要加入結論與說聲”Thank you”:
//Summary
let completionStep = ORKCompletionStep(identifier: "SummaryStep")
completionStep.title = "Thank You!!"
completionStep.text = "You have completed the survey"
steps += [completionStep]
以上就是有關調查任務的設定方式,是時候來呈現如何給予使用者一個調查系統問題,請先回到ViewController.swift,並新增一個surveryClicked的方法如下:
@IBAction func surveyClicked(sender : AnyObject) {
    let taskViewController = ORKTaskViewController(task: SurveyTask, taskRun: nil)
    taskViewController.delegate = self
    present(taskViewController, animated: true, completion: nil)
}
再說明一次,你可以掌握委託(Delegate)方法的結果,但在這個教學中,我們並不改變委託方法與略過任務控制器,在你啟動run button來測試APP時,在此,請確認你已將圖片檔案下載並放至Asset.xcassets中。
![]()
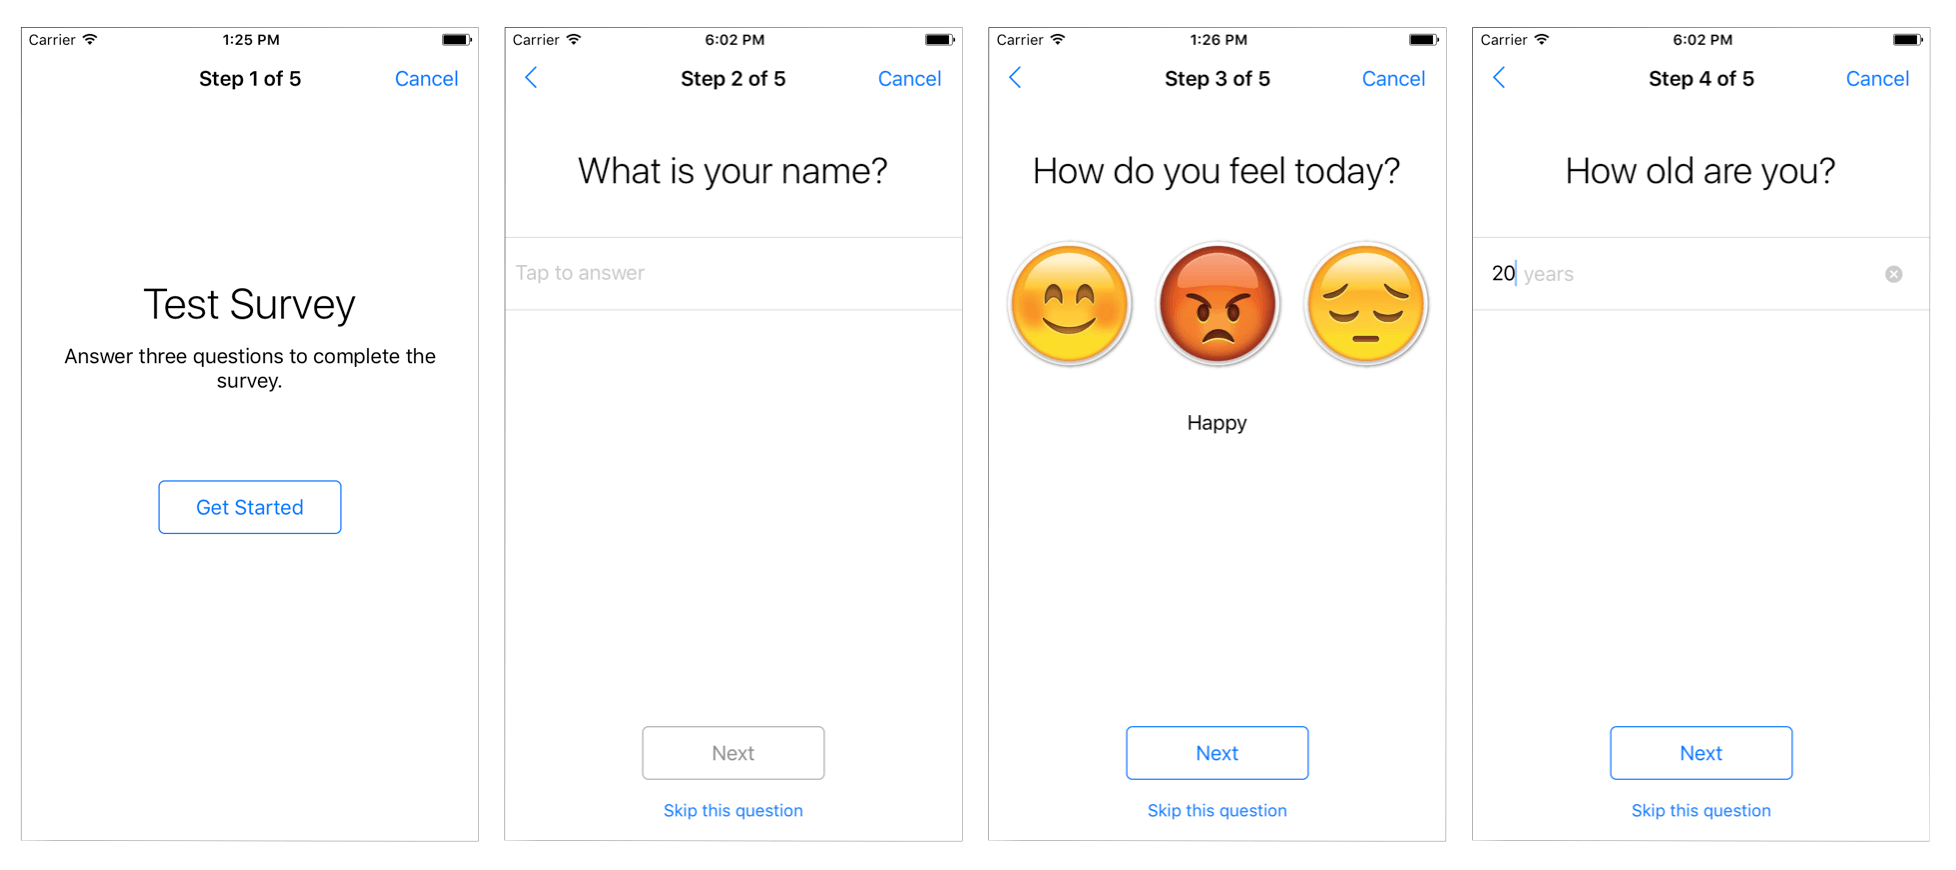
現在,可以執行APP,並可以看一下調查功能頁面顯示。
活動任務(Active Tasks)
ResearchKit框架最主要的目的就是為了能協助研究人員,當使用者被邀請來執行特定的活動時,可從中收集裝置相對應的感測訊號,活動任務(Active Tasks)就是應用iPhone內的感測器,如:加速度計、陀螺儀、GPS、麥克風與觸碰動作等來取得所需的訊號,像是你可以要求使用者走一段固定的距離,此時你的APP會同步擷取加速度計的數據。
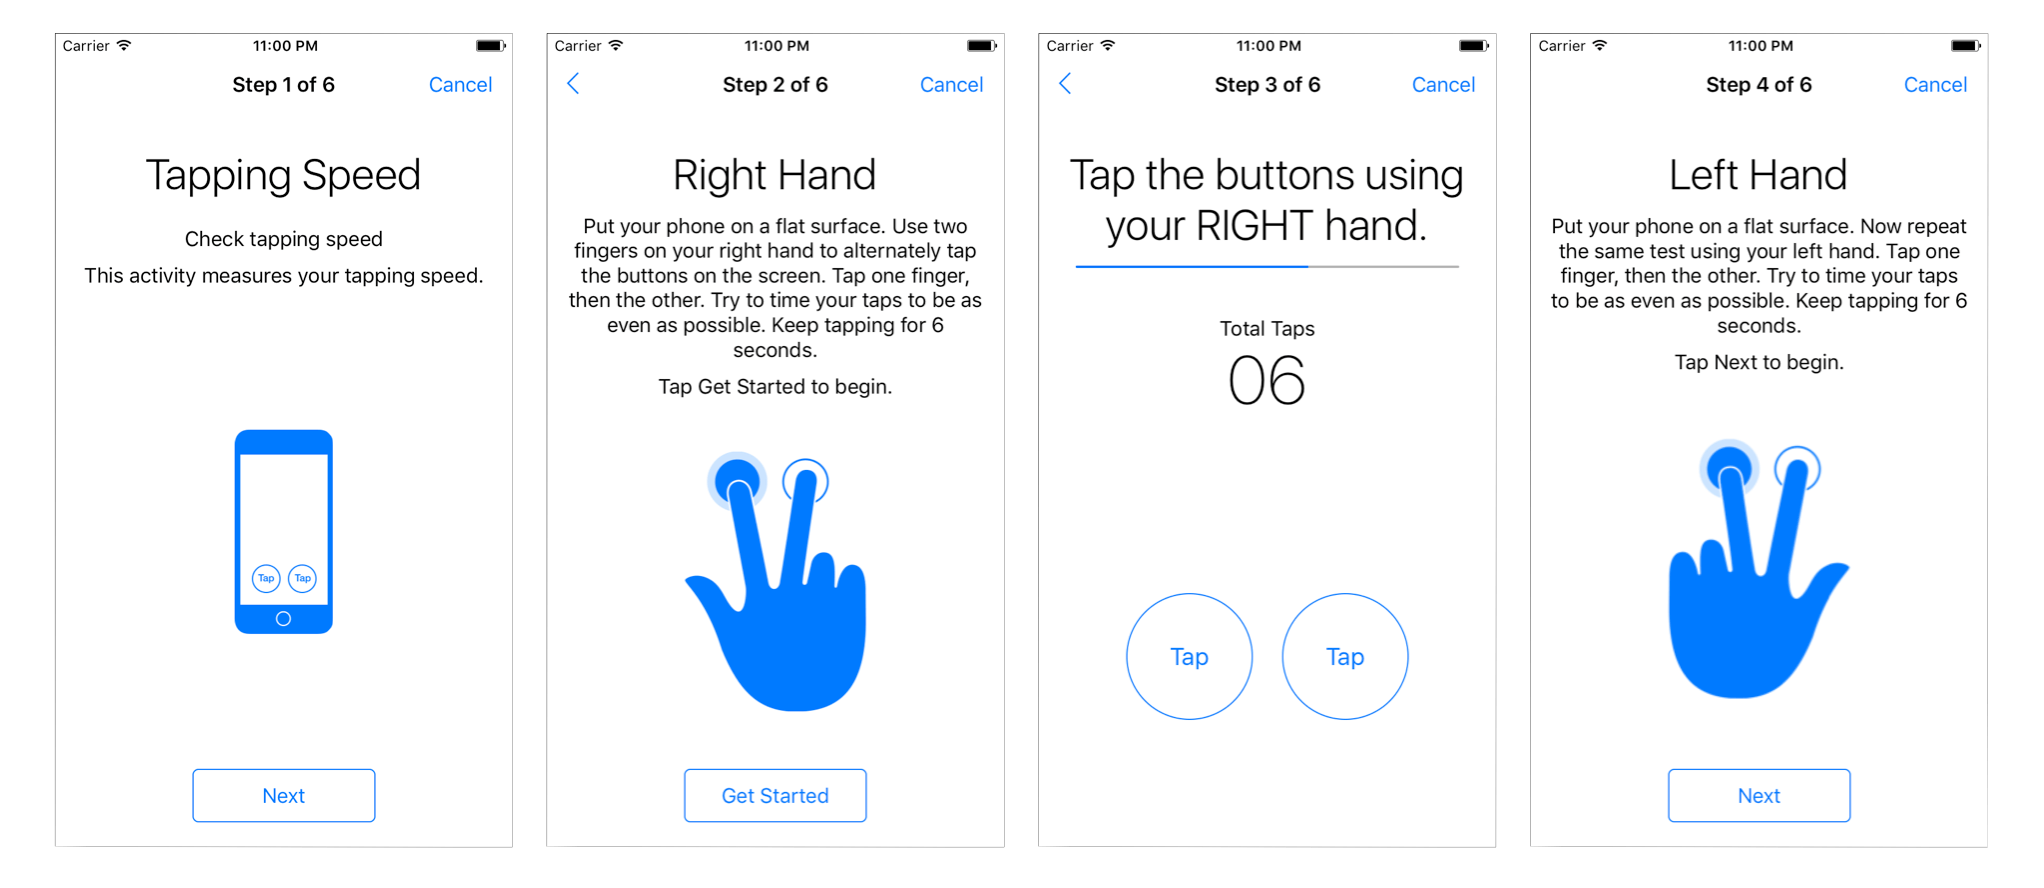
ResearchKit框架也包含了一系列的預先定義好的活動任務,像是測試使用者的反應時間。在這個教學上,我們將建立一個有關觸碰功能的任務,將會請使用者來做些觸碰測試。
第一,請建立一個全新的swift檔,並稱為ActiveTask.swift,並插入以下的程式碼至ActiveTask.swift內。
import ResearchKit

public var ActiveTask: ORKOrderedTask {
    return ORKOrderedTask.twoFingerTappingIntervalTask(withIdentifier: "TapTask", intendedUseDescription: "Check tapping speed", duration: 6, handOptions: .both, options: ORKPredefinedTaskOption())
}
twoFingerTappingIntervalTask是其中一個預先設定好的任務,它會要求使用者快速反覆觸碰兩次螢幕上的目標,我們也加入了”Check tapping speed”的描述,持續時間為6秒,在這個任務中有收集觸碰動作與加速度的訊號資訊。
就這樣,我們建立好了一個Active Task,現在我們需要在ViewController.swift初始這個任務,請增加activetaskClicked這個方法,程式碼如下:
@IBAction func activeTaskClicked(sender : AnyObject) {
    let taskViewController = ORKTaskViewController(task: ActiveTask, taskRun: nil)
    taskViewController.delegate = self
    present(taskViewController, animated: true, completion: nil)
}
現在,是時候來看看活動任務的特色,建立並執行你的APP,然後觸碰活動任務按鈕,看看會發生什麼事?
總結
在本次教學中,我們說明了ResearchKit框架中三個模組,在這些模組中,你可以建立一個令人驚豔的APP並繼續發揮無限的可能性。若想要了解更多,你可以參照官方ResearchKit文件。
另外,你也可從GitHub下載本次教學專案。

