作為一個 iOS App 開發者,我們應讓自己開發的 App 盡可能直觀易用。然而,對於某些功能,提供額外的資訊以教導使用者如何有效地使用這些功能可能會很有幫助。這就是 TipKit 的用途。TipKit 是在 iOS 17 中新引入的一個框架,用於在 App 中建立工具提示,讓開發者能夠提供額外的指導,確保使用者能夠充分利用你的應用程式功能。
在這個教學中,我們將探索 TipKit 框架,並看看如何為 SwiftUI App 創建提示。
使用 TipKit 框架
要使用 TipKit 框架,你首先必須將其導入到你的專案中:
import TipKit
了解 Tip 協定
要使用 TipKit 框架創建提示,你需要採用 Tip 協定來配置提示的內容。一般提示都包含標題和簡短描述。另外,你也可以加入與提示相關聯的圖像。

例如,要設置「儲存為最愛」提示,你可以建立一個符合 Tip 協定的 struct,如下所示。
struct FavoriteTip: Tip {
    var title: Text {
        Text("Save the photo as favorite")
    }

    var message: Text? {
        Text("Your favorite photos will appear in the favorite folder.")
    }
}
如果你想要將圖像添加到提示中,可以定義 image 屬性:
struct FavoriteTip: Tip {
    var title: Text {
        Text("Save the photo as favorite")
    }

    var message: Text? {
        Text("Your favorite photos will appear in the favorite folder.")
    }

		var image: Image? {
        Image(systemName: "heart")
    }
}
利用 Popover 和 TipView 顯示提示
TipKit 框架提供了兩種靈活的方式來顯示提示,即作為浮動視圖(popover)或內嵌視圖(inline view)。在浮動視圖中,提示會顯示在 App 的使用者界面上,可以是按鈕、圖片或其他 UI 元素。另一方面,內嵌視圖的行為類似於其他標準的 UI 元素,它會根據周圍視圖的位置進行調整,確保不會阻擋其他 UI 元素。
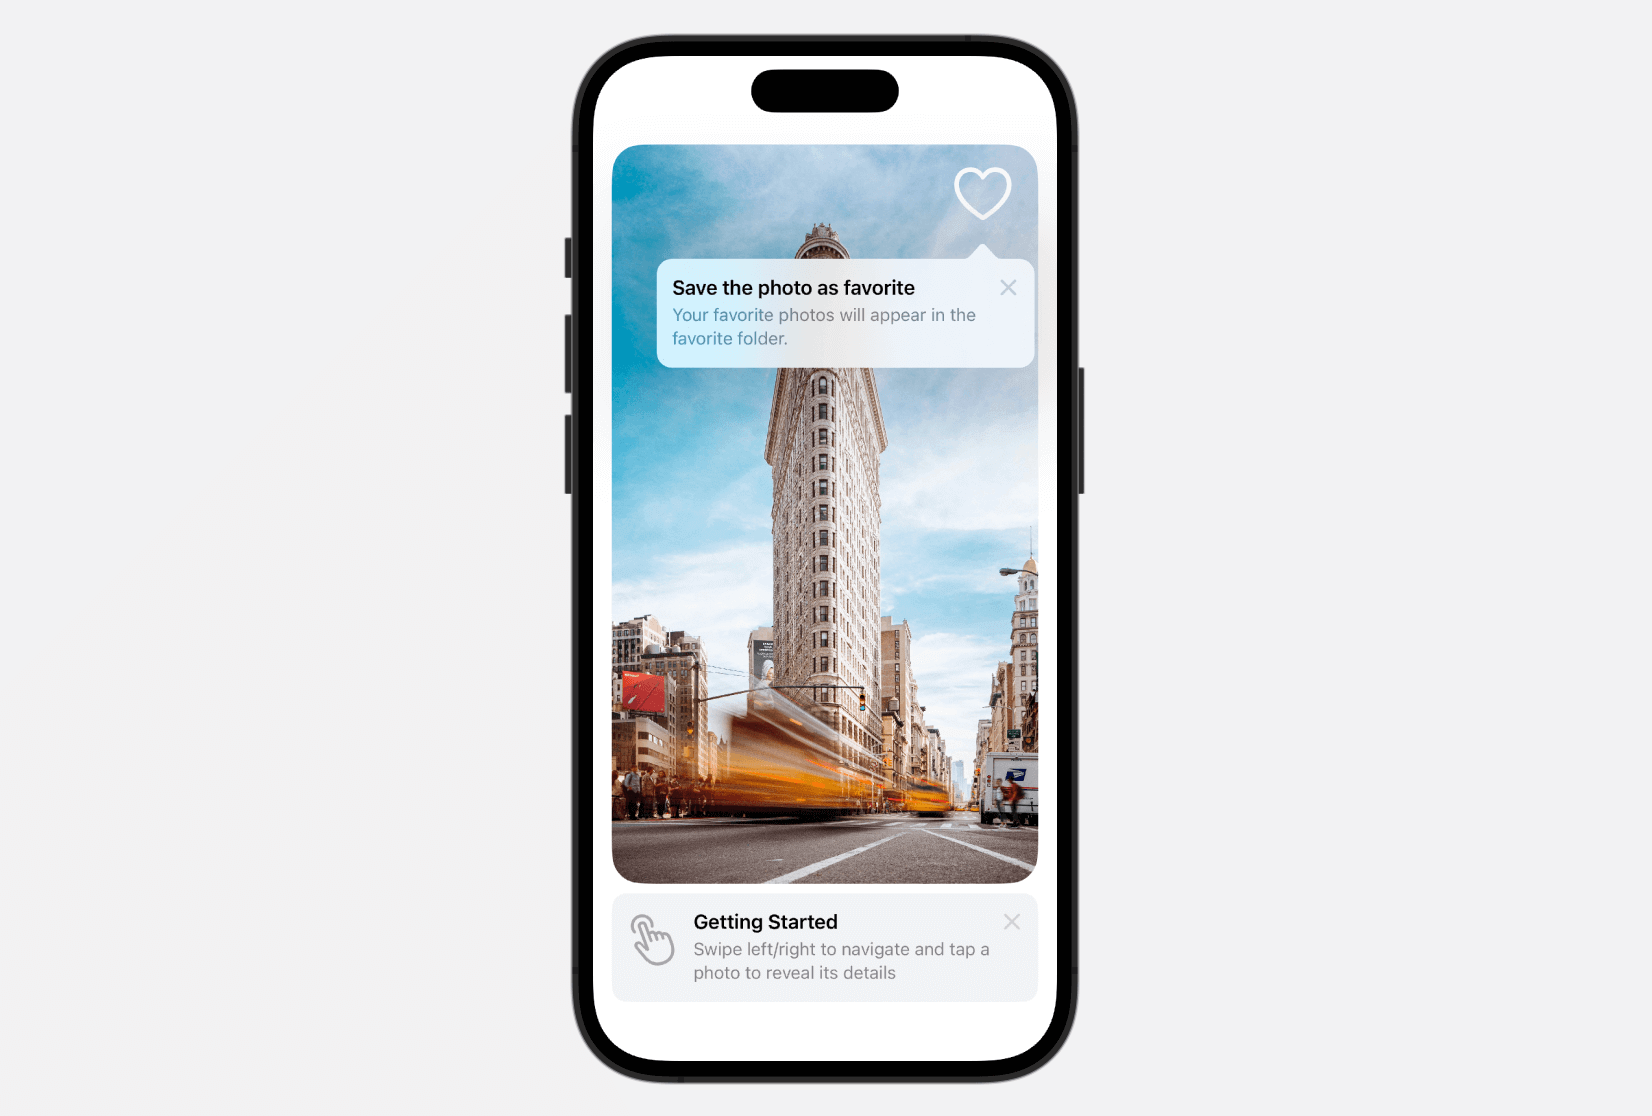
要將提示以內嵌視圖的方式顯示,你可以建立一個 TipView 實體並將要顯示的提示傳遞給它。以下是一個例子:
private let getStartedTip = GetStartedTip()

var body: some View {
    .
    .
    .

		TipView(getStartedTip)

    .
    .
    .
}
如果你想將提示以浮動視圖的方式顯示,可以將 popoverTip 修飾器附加到按鈕或其他 UI 元素上。
private let favoriteTip = FavoriteTip()

Image(systemName: "heart")
    .font(.system(size: 50))
    .foregroundStyle(.white)
    .padding()
    .popoverTip(favoriteTip, arrowEdge: .top)
要在 App 中顯示提示,最後一步是配置 Tips center。假設你的 Xcode 專案名稱為 TipKitDemo,可以切換到 TipKitDemoApp 並更新結構如下:
@main
struct TipKitDemoApp: App {
    var body: some Scene {
        WindowGroup {
            ContentView()
                .task {
                    try? Tips.configure([
                        .displayFrequency(.immediate),
                        .datastoreLocation(.applicationDefault)
                    ])
                }
        }
    }
}
我們可以使用 Tips center 的 configure 方法來自定義顯示頻率和資料存儲位置。在上面的程式碼片段中,顯示頻率被設置為 immediate,這意味著提示將立即顯示。如果你希望提示每 24 小時顯示一次,可以使用 .daily 選項。此外,你也可以彈性地自定義顯示頻率為任何所需的時間間隔,如下面的例子所示:
let threeDays: TimeInterval = 3 * 24 * 60 * 60

Tips.configure([
    .displayFrequency(threeDays),
    .dataStoreLocation(.applicationDefault)
])
設置好 Tips center 後,你應該可以在模擬器中運行 App 時看到提示。
預覧工具提示
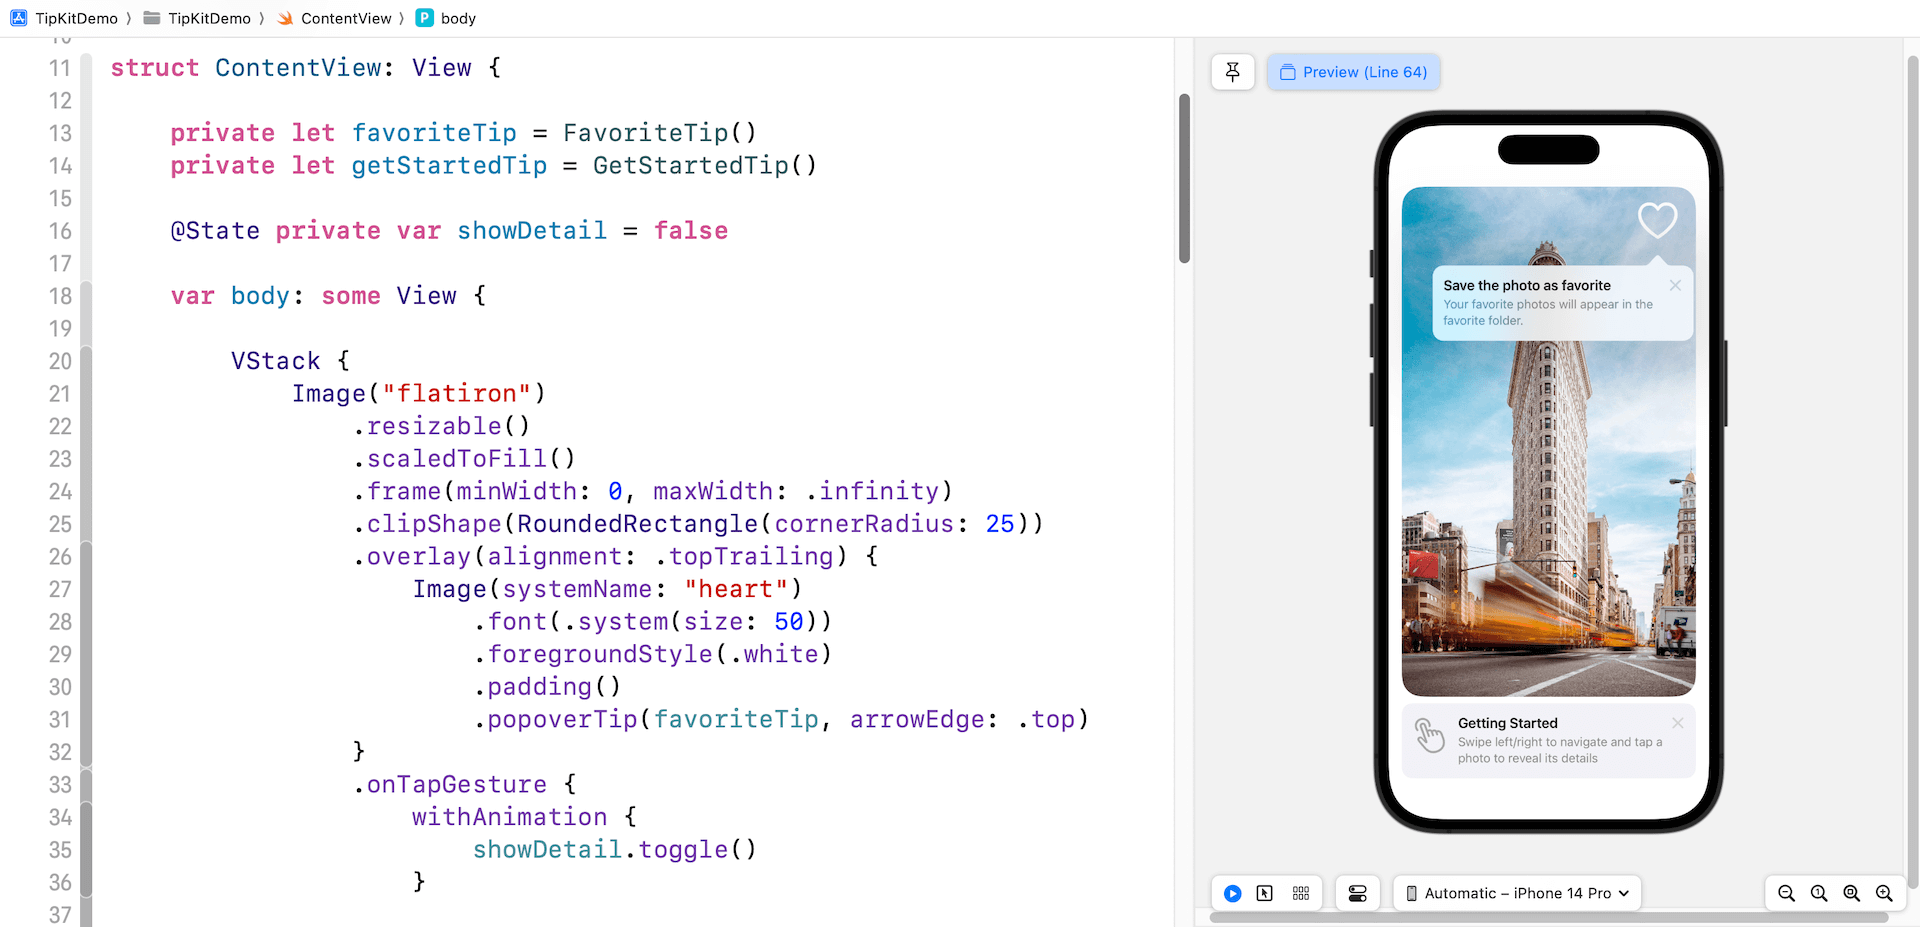
如果你希望在預覽視窗中預覽提示,你還需要在 #Preview 區塊中設置 Tips center。以下是一個例子:
#Preview {
    ContentView()
        .task {
            try? Tips.resetDatastore()

            try? Tips.configure([
                .displayFrequency(.immediate),
                .datastoreLocation(.applicationDefault)
            ])
        }
}
需要注意的一個重要點是添加額外的程式碼行來重設 data store。一旦提示被關閉,它將不再在 App 中顯示。然而,要確保提示一直顯示時,建議每次重設資料 data store。
關閉提示
使用者可以通過點擊 x 符號來關閉提示。如果需要在 App 中自動關閉提示視圖,你可以使用 invalidate 方法,並提供一個具體的原因,如下所示:
getStartedTip.invalidate(reason: .actionPerformed)
actionPerformed 是指使用者已執行了提示所描述的操作。
設定提示顯示規則
Tip 協定有一個可選屬性,供你設定提示的顯示規則。它支援兩種類型的規則:基於參數(Parameter-based)和基於事件(Event-based)。Parameter-based 的規則適用於根據特定的 Swift 值類型顯示提示。另一方面,Event-based 的規則則跟據預設的事件而顯示相應提示。
例如,只有在「入門指南」提示之後才應顯示「Favourite」提示。我們可以像這樣設定基於參數的規則:
struct FavoriteTip: Tip {

    var title: Text {
        Text("Save the photo as favorite")
    }

    var message: Text? {
        Text("Your favorite photos will appear in the favorite folder.")
    }

    var rules: [Rule] {
        #Rule(Self.$hasViewedGetStartedTip) { $0 == true }
    }

    @Parameter
    static var hasViewedGetStartedTip: Bool = false
}
在上面的程式碼中,我們使用 @Parameter 引入了一個名為 hasViewedGetStartedTip 的參數,初始值設置為 false。rules 屬性包含一個規則:驗證 hasViewedGetStartedTip 變數的值。當值為 true 時應顯示該提示。
當點擊圖像時,「Getting Started」提示就會關閉。在相同的閉包中,我們可以將 hasViewedGetStartedTip 的值設置為 true。
.onTapGesture {
    withAnimation {
        showDetail.toggle()
    }

    getStartedTip.invalidate(reason: .actionPerformed)

    FavoriteTip.hasViewedGetStartedTip = true
}
在啟動 App 時,只會顯示「Getting Started」提示。你可以點擊圖像以關閉提示,隨後 App 就會顯示「Favourite」提示。
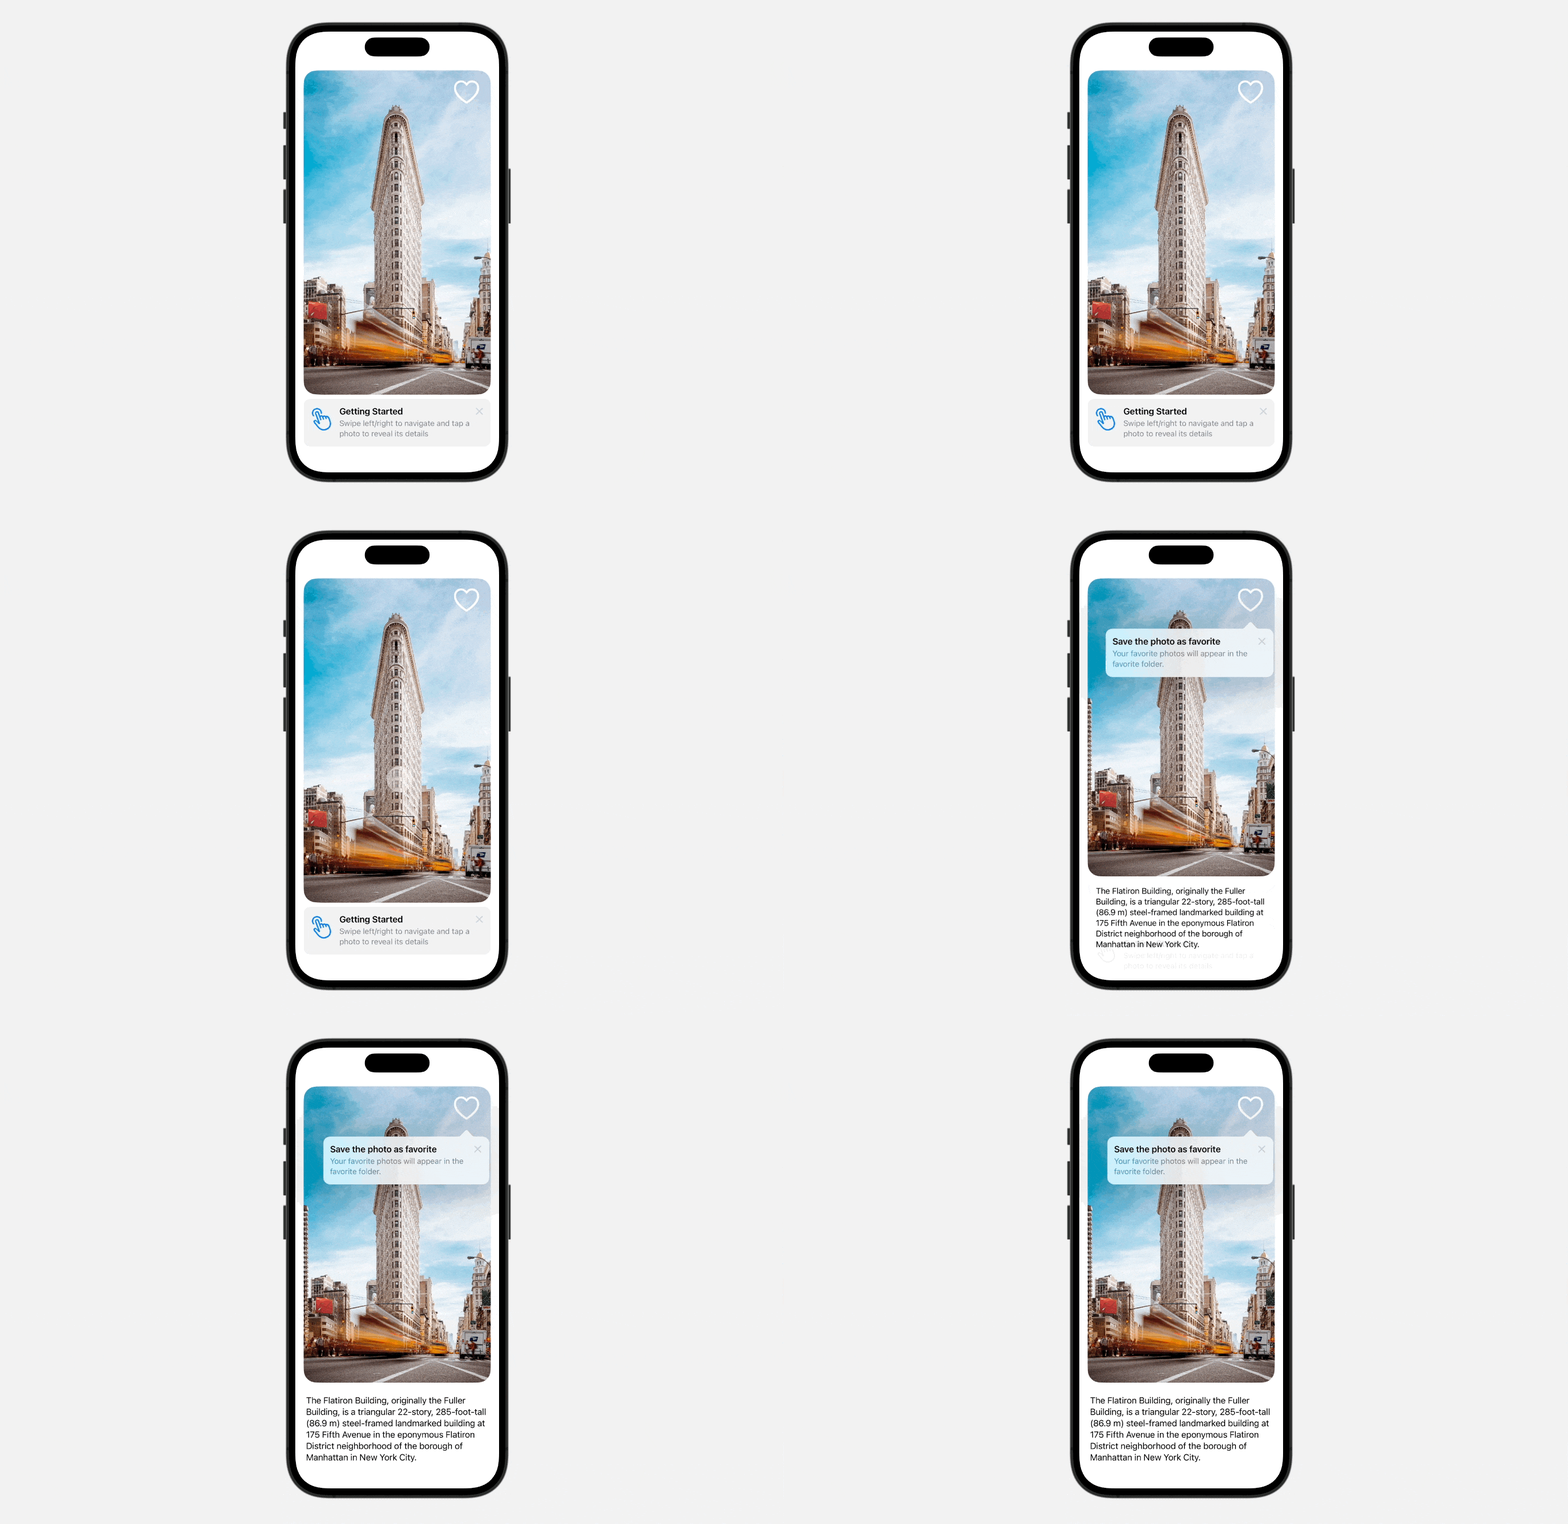
你也可以定義 Event-based 的規則來達到相同的結果。你不再需要使用 @Parameter 定義 hasViewedGetStartedTip 變數,而是將該變數配置為 Tips.Event,如下所示:
static let hasViewedGetStartedTip = Tips.Event(id: "hasViewedGetStartedTip")
在使用 Event-based 的規則時,你可以驗證捐贈次數(donation count)是否符合指定的條件。在這種情況下,我們檢查 hasViewedGetStartedTip 的 donation count 是否大於一:
var rules: [Rule] {
    #Rule(Self.hasViewedGetStartedTip) {
        $0.donations.count >= 1
    }
}
要增加 donation count,可以在某特定操作發生時呼叫 donate() 。在示範 App,我將在「Getting Started」提示關閉時捐贈該事件。因此,可以像這樣更新 onTapGesture 閉包:
.onTapGesture {
    withAnimation {
        showDetail.toggle()
    }

    getStartedTip.invalidate(reason: .actionPerformed)

    Task {
        await FavoriteTip.hasViewedGetStartedTip.donate()
    }

}
通過呼叫 donate() 方法,hasViewedGetStartedTip 的 donation count 將增加一次。這就會觸發顯示「Favourite」提示。
總結
在本章中,我們介紹了 iOS 17 上可用的 TipKit 框架。這是一個非常方便的工具,用於展示隱藏的App功能並教導使用者如何有效利用它們。你可以輕鬆地利用 TipKit 創建提示,以增強使用者體驗。如果你也喜歡蘋果公司新推出的 TipKit ,可以考慮在下一次 App 更新中加入提示功能。

