對許多剛學會 App 開發技術的初學者來說,他們懂得 Swift 語法,也熟悉各種常見功能的 iOS SDK,但在實際開發 App 時,卻常遭遇 2 個問題:
- 不知如何寫出容易理解和維護的程式。
- 遇到問題時,想到四五種解法,不知該用哪一種。
要解決這兩個問題,最好的方法莫過於參考大大們的 App 大作,學習模仿他們的程式碼。然而有時神人們可能會採用一些高深莫測的技術,讓初學者難以理解。對初學者來說,也許 Apple 官方的教學電子書會是更好的選擇。因為 Apple 出品,品質自然不在話下,又因是給初學者學習的教學範例,採用的也將是初學者容易理解掌握的做法。
Apple 的電子書提到大部分 App 常見的功能,比方資料的讀取新增修改,資料的儲存,從網路抓取資料等。若能完全掌握書裡介紹的技巧,開發一些基本功能的 App 應該完全不是問題。接下來的文章裡,我將列出一些書裡值得參考模仿的重點,希望能幫助大家更方便抄襲。讓我們一起來模仿 Apple 大大,寫出一手好 Swift!
變數,function,型別的命名
開發 iOS App 時,如何為變數,型別,function 命名,一直是件頭大的事。為了清楚表達意思,名字常常以多個單字組成,並以 Camel case 方法命名,每個單字的開頭大寫,第一個單字例外,比方顯示答案的變數 resultAnswerLabel。(camel 的意思是駱駝,當單字的字首大寫,多個單字組合起來時,每個單字的字首就像駱駝的駝峰,十分可愛。)
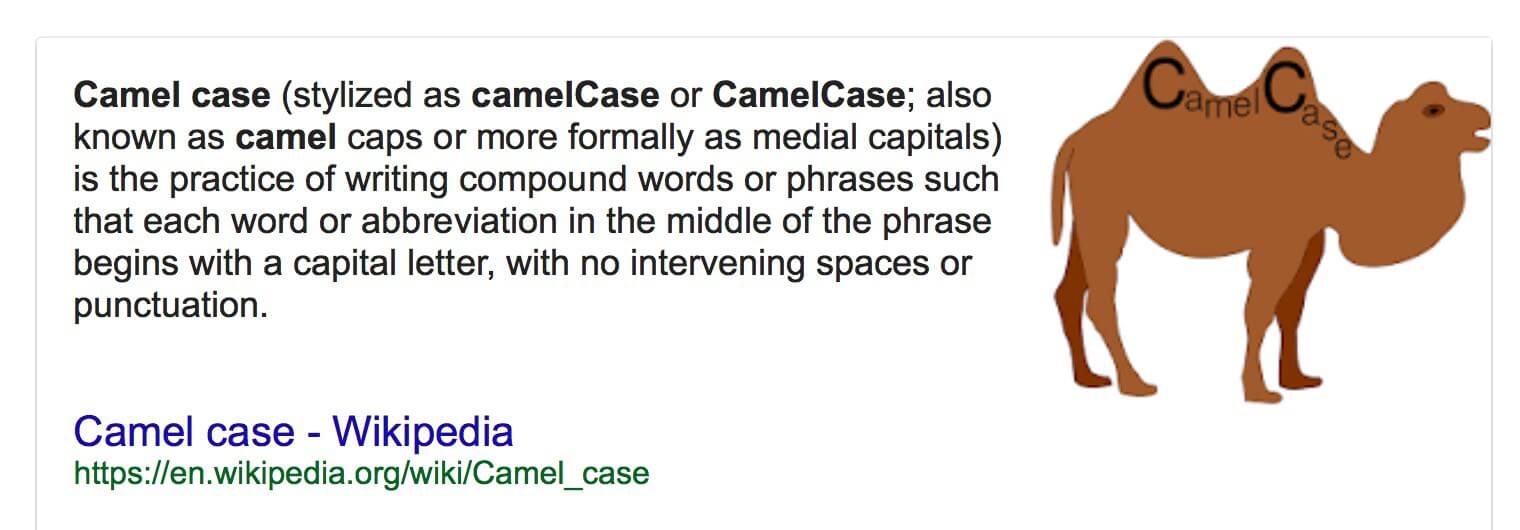
此方法的好處在於我們更容易看出名稱由哪幾個單字組成,方便看懂名稱的意思。第一個單字的字首小寫,則是因為 Swift 習慣上只有型別名稱的字首大寫。
至於什麼才是好名字,依 Apple 的教學範例,可整理出以下幾點常見的規則:
1. 自訂的類別繼承父類別時,類別名稱以父類別的名稱結尾。
以 ViewController 結尾。
class QuestionViewController: UIViewController {

}
以 TableViewController 結尾。
class CategoryTableViewController: UITableViewController {

}
2. 畫面上的 UI 元件,其變數名稱結尾和型別有關。
@IBOutlet weak var questionLabel: UILabel!
@IBOutlet weak var rangedSlider: UISlider!
3. UI 元件事件觸發的 function 名和事件有關。
按鈕被點選。
@IBAction func singleAnswerButtonPressed(_ sender: UIButton) {

}
滑動 slider。
sliderChanged(_ sender: UISlider) {

}
4. Array 型別的變數名加 s。
var categories = [String]()
共用資料宣告成型別常數,取名為 shared 或 default。
App 裡有些負責特定功能的物件會在多個頁面使用,比方抓取網路資料的物件。你可將它宣告成只會建立一次的型別常數,省去每次使用時重新生成的麻煩,並享有任何地方皆可方便存取的好處,就像以下例子的 MenuController.shared。
class MenuController {

    static let shared = MenuController()

}
iOS SDK 本身就有很多類似例子,比方 URLSession.shared,UIApplication.shared, FileManager.default。
將字串定義成型別常數
開發 iOS App 時,總有某些東西是我們無法避免,必須以字串輸入的,比方 segue ID,cell ID,storyboard ID 等。然而只要你一不小心打錯,將產生非常可怕的後果,輕則功能失效,重則讓 App 閃退,地球毀滅 !
因此,不妨參考 Apple 的做法,將字串定義成型別常數,到時輸入時 Xcode 將幫我們自動完成,一輩子都不會打錯。
讓我們看看以下幾個例子:
1. segue ID 和 cell ID
在 controller 裡以 struct 定義型別 PropertyKeys,宣告屬性儲存 segue ID 和 cell ID。
class AthleteTableViewController: UITableViewController {
    struct PropertyKeys {
        static let athleteCell = "AthleteCell"
        static let addAthleteSegue = "AddAthlete"
        static let editAthleteSegue = "EditAthlete"
    }
以 struct 定義型別 SegueID, 宣告屬性儲存 segue ID。
struct SegueID {
    static let topicPicker = "TopicPickerController"
    static let mainShowDetail = "ShowDetail"
    static let mainAddNew = "AddNew"
}
2. Storyboard ID
以 struct 定義型別 StoryboardID,宣告屬性儲存 storyboard ID。
struct StoryboardID {
    static let main = "Main"
    static let mainNC = "MainNC"
    static let zoneNC = "ZoneNC"
    static let note = "Note"
    static let noteNC = "NoteNC"
}
在 controller 裡宣告屬性 storyboardIdentifier 儲存它的 storyboard ID。
class BuildIceCreamViewController: UIViewController {
    static let storyboardIdentifier = "BuildIceCreamViewController"
}
3. Notification name
定義 Notification.Name 的 extension,宣告屬性儲存自訂的通知名稱。
extension Notification.Name {
    static let zoneCacheDidChange = Notification.Name("zoneCacheDidChange")
    static let topicCacheDidChange = Notification.Name("topicCacheDidChange")
}
4. Dictionary 的 key。
以 struct 定義型別 NotificationObjectKey,宣告屬性儲存 Notification 的 userInfo 裡自訂的 key。
struct NotificationObjectKey {
    static let reason = "reason"
    static let recordIDsDeleted = "recordIDsDeleted"
    static let recordsChanged = "recordsChanged"
    static let newNote = "newNote"
}
以 struct 定義型別 PropertyKey,宣告屬性儲存想要寫檔的欄位字串。
class Note: NSObject, NSCoding {
    let title: String
    let text: String
    let timestamp: Date

    struct PropertyKey {
        static let title = "title"
        static let text = "text"
        static let timestamp = "timestamp"
將設定畫面內容的程式定義成 update 開頭的 function。
controller 一般會有一段設定畫面內容的程式,而且會在多個時候設定,比方 viewDidLoad, viewWillAppear,或是抓到網路上的資料後。所以你可將設定畫面內容的程式另外定義成 update 開頭的 function,如此需要設定畫面內容時,只要呼叫此 function 即可。
func updateUI() {
    let currentQuestion = questions[questionIndex]
    questionLabel.text = currentQuestion.text
}

override func viewDidLoad() {
    super.viewDidLoad()
    updateUI()
}

func nextQuestion() {
    questionIndex += 1

    if questionIndex < questions.count {
        updateUI()
    } else {
        performSegue(withIdentifier: SegueID.resultsSegue, sender: nil)
    }
}
在 viewDidLoad 和 nextQuestion 裡呼叫 updateUI()。
搭配 guard let 建立自訂型別的 cell
建立自訂類別的 cell 時,如果你很有信心,覺得不可能失敗,一般會使用 as! 強制轉型。
override func tableView(_ tableView: UITableView, cellForRowAt indexPath: IndexPath) -> UITableViewCell {

    let cell = tableView.dequeueReusableCell(withIdentifier: PropertyKeys.loverCell, for: indexPath) as! BookTableViewCell

    let book = books[indexPath.row]
    cell.update(with: book)

    return cell
}
其實有更安全的做法,你可以用 guard let 讀取搭配 as? 轉型的 cell。
override func tableView(_ tableView: UITableView, cellForRowAt indexPath: IndexPath) -> UITableViewCell {

    guard let cell = tableView.dequeueReusableCell(withIdentifier: PropertyKeys.loverCell, for: indexPath) as? BookTableViewCell else {
        fatalError("Could not dequeue a cell")
    }

    let book = books[indexPath.row]
    cell.update(with: book)

    return cell
}
將設定 cell 顯示內容的程式定義成 function
在 controller 裡定義設定 cell 內容的 function,如以下例子裡的 configure(cell:forItemAt:)。
func configure(cell: UITableViewCell, forItemAt indexPath: IndexPath) {
    let categoryString = categories[indexPath.row]
    cell.textLabel?.text = categoryString.capitalized
}

override func tableView(_ tableView: UITableView, cellForRowAt indexPath: IndexPath) -> UITableViewCell {
    let cell = tableView.dequeueReusableCell(withIdentifier: PropertyKeys.categoryCellIdentifier, for: indexPath)
    configure(cell: cell, forItemAt: indexPath)
    return cell
}
在自訂的 cell 類別裡定義設定內容的 function,名稱以 update 開頭,參數為要顯示的資料。
class BookTableViewCell: UITableViewCell {

    func update(with book: Book) {
        titleLabel.text = book.title
        authorLabel.text = book.author
        genreLabel.text = book.genre
        lengthLabel.text = book.length
    }
}

class BookTableViewController: UITableViewController {

    override func tableView(_ tableView: UITableView, cellForRowAt indexPath: IndexPath) -> UITableViewCell {

        guard let cell = tableView.dequeueReusableCell(withIdentifier: PropertyKeys.loverCell, for: indexPath) as? BookTableViewCell else {
            fatalError("Could not dequeue a cell")
        }

        let book = books[indexPath.row]
        cell.update(with: book)

        return cell
    }
}
資料輸入頁面以 static cell 實作
資料的輸入頁面往往有很多欄位,適合以上下捲動的表格呈現。又因欄位個數是固定的,所以可以直接用 UITableViewController 搭配 static cell 實作,享有以下幾點好處:
- cell 裡的輸入欄位,諸如 text field, slider,皆可設為 controler 的 outlet 變數。(若為 Dynamic Prototypes 的表格,cell 上的元件只能設為 cell 類別的 outlet。)
-
鍵盤出現時,表格會自動往上捲,text field 不會被檔到。

class BookFormTableViewController: UITableViewController {

    @IBOutlet weak var titleTextField: UITextField!
    @IBOutlet weak var authorTextField: UITextField!
    @IBOutlet weak var genreTextField: UITextField!
    @IBOutlet weak var lengthTextField: UITextField!
新增資料時 present 另一個 navigation controller
iOS App 在新增資料時,常使用 present 另一個 navigation controller 的設計,例如內建的通訊錄 App 和行事曆 App。
利用 guard let 或 if let 比對多個 optional,檢查使用者輸入的內容
當 App 的表單頁面有很多欄位時,我們往往要用大量的 guard let 或 if let 確認使用者輸入的資料,例如以下例子:
@IBAction func saveButtonTapped(_ sender: Any) {
    guard let title = titleTextField.text else {
        return
    }

    if title.count == 0 {
        return
    }

    guard let author = authorTextField.text else {
        return
    }

    if author.count == 0 {
        return
    }

    book = Book(title: title, author: author)
    performSegue(withIdentifier: PropertyKeys.unwind, sender: self)
}
其實不用這麼麻煩,guard let 結合逗號即可一次比對多個 optional。
@IBAction func saveButtonTapped(_ sender: Any) {
    guard let title = titleTextField.text,
        title.count > 0,
        let author = authorTextField.text,
        author.count > 0 else {
            return
    }
    book = Book(title: title, author: author)
    performSegue(withIdentifier: PropertyKeys.unwind, sender: self)
}
長得跟 guard let 很像的好兄弟 if let 結合逗號後,也一樣能一次比對多個 optional。
@IBAction func saveButtonTapped(_ sender: Any) {
    if let name = nameTextField.text,
        let employeeType = employeeType {
        employee = Employee(name: name, dateOfBirth: dobDatePicker.date, employeeType: employeeType)
        performSegue(withIdentifier: PropertyKeys.unwindToListIndentifier, sender: self)
    }
}
利用 ?? (nil-coalescing operator) 設定資料的預設值
用 ?? 語法方便地讀取 optional 內容,並在它為 nil 時另外指定預設值,很適合運用在讀取 text field 內容建立資料的情境。
var registration: Registration {

    let firstName = firstNameTextField.text ?? ""
    let lastName = lastNameTextField.text ?? ""

    return Registration(firstName: firstName,
                            lastName: lastName)
}
利用 unwind segue 返回之前頁面和回傳資料
返回之前頁面和回傳資料有很多實現的方法,不過在 Apple 的範例裡,它主要介紹 unwind segue,因為和其它方法比起來,它最簡單也最容易上手,只要拉 segue 到 Exit 和定義 segue 的相關 function。
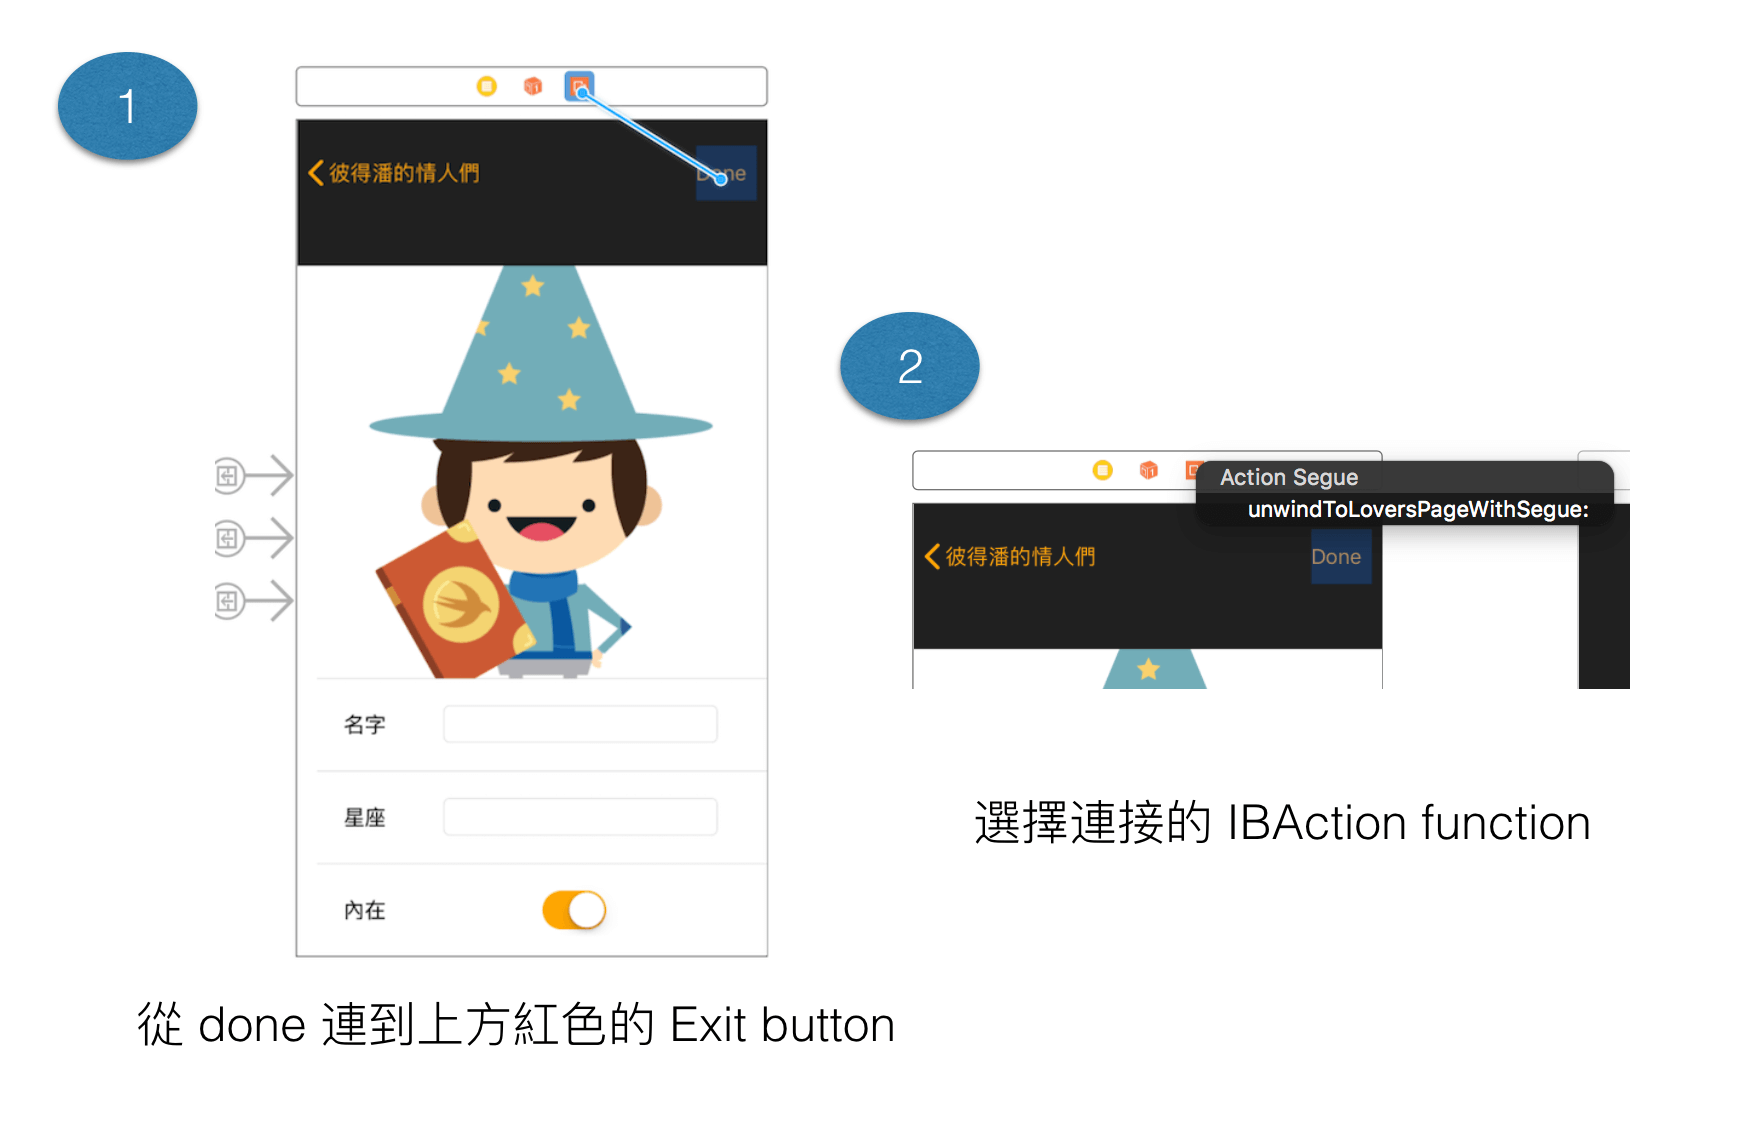
對 unwind segue 有興趣的朋友,可進一步參考 Apple 的說明文件,Using Unwind Segues。
利用 if let 和逗號,串接一連串的 optional 比對解析 JSON。
當後台回傳的 JSON 很複雜時,我們常常要像剝洋蔥一樣,透過層層的 as? 轉型和 optional binding, 辛苦挖出想要的內容。
let urlStr = "https://itunes.apple.com/search?term=love&media=music"
let url = URL(string: urlStr)
let task = URLSession.shared.dataTask(with: url!) { (data, response , error) in
    if let data = data {
        if let dic = try? JSONSerialization.jsonObject(with: data, options: []) as? [String: Any] {
            if let resultArray = dic?["results"] as? [[String: Any]] {
                for songDic in resultArray {
                    print(songDic["trackName"])
                }
            }
        }
    }
}
task.resume()
層層的 as? 是無法避免的,但是利用 if let 結合逗號串接一連串的 optional 比對,將讓我們的程式精簡不少。
let urlStr = "https://itunes.apple.com/search?term=love&media=music"
let url = URL(string: urlStr)
let task = URLSession.shared.dataTask(with: url!) { (data, response , error) in
    if let data = data, let dic = try? JSONSerialization.jsonObject(with: data, options: []) as? [String: Any], let resultArray = dic?["results"] as? [[String: Any]] {
        for songDic in resultArray {
            print(songDic["trackName"])
        }
    }
}
task.resume()
將 JSON 資料生成自訂型別
結合 Swift 4 新發明的 JSONDecoder 和 Codable,將 JSON 變成自訂型別變得十分容易,例如以下範例:
struct SongResults: Codable {
    struct Song: Codable {
        var artistName: String
        var previewUrl: URL
        var trackPrice: Double?
    }
    var resultCount: Int
    var results: [Song]
}

func download() {
    if let url = URL(string: "https://itunes.apple.com/search?term=love&media=music") {
        let task = URLSession.shared.dataTask(with: url) { (data, response , error) in
            let decoder = JSONDecoder()
            decoder.dateDecodingStrategy = .iso8601
            if let data = data, let songResults = try?
                decoder.decode(SongResults.self, from: data)
            {
                for song in songResults.results {
                    print(song)
                }
            } else {
                print("error")
            }
        }
        task.resume()
    }
}
關於 JSONDecoder 和 Codable 的相關介紹,有興趣的朋友可進一步參考利用 Swift 4 的 JSONDecoder 和 Codable 解析 JSON 和生成自訂型別資料。
MVC, model controller 和 helper controller
iOS App 開發最常見的架構為 MVC,不過在書本裡,Apple 提到除了 C 對應的 View Controller,還可另外建立 model controller 和 helper controller,讓程式的分工更清楚。
- model controller - 負責實現 model 的相關功能。比方你在做一個筆記 App,要處理 Note 的新增,刪除,修改等,你可以另外定義 NoteController 實現相關功能,而不用把大量的程式寫在 view controller 或 note 裡。
-
helper controller - 負責特定的功能,最常見的例子為 NetworkController,專門處理 App 跟後台溝通的部分。
比方下圖即為此架構下的專案檔案分類。

將抓取網路資料的程式定義成 function, 透過參數 closure 回傳資料
將抓取網路資料的程式定義成 function,讓我們能在想抓資料時隨時呼叫。但請特別注意,以下將抓到的資料 return 的寫法是錯的,因為如果你想要 function fetchImage 回傳 UIImage,你應該在 task.resume() 後回傳,而不是在 dataTask 的參數 completionHandler 裡回傳。
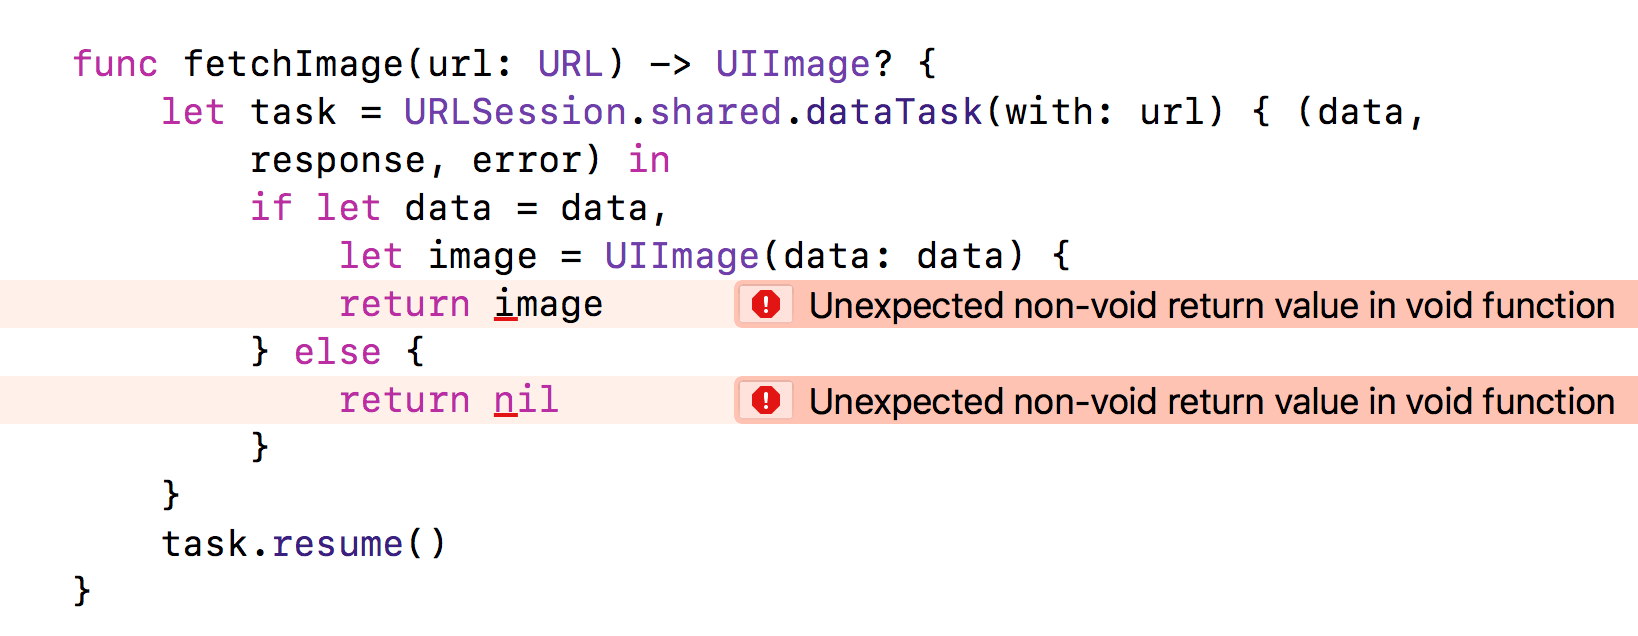
但是我們不可能在 task.resume() 後回傳資料呀,因為資料要等到傳入 dataTask 的 closure 執行時才有。正確的做法其實就近在眼前,就跟我們的真愛一樣。你可以模仿 function dataTask,宣告 closure 型別的參數 completion,等抓到資料時再呼叫 completion 傳入資料即可。
func fetchImage(url: URL, completion: @escaping (UIImage?) -> Void) {
    let task = URLSession.shared.dataTask(with: url) { (data, response, error) in
        if let data = data,
            let image = UIImage(data: data) {
            completion(image)
        } else {
            completion(nil)
        }
    }
    task.resume()
}
和後台 API 溝通的的程式寫在哪
和後台 API 溝通的程式不難寫,但是如果沒有好好規劃,常常一個不小心,就讓我們的程式變得十分複雜。Apple 提到了常見的三種做法,你可依 App 需求選擇合適的做法。
1. 寫在 View Controller 裡
初學者最常採用的做法,因為它最簡單直接,在 controller 裡抓資料,然後再把它顯示到畫面上。如以下例子,在 controller 裡定義 function fetchPhotoInfo 抓資料。
class PhotoViewController: UIViewController {

    override func viewDidLoad() {
         fetchPhotoInfo { (photoInfo) in
            self.updateUI(with: photoInfo)
        }
    }

    func updateUI(with photoInfo: PhotoInfo) {...}
    func fetchPhotoInfo(completion: @escaping (PhotoInfo?) ->
    Void) {...}
}
建議只在 API 沒有太多太複雜時採用,因為它將讓你的 view controller 複雜許多,而且每個頁面的 controller 需要抓資料時,都要重寫一次相關的程式碼。(就算是用複製貼上,還是有點累呀。)
2. 寫在 model 裡,定義抓資料的 static function
既然要抓某種 model 的資料,不如就將抓取的程式碼定義成 model 的型別 function,如此之後不管在哪個 controller,都可以方便地抓取資料取得 model。
extension PhotoInfo {

    static func fetchPhotoInfo(completion: @escaping
    (PhotoInfo?) -> Void) {...}
}

class PhotoViewController: UIViewController {

    override func viewDidLoad() {

        PhotoInfo.fetchPhotoInfo { (photoInfo) in
            self.updateUI(with: photoInfo)
        }
    }

    func updateUI(with photoInfo: PhotoInfo) {...}
}
3. 寫在 model controller 或 helper controller 裡
為了避免 view controller 或 model 的程式太複雜,也可考慮另外定義 model controller 或 helper controller 專門處理後台 API。
定義 model controller PhotoInfoController。
struct PhotoInfoController {

    func fetchPhotoInfo(completion: @escaping (PhotoInfo?) ->
    Void) {...}
}

class PhotoViewController: UIViewController {
    let photoInfoController = PhotoInfoController()

    override func viewDidLoad() {

        photoInfoController.fetchPhotoInfo { (photoInfo) in
            self.updateUI(with: photoInfo)
        }
    }

    func updateUI(with photoInfo: PhotoInfo) {...}
}
定義 helper controller NetworkController。
struct NetworkController {

    static let shared = NetworkController()

    func fetchPhotoInfo(completion: @escaping (PhotoInfo?) ->
    Void) {...}
}

class PhotoViewController: UIViewController {

    override func viewDidLoad() {

        NetworkController.shared.fetchPhotoInfo { (photoInfo) in
            self.updateUI(with: photoInfo)
        }
    }

    func updateUI(with photoInfo: PhotoInfo) {...}
}
Swift 的空白縮排格式
Swift 對於空白和縮排其實沒有太龜毛的限制,不過如果希望寫的程式跟 Apple 範例一致的話,可以注意一下幾個地方:
- 冒號後留一個空白,比方 Type Annotation,Inheritance 和 dictionary。
let name: String = "彼得潘"
class ViewController: UIViewController {
}
let songDic: [String: String] = ["singer": "田馥甄", "name": "演員"]
- 逗號後留一個空白,比方分隔參數,分隔 array 成員,遵從 protocol。
func crushOn(name: String, gender: String) {
}
crushOn(name: "Wendy", gender: "女")
class ViewController: UIViewController, UITableViewDelegate {
}
let names = ["Peter", "Wendy", "Hook"]
- -> 的前後留一個空白。
func crushOn(name: String, gender: String) -> Bool {
    if name == "Wendy" && gender == "女" {
        return true
    } else {
        return false
    }
}
- { 前留一個空白,比方類別的 {,function 的 { 。
class Baby {

    func eat() {

    }
}
- else 接在 } 的後面,前面留一個空白。
var age = 18
if age < 30 {
    print("你是我的傳說")
} else if age < 50 {
    print("你可能是我的傳說")
} else {
    print("你不能是我的傳說")
}
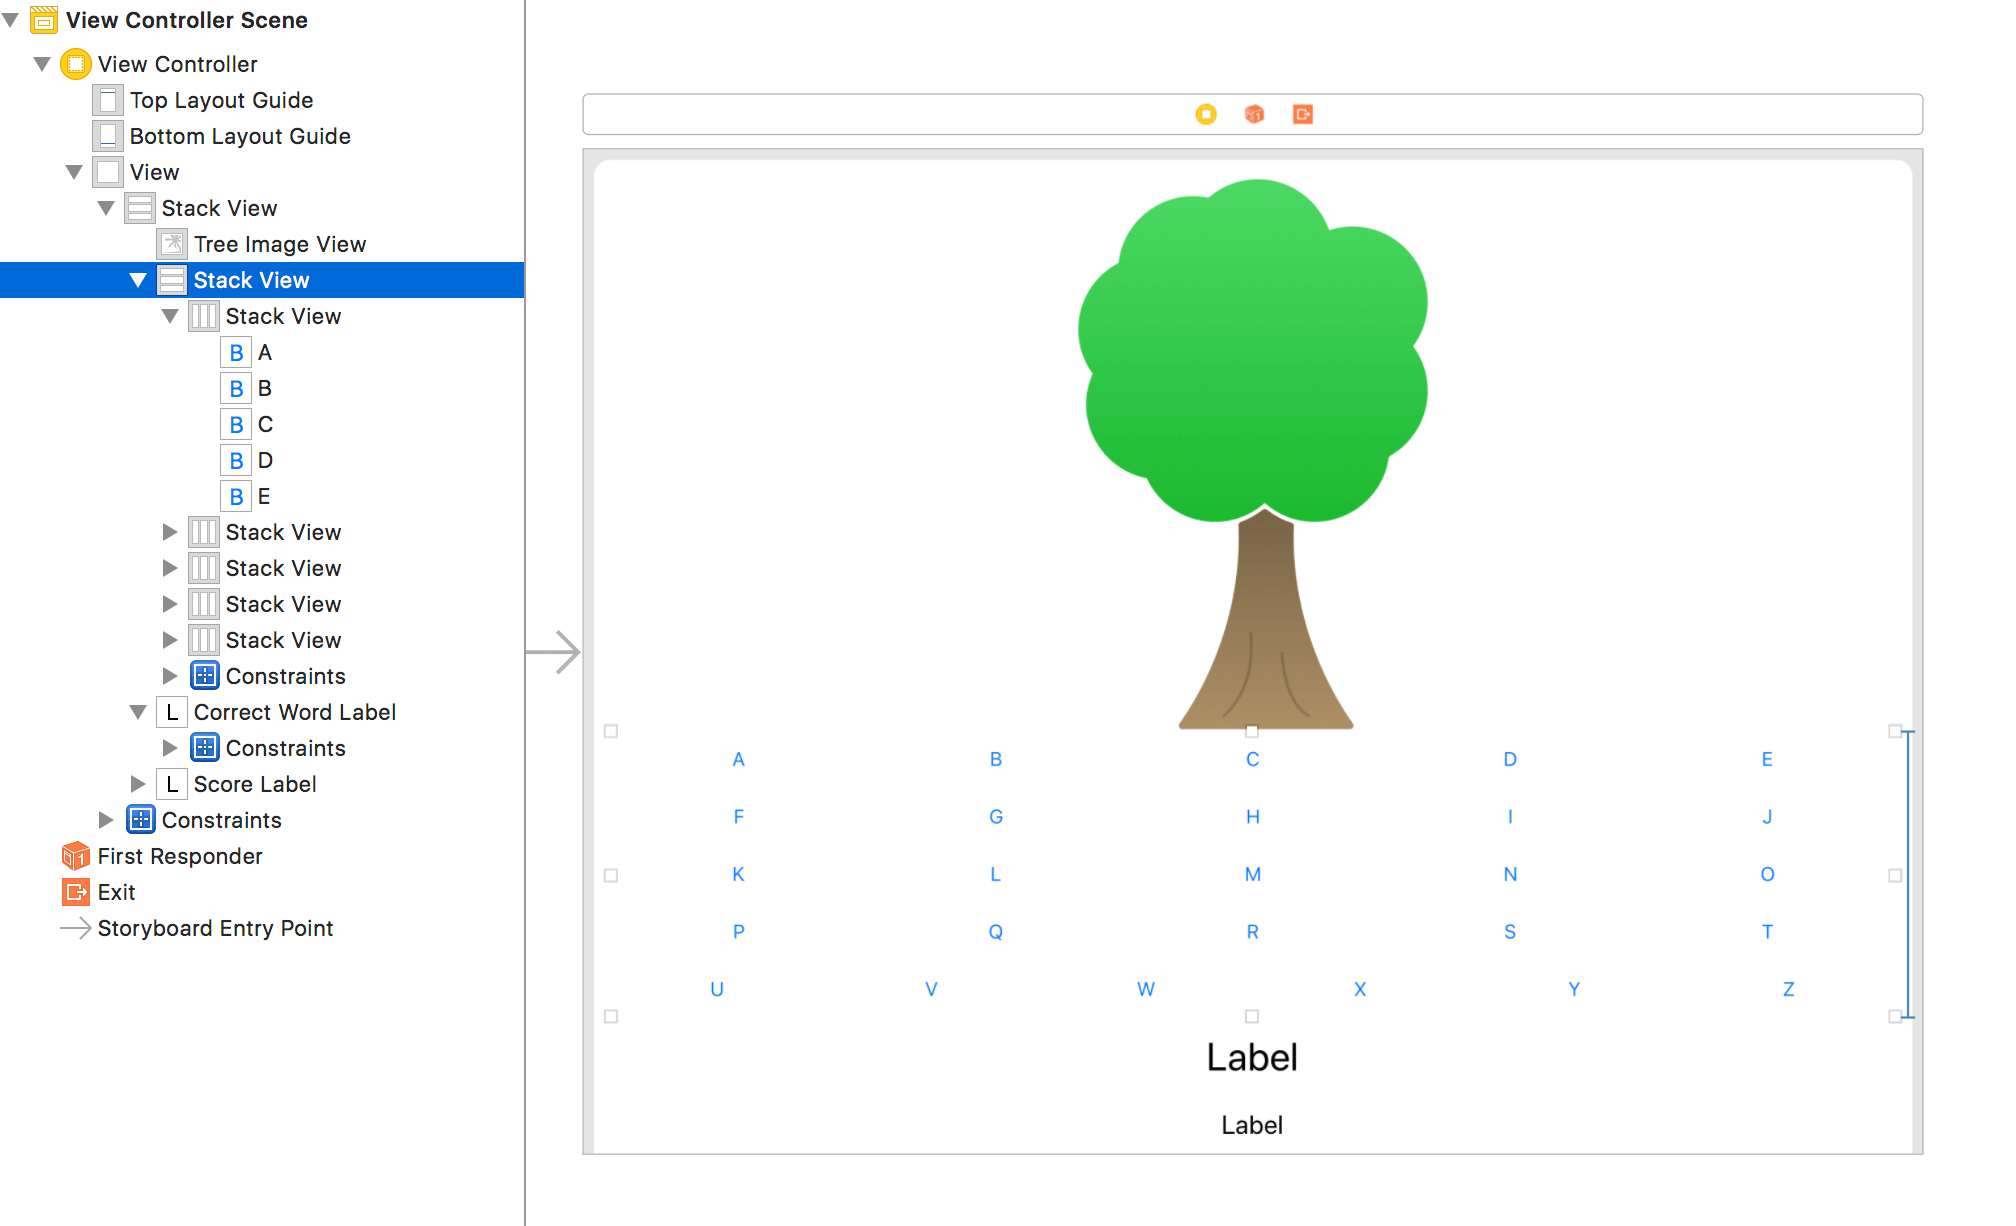
使用 stack view
Auto Layout 對新手來說,的確需要一段時間才能熟練上手。不過自從 stack view 推出後,難度已經大幅降低,因為 stack view 需要手動設定的條件少很多,對新手來說,也更容易親近學習。
Apple 書本裡大量使用 stack view,因為大部分的 App 畫面都是單純地水平或垂直排列,很適合以 stack view 實作。若要雞蛋裡挑骨頭,聊聊 stack view 的缺點,大概就是 iOS 9 以上才支援,不過 iOS 都已經來到 11,相信此時我們已可安心地拋棄 iOS 8。
書本裡使用大量 stack view 實作的 Apple Pie 範例:
enum 的使用時機
和 class, struct 相比,enum 常被我們忽略。其實它也有出頭天的時候,當你想表達的資料內容只有固定幾種時,enum 十分好用,不只能搭配 switch 比對,還可讓程式更安全,更不易出錯,例如以下例子:
電影的種類 genre 定義成字串,容易打錯字,甚至產生世界上不存在的電影種類。
struct Movie {
  var name: String
  var releaseYear: Int
  var genre: String
}

let loveMovie = Movie(name: "你的名字", releaseYear: 2016, genre: "帥到分手")
將電影的種類 genre 改以 enum Genre 定義,讓我們不易打錯字,而且建立電影時也更安全,你只能傳入 Genre 型別的電影種類,不可能發明種類帥到分手的電影。
enum Genre {
  case animated, action, romance, documentary, biography,
  thriller
}

struct Movie {
  var name: String
  var releaseYear: Int
  var genre: Genre
}

let loveMovie = Movie(name: "Finding Dory", releaseYear: 2016,
genre: .animated)
總結
以上是彼得潘研究 Apple 教科書後,小小整理的一些重點。若能模仿以上做法開發 iOS App,應該就能寫出長得很像 Apple 範例的程式,讓人更容易理解修改。當你有一天被高薪挖角,準備離開原公司時,也能安心地交接程式,不再怕新人看不懂而日夜糾纏。當然,未來當你經驗成長,功力更加深厚後,你就能運用一些 Apple 書裡沒提到,一些比較進階的技巧,比方 protocol-oriented programming,從程式實作 Auto Layout 等。
關於 Swift iOS App 開發的相關技術,大家若有任何問題,都可在底下留言。或是直接 FB / LINE 聯絡彼得潘。當彼得潘回答大家的問題時,其實也在找答案的過程中精進學習,增長了自己的功力,和大家交了朋友,獲得再多錢也買不到的回報和收獲。