人稱「四人幫」(Gang of Four, GoF)的 Erich Gamma、Richard Helm、 Ralph Johnson 及 John Vlissides 所著的 “Design Patterns: Elements of Reusable Object-Oriented Software”,開創、收集、並解釋了目前常見的 23 種經典軟體開發設計模式 (design pattern)。本教學將會重點介紹其中兩個四人幫稱為「創建」的模式:工廠方法模式 (factory method) 以及單例模式 (singleton)。
軟體開發是一種致力將現實世界情境模組化的過程,希望能夠建立工具來加強這個情境裡的使用者體驗。在財務管理方面的工具,例如銀行 App 或是購物工具如 Amazon 或 eBay 的 iOS App 等,絕對讓現在的生活比十年前來得方便。再想想我們至今走過的道路,雖然軟體 App 的功能越來越強大,對使用者亦更簡單易用;但對開發者來說,這種 App 的開發也變得更加複雜。
因此,開發者建立了一系列管理複雜性的最佳實作方式,一些較熱門的例子像是物件導向程式設計 (Object-Oriented Programming)、協定導向程式設計 (Protocol-Oriented Programming)、數值語義 (Value Semantics)、Local Reasoning,拆分大型函式為多個有良好定義介面的小型函式(像是 Swift Extension)、 語法糖 (Syntactic Sugar) 等。還有一個在眾多最佳實作最值得關注的,就是設計模式的使用。
設計模式
設計模式是一個非常重要的工具,讓開發者可以管理複雜的程式碼。要將其概念化的話,可以說它是一種樣版技術,而每個樣版都是量身訂做來解決相對應、重複出現、又容易識別的問題。你可以把它們用於構思程式情境的最佳實作清單,在構思的過程中你會反覆查看它們,像是如何從物件家族中建立物件、而不必了解物件家族的所有詳細實作細節。設計模式的重點便是它們適用於常見的場景上,因為它們是泛用的,所以可以重複使用。讓我舉一個具體的例子。
設計模式並不是特定於某些使用案例,像是迭代 (Iterating) 一個有 11 個整數 (Int) 的 Swift 陣列。舉例來說,四人幫定義迭代器 (Iterator) 模式來提供一個通用介面,以穿透集合裡的所有項目,而無需知道集合裡的複雜性(像是型別)。設計模式並不是編寫語言程式碼,而是一個解決常見軟體開發情境的一套準則或或經驗法則。
還記得我在 AppCoda 上談論過的 “Model-View-ViewModel” (MVVM) 設計模式,以及受到 Apple 與許多 iOS 開發者青睞的 “Model-View-Controller” (MVC) 設計模式嗎?
這兩個模式通常被應用在整個 App 上。MVVM 與 MVC 是架構 (Architectural) 設計模式,旨在將使用者界面 (UI) 與 App 的資料和呈現邏輯的程式碼分開,同時也將 App 的資料與核心資料處理及/或商業邏輯分開。四人幫的設計模式在性質上更為具體,旨在解決在 App 的程式庫裡更具體的問題。你可以在一個 App 裡使用三個、或七個、甚至十二個四人幫的設計模式。還記得我的迭代範例吧?雖然這不在四人幫的設計模式清單裡,但是代理 (Delegation) 是另一個很棒的設計模式。
雖然四人幫的書對很多開發者來說就如聖經,但是亦有批評者存在的。我們將會在本篇文章的結論中討論這一點。
設計模式分類
四人幫將 23 個設計模式分為「創建 (Creational)」、「結構 (Structural)」及「行為 (Behavioral)」三大類別。此次教學會談論創建類別中的兩個模式。這個模式的目的,是要讓開發者建立物件(通常很複雜的)的過程更簡單直接、可理解及維護,並隱藏一些像實例化或物件實作的細節。
聰明的開發者的最終目標就是隱藏複雜性(封裝)。例如,物件導向 (OOP) 類別能夠提供非常複雜而強大的功能,但不需要開發者了解關於類別內部的運作。在創建模式中,開發者可能不必知道類別的關鍵屬性及方法,但如果需要的話,他可以看一眼感興趣類別的介面(也就是 Swift 的協定),然後即插即用。看完我們第一個「工廠方法」設計模型範例後,你就應該會明白了。
工廠方法設計模式 (The factory method design pattern)
如果你已經研究過四人幫的設計模式,並/或花了不少時間在 OOP 世界,那麼你大概會聽過「抽象工廠 (Abstract Factory)」、「工廠 (Factory)」或「工廠方法 (Factory Method)」模式。我將展示的範例是最接近「工廠方法」模式的。
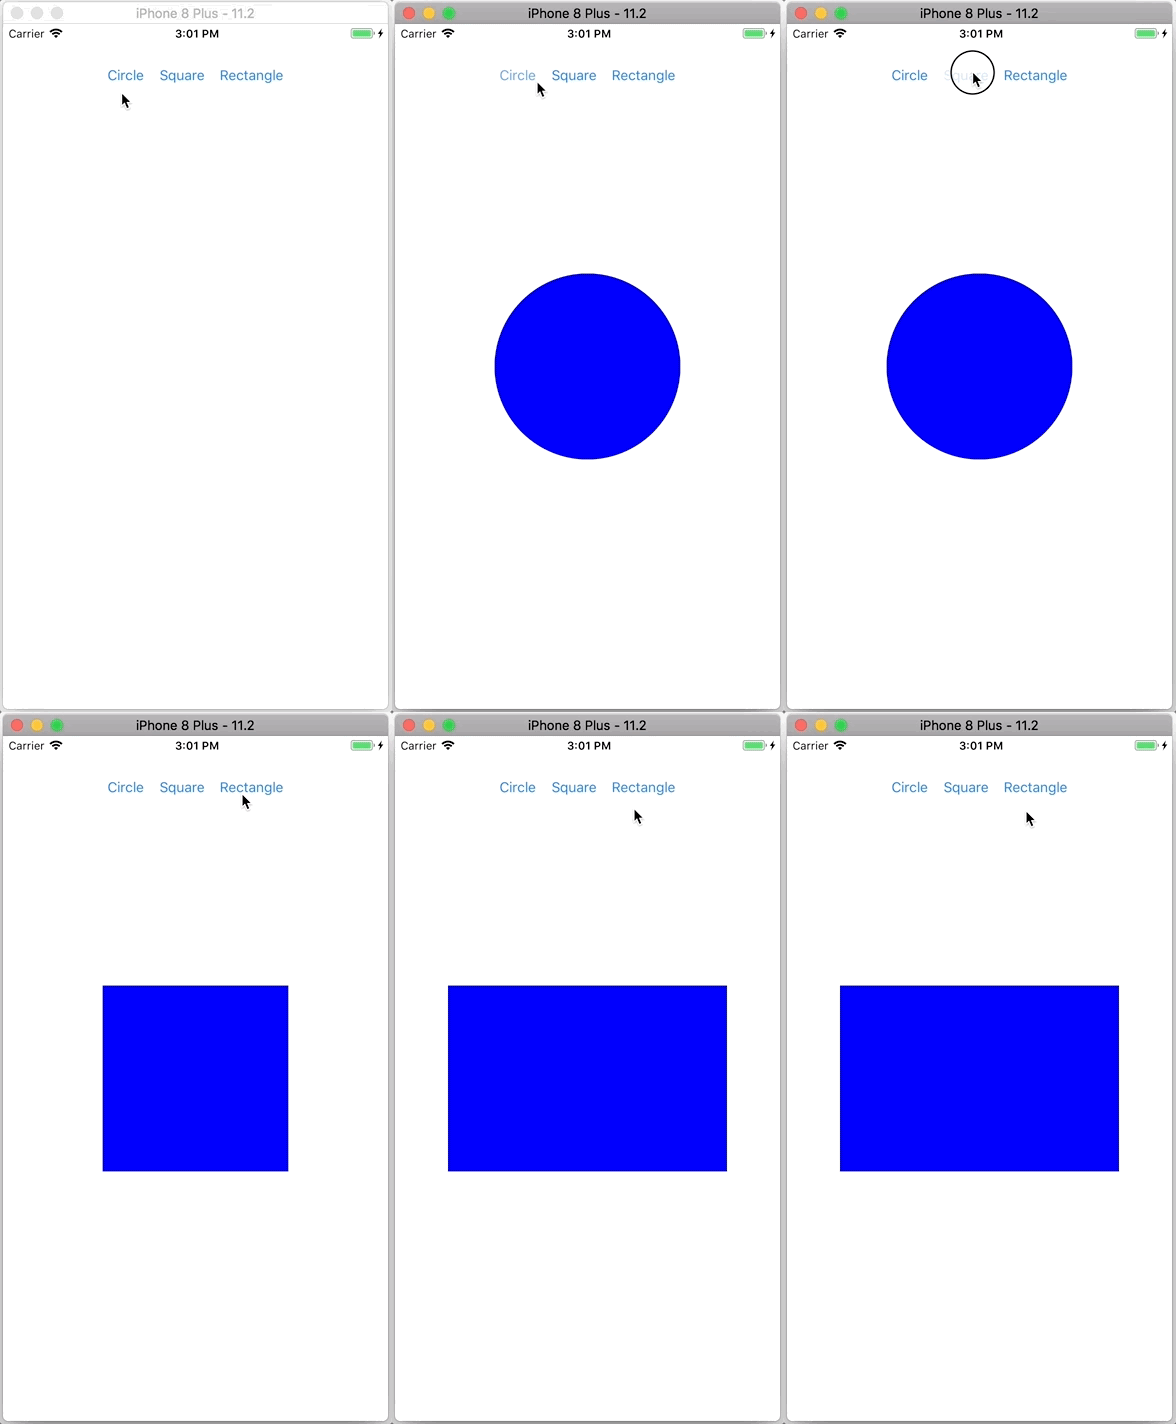
在這個範例中,你可以建立非常有用的物件,而不需直接呼叫類別建構函式,亦不需了解任何由工廠方法實例化的類別或是類別階層結構。你會非常驚訝,原來只需要少量程式碼,就可以達到所要的功能及 UI(如適用)。我在 GitHub 上提供的工廠方法範例專案,就展示了團隊的 UI 開發者如何能夠輕鬆使用一般類別階層的物件:

大部分成功的 App 都有個一致的外觀,貫徹一個佈景主題,讓使用者用起來覺得愉快,而且主題亦與 App 及/或開發者有關。假設在我們假想 App 裡,所有形狀的顏色和大小都相同,以便與 App 的佈景主題保值一致 ── 這就是品牌。這些形狀能夠透過 App 來成為客製化按鈕,或是介紹流程中背景圖像的一部分。
假設設計團隊已經同意將 App 的佈景主題程式碼用於 App 背景圖像,我們將一起看看我的程式碼,從協定開始,到類別階層結構,然後是我們假想的 UI 開發者不必擔心的工廠方法。
看一下 ShapeFactory.swift 檔案。這個協定就是負責為早已存在的 ViewController 繪製形狀。因為它可能有多種用途,所以它的訪問權限是 Public:
// these values have been pre-selected by
// the graphics and design teams
let defaultHeight = 200
let defaultColor = UIColor.blue

protocol HelperViewFactoryProtocol {

    func configure()
    func position()
    func display()
    var height: Int { get }
    var view: UIView { get }
    var parentView: UIView { get }

}
記住 UIView 類別預設有一個矩形的 frame,所以它可以讓我簡單地製作 Square 基底形狀類別:
fileprivate class Square: HelperViewFactoryProtocol {

    let height: Int
    let parentView: UIView
    var view: UIView

    init(height: Int = defaultHeight, parentView: UIView) {

        self.height = height
        self.parentView = parentView
        view = UIView()

    }

    func configure() {

        let frame = CGRect(x: 0, y: 0, width: height, height: height)
        view.frame = frame
        view.backgroundColor = defaultColor

    }

    func position() {

        view.center = parentView.center

    }

    func display() {

        configure()
        position()
        parentView.addSubview(view)

    }

} // end class Square
請注意,我利用 OOP 的特性來重用程式碼,讓形狀階層結構簡化而可維護。類別 Circle 及 Rectangle 是 Square 的特化(請記住由一個完美的方形畫出一個圓形是非常容易的):
fileprivate class Circle : Square {

    override func configure() {

        super.configure()

        view.layer.cornerRadius = view.frame.width / 2
        view.layer.masksToBounds = true

    }

} // end class Circle

fileprivate class Rectangle : Square {

    override func configure() {

        let frame = CGRect(x: 0, y: 0, width: height + height/2, height: height)
        view.frame = frame
        view.backgroundColor = UIColor.blue

    }

} // end class Rectangle
我用了 fileprivate 來加強工廠方法模式的一個目的:隱藏複雜性。你應該也看到,我們無須改變下面的工廠方法,也可以輕易調整或是被延伸形狀類別階層架構。以下是工廠方法的程式碼,可以讓物件建立變得抽象及簡單:
enum Shapes {

    case square
    case circle
    case rectangle

}

class ShapeFactory {

    let parentView: UIView

    init(parentView: UIView) {

        self.parentView = parentView

    }

    func create(as shape: Shapes) -> HelperViewFactoryProtocol {

        switch shape {

        case .square:

            let square = Square(parentView: parentView)
            return square

        case .circle:

            let circle = Circle(parentView: parentView)
            return circle

        case .rectangle:

            let rectangle = Rectangle(parentView: parentView)
            return rectangle

        }

    } // end func display

} // end class ShapeFactory

// Public factory method to display shapes.
func createShape(_ shape: Shapes, on view: UIView) {

    let shapeFactory = ShapeFactory(parentView: view)
    shapeFactory.create(as: shape).display()

}

// Alternative public factory method to display shapes.
// Technically, the factory method should return one of
// a number of related classes.
func getShape(_ shape: Shapes, on view: UIView) -> HelperViewFactoryProtocol {

    let shapeFactory = ShapeFactory(parentView: view)
    return shapeFactory.create(as: shape)

}
請注意,我已經寫了一個工廠類別和兩個工廠方法,來讓你消化一下這個設計模式。技術上來說,工廠方法應該回傳眾多相關類別中的其中一個,而這些類別都具有公開的基底類別及/或公開的協定。因為這裡的目的是要在視圖中繪製一個形狀,所以我較喜歡 createShape(_:view:) 方法。有時提供替代方案是個好主意,可以用來實驗及探索新的可能性。
最後,我讓你看一下如何用兩個工廠方法來繪製形狀。UI 開發者不必知道任何有關形狀類別如何被編碼,更不用了解形狀類別是如何被初始化。在 ViewController.swift 檔案裡的程式碼是相當簡易好讀的:
import UIKit

class ViewController: UIViewController {

    override func viewDidLoad() {
        super.viewDidLoad()
        // Do any additional setup after loading the view, typically from a nib.

    }

    override func didReceiveMemoryWarning() {
        super.didReceiveMemoryWarning()
        // Dispose of any resources that can be recreated.
    }

    @IBAction func drawCircle(_ sender: Any) {

        // just draw the shape
        createShape(.circle, on: view)

    }

    @IBAction func drawSquare(_ sender: Any) {

        // just draw the shape
        createShape(.square, on: view)

    }

    @IBAction func drawRectangle(_ sender: Any) {

        // actually get an object from the factory
        // and use it to draw the shape
        let rectangle = getShape(.rectangle, on: view)
        rectangle.display()

    }

} // end class ViewController
單例設計模式 (The singleton design pattern)
大部分的 iOS 開發者都對單例模式十分熟悉。這些你如果想要發送通知、在 Safari 開啟 URL、或是操作 iOS 檔案時,就必須使用 UNUserNotificationCenter.current()、 UIApplication.shared 或 FileManager.default 這些單例。單例的好處在於可以保護共享資源、提供存取予只有一個物件實例的系統、支援執行 App 範圍內協作型別的物件、並能夠提供一個內建於 iOS 單例的增值 Wrapper,這一點我們將會加以詳述。
為了實作一個單例,我們要確認這個類別:
- 宣告並初始化一個自己的靜態常數屬性,並命名為
shared來傳達類別的實例是一個單例(預設為 Public); -
宣告一個我們想要控制/保護、同時也由
shared分享的 private 屬性; -
宣告一個 private 初始器,讓我們的單例可以自我初始化,而在這個
init裡,我們初始化了想要控制並共享的資源。
藉由建立一個類別的 private 初始器、並定義 shared 靜態常數,我們確保了只會有一個類別的實例,而且這個類別只能自我初始化一次,同時類別的 shared 實例可以在整個 App 中被存取。就這樣,我們成功建立了一個單例!
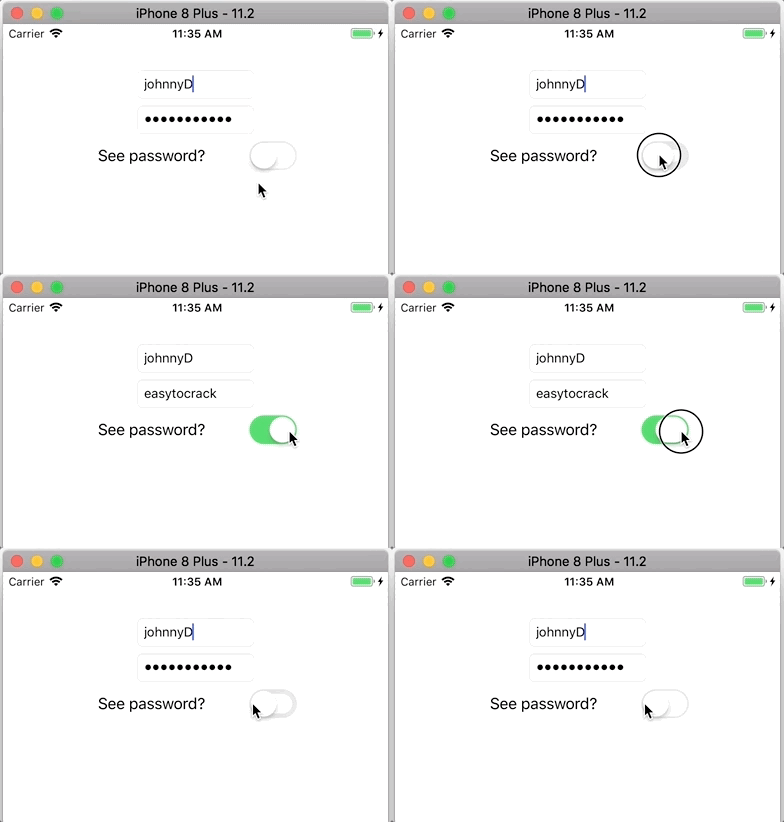
我在 GitHub 上的單例範例專案,展示了開發團隊如何安全並持續地儲存使用者偏好,而錯誤亦較少。以下是我的範例 App,記住了使用者密碼為未加密文字或加密字樣的偏好。雖然這不是個最好的例子,但我需要一個範例來展示程式碼的運作。這段程式碼只為教學目的,我建議你絕對不要讓密碼暴露出來。下面是使用者如何能夠設定自己的密碼偏好,然後將偏好儲存於 UserDefaults:

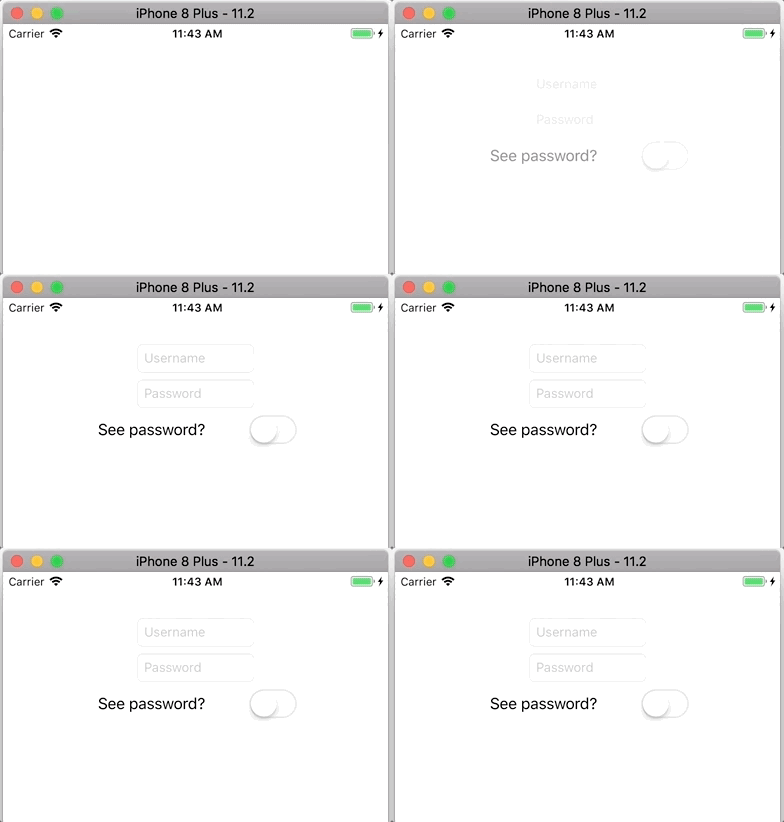
When the user closes and eventually comes back to the app, note that her/his password preference is remembered:
當使用者關閉 App 然後再次回到 App 時,你會看到使用者的密碼偏好被記住了:

讓我們看看 PreferencesSingleton.swift 檔案裡的一段程式碼節錄,裡面有些註解,看完你就會清楚了解我在說甚麼了:
class UserPreferences {

    // Create a static, constant instance of
    // the enclosing class (itself) and initialize.
    static let shared = UserPreferences()

    // This is the private, shared resource we're protecting.
    private let userPreferences: UserDefaults

    // A private initializer can only be called by
    // this class itself.
    private init() {

        // Get the iOS shared singleton. We're
        // wrapping it here.
        userPreferences = UserDefaults.standard

    }

} // end class UserPreferences
就我對 Swift 的了解,我們不需要擔心 App 啟動時靜態屬性及全域變數的初始器會延遲運行。
你可能會問「為什麼我們要為另一個單例 UserDefaults 建立一個單例 Wrapper?」。首先,我這裡主要的目的是向你展示在 Swift 中建立及使用單例的最佳實作範例,然後使用者偏好應該是只有單一進入點的資源類型。所以 UserDefaults 是一個非常明顯的教學例子。但,想一想你在 App 的程式庫看到UserDefaults 被使用了(濫用)多少次。
我看過 App 裡的 UserDefaults(或「以前」的 NSUserDefaults)沒來由的遍佈整個專案程式碼,在使用者偏好裡每個單一對應的鍵都是人手拼出來的,後來我在程式碼中發現了一個 Bug,就是我把 “switch” 拼成 “swithc”,然後我一直對這個錯誤複製貼上,結果在發現問題前已經留下了很多 “swithc” 實例。如果其他團隊成員啟動 App 或是繼續使用 “switch” 為儲存相關資料的鍵,會發生甚麼事?App 原本應該只有一個狀態被保存起來,但這樣的情況最終可能會有兩個或更多的狀態被保存。UserDefaults 使用字串為我們希望維護的部分 App 狀態的數值關鍵,這完全沒有問題,因為最好使用有意義、容易識別、且容易記住的單詞,來描述數值。但是字串也不是沒有風險的。
你們大部分可能讀過關於被稱為「泛字串型別 (Stringly-Typed)」的程式碼,就像我剛才關於 “swithc” 與 “switch” 的討論。雖然字串是非常有描述性的,但是使用字串作為整個程式庫的唯一識別,可能只因為拼寫錯誤,而導致細微但災難性的錯誤。Swift 編譯器無法讓我們避免產生泛字串型別錯誤。
使用 enum 形式的字串常數,就可以解決泛字串型別錯誤。它不但可以標準化我們的字串使用,也可以將字串組織成不同類別。再看一次 PreferencesSingleton.swift:
...
class UserPreferences {

    enum Preferences {

        enum UserCredentials: String {
            case passwordVisibile
            case password
            case username
        }

        enum AppState: String {
            case appFirstRun
            case dateLastRun
            case currentVersion
        }

    } // end enum Preferences
...
雖然我開始徘徊於單例設計模式的的定義裡,但我還是想簡單展示並解釋在大部分 App 的 UserDefaults 使用單例 Wrapper 的原因。有很多增值功能可以讓 UserDefaults 單例 Wrapper 變得更方便,同時增加程式碼的可靠性,例如是取得及設定偏好時立即提供錯誤判斷。而另一個我想添加的功能,就是為常用使用者偏好提供方便的方法,像是如何處理密碼。你在閱讀下面的程式碼時,就會看到剛剛提過的部份。以下是我PreferencesSingleton.swift 檔案裡的程式碼:
import Foundation

class UserPreferences {

    enum Preferences {

        enum UserCredentials: String {
            case passwordVisibile
            case password
            case username
        }

        enum AppState: String {
            case appFirstRun
            case dateLastRun
            case currentVersion
        }

    } // end enum Preferences

    // Create a static, constant instance of
    // the enclosing class (itself) and initialize.
    static let shared = UserPreferences()

    // This is the private, shared resource we're protecting.
    private let userPreferences: UserDefaults

    // A private initializer can only be called by
    // this class itself.
    private init() {

        // Get the iOS shared singleton. We're
        // wrapping it here.
        userPreferences = UserDefaults.standard

    }

    func setBooleanForKey(_ boolean:Bool, key:String) {

        if key != "" {
            userPreferences.set(boolean, forKey: key)
        }

    }

    func getBooleanForKey(_ key:String) -> Bool {

        if let isBooleanValue = userPreferences.value(forKey: key) as! Bool? {
            print("Key \(key) is \(isBooleanValue)")
            return true
        }
        else {
            print("Key \(key) is false")
            return false
        }

    }

    func isPasswordVisible() -> Bool {

        let isVisible = userPreferences.bool(forKey: Preferences.UserCredentials.passwordVisibile.rawValue)

        if isVisible {
            return true
        }
        else {
            return false
        }

    }

    func setPasswordVisibity(_ visible: Bool) {

        userPreferences.set(visible, forKey: Preferences.UserCredentials.passwordVisibile.rawValue)

    }

} // end class UserPreferences
看看我的 ViewController.swift 檔案,就會發現存取及使用架構良好的單例是多麼簡單:
import UIKit

class ViewController: UIViewController {

    @IBOutlet weak var passwordTextField: UITextField!
    @IBOutlet weak var passwordVisibleSwitch: UISwitch!

    override func viewDidLoad() {
        super.viewDidLoad()
        // Do any additional setup after loading the view, typically from a nib.

        if UserPreferences.shared.isPasswordVisible() {
            passwordVisibleSwitch.isOn = true
            passwordTextField.isSecureTextEntry = false
        }
        else {
            passwordVisibleSwitch.isOn = false
            passwordTextField.isSecureTextEntry = true
        }

    } // end func viewDidLoad

    override func didReceiveMemoryWarning() {
        super.didReceiveMemoryWarning()
        // Dispose of any resources that can be recreated.
    }

    @IBAction func passwordVisibleSwitched(_ sender: Any) {

        let pwdSwitch:UISwitch = sender as! UISwitch

        if pwdSwitch.isOn {
            passwordTextField.isSecureTextEntry = false
            UserPreferences.shared.setPasswordVisibity(true)
        }
        else {
            passwordTextField.isSecureTextEntry = true
            UserPreferences.shared.setPasswordVisibity(false)
        }

    } // end func passwordVisibleSwitched

} // end class ViewController
總結
一些評論說使用設計模式就證明了程式語言的不足之處,而且經常在程式碼看到模式出現不太好;我並不同意這看法。期待程式語言擁有所有功能是不切實際的,而且可能會導致本來已經很巨大的程式語言如 C++ 變得更巨大、更複雜,以致難以學習、使用和維護。了解並解決經常發生的問題是一個積極的特質,值得積極鼓勵。設計模式是人類從歷史中學到的成功範例。針對常見問題來寫出摘要並提出標準解決方法,讓這些解決方法可以被移植及分散出去。
像 Swift 這般的簡潔程式語言與最佳實踐範例(像是設計模式)結合,是一個理想而有趣的媒介。一致的程式碼通常都是可讀且可維護的。還要記住,隨著數百萬開發者不斷討論及分享想法,設計模式仍不斷發展。藉由網際網路連結在一起,這種開發者的討論就形成了不斷自我調整的集體智慧。
原文:Design Patterns in Swift #1: Factory Method and Singleton


