

歡迎來到拖放 (Drag and Drop) 操作系列教程的第一部分。在這篇教學中,你將會學習到如何將拖放功能實作到 UIViewController。而下一部教學中,就會學習如何使用帶有 UITableViewControllers 和 UICollectionViewControllers 的拖放 API。
iOS 11 推出時最令人期待的,就是公佈了幾個新拖放 API。如果你不太了解拖放功能,讓我來解釋一下吧。拖放功能是一種方式,讓你將數據從一個 App 移動或複製到另一個 App、或是在同一個 App 中進行移動或複製。
要將拖放操作實作到 App 中可以有很多範例,亦有許多 API 讓你針對不同場景進行實作,而且實作起來非常簡單。 我將教你如何在 App 中實作拖放,特別是關於 UIViewController 的拖放。讓我們開始吧!
拖放功能介紹
如前文所述,拖放是一種圖形化方法,在兩個 App 之間移動或複製數據,你先要認識下列術語:
當從一個 App 拖動項目到另一個 App 時,Source App 和 Destination App 將像平常一樣繼續運作。也就是說,這兩個動作是同步的,你可以用另一隻手指繼續操作 App 或開始新的 Drag Activity。
另外,你不需要將這些 API 整合到 UITextViews 和 UITextField 中,因為它們會自動支援拖放操作,你可以配置 UICollectionViews、UITableViews、或幾乎任何視圖 (View) 去支援拖放操作。
本篇教程中,我們會重點介紹如何將拖放添加到 UIViewControllers 中,讓我們開始進入實作內容吧!
如何實現置放操作
首先,請在此處下載初始專案。如你所見,我們有一個簡單的 ViewController 和兩張已經連結到程式碼的 UIImageViews,這兩張是讓你置放 (drop) 的圖像視圖。現在我們要做的就是開始編寫程式碼!
來從整合置放 API 開始吧!我們只須幾個簡短步驟就可以實作這些 API,第一步是將 UIDropInteractionDelegate 添加到 ViewController,將這個類別更改為下列所示:
class ViewController: UIViewController, UIDropInteractionDelegate {

    @IBOutlet weak var firstImageView: UIImageView!
    @IBOutlet weak var secondImageView: UIImageView!

    override func viewDidLoad() {
        super.viewDidLoad()
        // Do any additional setup after loading the view, typically from a nib.
    }
    override func didReceiveMemoryWarning() {
        super.didReceiveMemoryWarning()
        // Dispose of any resources that can be recreated.
    }
}
接下來,在視圖中添加 Interaction Recognizer,這可以在 viewDidLoad 方法中實作,請在 super.viewDidLoad() 後面輸入下列程式碼:
view.addInteraction(UIDropInteraction(delegate: self))
現在,為了讓類別符合 UIDropInteractionDelegate,我們必須實現三個方法,讓我逐一解釋。
func dropInteraction(_ interaction: UIDropInteraction, performDrop session: UIDropSession)
此方法告訴 Delegate 可以從 Session 的置放項目中,請求項目提供者的數據。func dropInteraction(_ interaction: UIDropInteraction, sessionDidUpdate session: UIDropSession) -> UIDropProposal
此方法告訴 Delegate 置放 Session 已更改。在我們的範例中,如果 Session 已被更新,我們就希望複製這些項目。-
func dropInteraction(_ interaction: UIDropInteraction, canHandle session: UIDropSession) -> Bool
該方法檢查視圖是否可以處理 Session 的拖動項目。在現在這個情境,我們希望 View 接受圖片為拖動項目。
我們先來實現第二個和第三個方法:
func dropInteraction(_ interaction: UIDropInteraction, sessionDidUpdate session: UIDropSession) -> UIDropProposal {
    return UIDropProposal(operation: .copy)
}

func dropInteraction(_ interaction: UIDropInteraction, canHandle session: UIDropSession) -> Bool {
    return session.canLoadObjects(ofClass: UIImage.self)
}
在 dropInteraction(_:sessionDidUpdate:) 方法中,我們回傳一個 UIDropProposal 物件,並指明這是一個複製操作,如果視圖的 Drop Interaction Delegate 接受置放項目,你就必須回傳 UIDropProposal 物件。針對 dropInteraction(_:canHandle:) 方法,實作的回傳值展示了置放有否被接受。在上面的程式碼中,我們只接受包含 Image 的 Drop Activity。
我們差不多完成了,現在要添加允許 App 執行置放操作的程式碼到視圖上。請複製並貼上以下代碼:
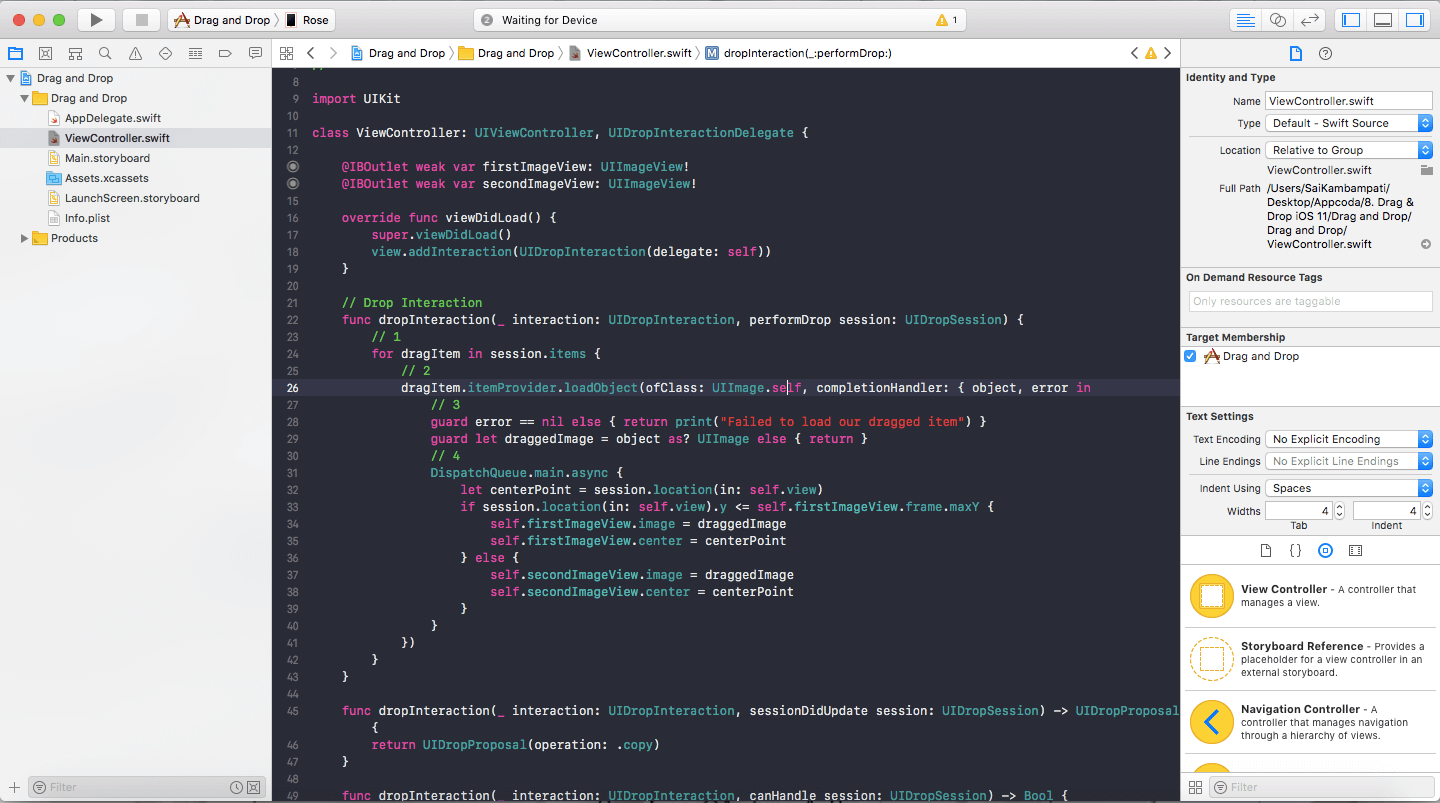
func dropInteraction(_ interaction: UIDropInteraction, performDrop session: UIDropSession) {
    // 1
    for dragItem in session.items {
        // 2
        dragItem.itemProvider.loadObject(ofClass: UIImage.self, completionHandler: { object, error in
            // 3
            guard error == nil else { return print("Failed to load our dragged item") }
            guard let draggedImage = object as? UIImage else { return }
            // 4
            DispatchQueue.main.async {
                let centerPoint = session.location(in: self.view)
                //5
                if session.location(in: self.view).y <= self.firstImageView.frame.maxY {
                    self.firstImageView.image = draggedImage
                    self.firstImageView.center = centerPoint
                } else {
                    self.secondImageView.image = draggedImage
                    self.secondImageView.center = centerPoint
                }
            }
        })
    }
}
- 有時候當我們將 Image 拖到 Board 時,可能會拖動多於一個 Image。這樣會回傳一個
session.items陣列,所以我們為每個dragItem運行以下程式碼。 - 我們將
UIImage物件加載到dragItems中。 - 如果發生錯誤,我們使用
guard語法來處理。如果錯誤存在 (例如該項目不符合UIImage類別),那麼我們會展示一條錯誤訊息。 - 如果沒有錯誤,我們將
imageView的 Image 設置為draggedImage。 - 確認手指放置的位置,以查看是否將 Image 設置為第一個
imageView或第二個imageView。請注意,我們手指的位置正正在 Image 的中心。
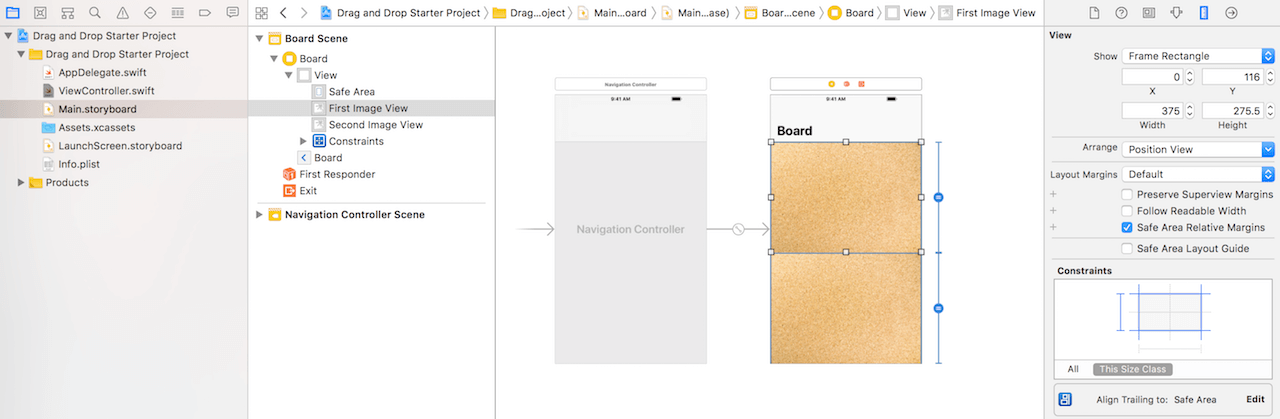
完成了!讓我們運行這個 App,看看它的操作!但是,首先確認你的程式碼如下圖所示:
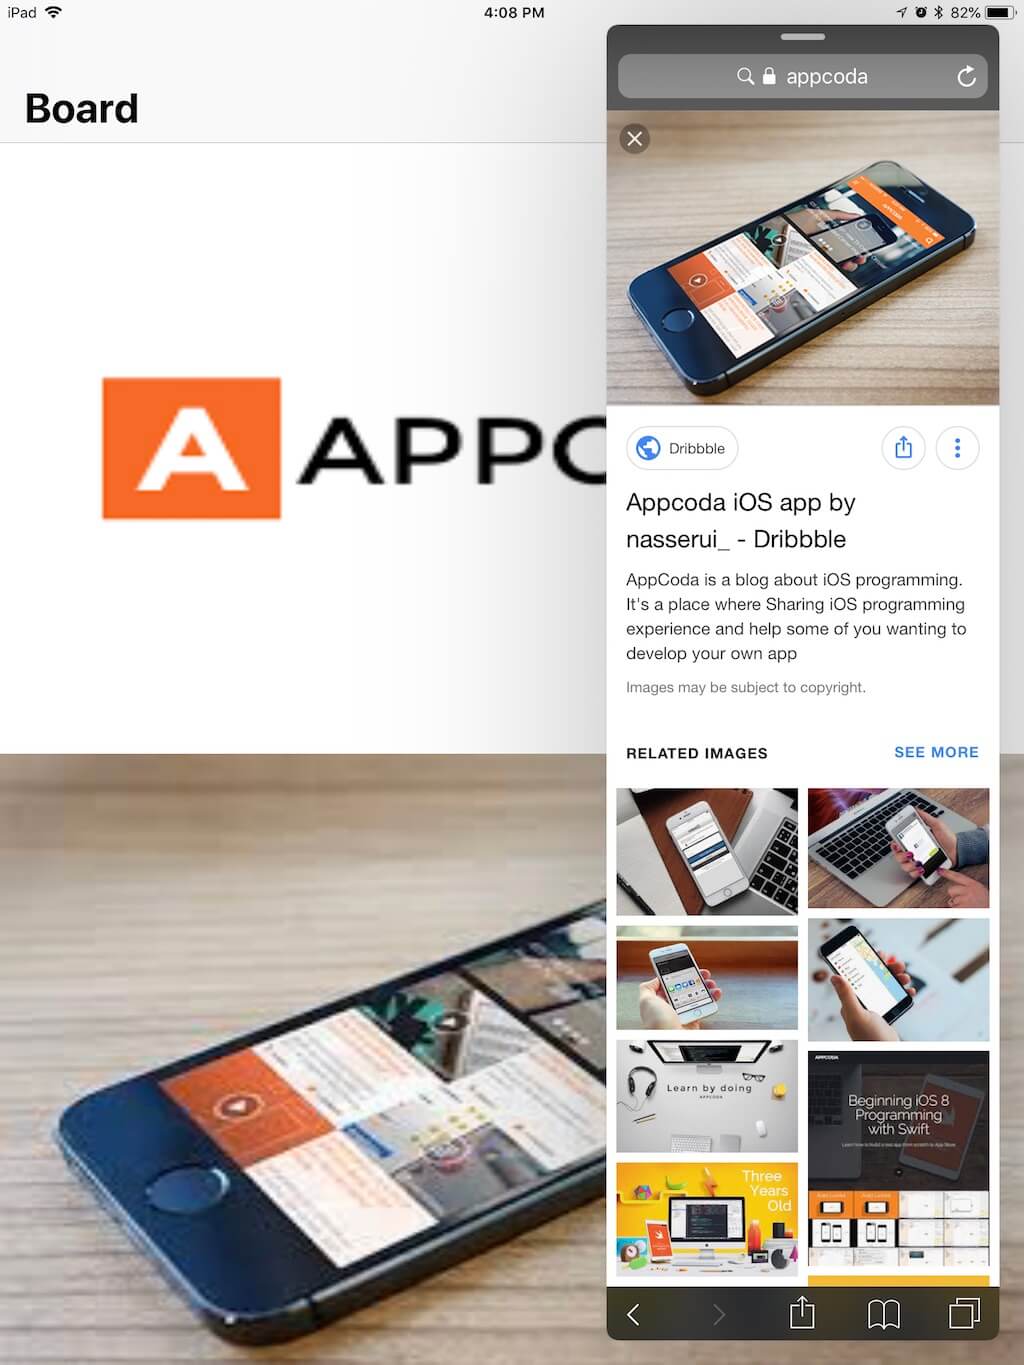
目前只有 iPad 能支援在不同 App 之間的拖放共享,因此,如果你想從 Safari 或 Photos 拖動 Image 並置放到視圖上,則需要在 iPad 上運行範例 App。iPhone 只支援 App 內部的拖放。在模擬器上,可能需要一些時間才能將 Image 複製到 Board 上。
如果正確遵循我的步驟,你的 App 應該如預期般運行!但是如果你犯了個錯誤,又想將第一個 Image View 中的 Image 拖到第二個呢?那很簡單!現在,我們來實作拖動 API。
拖動一個物件
現在,這個在 Board 面的 Image 是錯誤的,我們想要刪除它,那麼我們就需要把 Image 拖到另一個位置。為了實現這一點,我們需要實作拖動 API,來看看怎樣做吧!
首先,我們要添加 UIDragInteractionDelegate。只要把 UIDragInteractionDelegate 添加到類別中的協定列表裡即可:
class ViewController: UIViewController, UIDropInteractionDelegate, UIDragInteractionDelegate
現在你可能會看到一個 Error,因為我們還沒在程式碼中實現所需的 Protocol Stubs。與 UIDropInteractionDelegate 不同,我們不需要 3 種方法來遵守協定,在這裡我們只需要實現一個方法。請在程式碼最後加上這段函數:
func dragInteraction(_ interaction: UIDragInteraction, itemsForBeginning session: UIDragSession) -> [UIDragItem] {
}
基本上,這個方法是用來檢測被拖動物件的類型,並決定如何處理它。
在實作這個方法之前,我們需要稍微修改 viewDidLoad 程式碼。由於我們將觸控這個 Image View,因此需要為這兩個 Image Views 啟用 userInteraction 屬性。如此修改 viewDidLoad 方法:
override func viewDidLoad() {
    super.viewDidLoad()
    view.addInteraction(UIDropInteraction(delegate: self))
    view.addInteraction(UIDragInteraction(delegate: self))
    firstImageView.isUserInteractionEnabled = true
    secondImageView.isUserInteractionEnabled = true
}
現在請將 dragInteraction(:_) 函式修改為下列所示:
func dragInteraction(_ interaction: UIDragInteraction, itemsForBeginning session: UIDragSession) -> [UIDragItem] {
        if session.location(in: self.view).y <= self.firstImageView.frame.maxY {
            guard let image = firstImageView.image else { return [] }
            let provider = NSItemProvider(object: image)
            let item = UIDragItem(itemProvider: provider)
            return [item]
        } else {
            guard let image = secondImageView.image else { return [] }
            let provider = NSItemProvider(object: image)
            let item = UIDragItem(itemProvider: provider)
            return [item]
        }
}
完成了!運行你的程式碼,並試試是否可以從 Photos 相冊或網絡中拖放圖片。將圖片從第一個 Image View 複製到第二個 Image View,成功了!看看下面的結果吧!

總結
如你所見,將拖放操作添加到 App 是非常簡單的,這能讓你的 App 啟用一組全新而強大的 API。在本教程中,你學習到如何拖放 Image,但其實這也可應用於文本中!更重要的是,在不同的視圖控制器如 UITableViews 和 UICollectionViews 中進行拖放,真的可以為用戶提供無差別體驗 (Seamless Experience)。
要下載完整專案,可以在此處從 Github Repository 下載。
想要了解更多關於拖放功能的資訊,建議讀者可以去看看 WWDC 2017 的相關影片!
- Introducing Drag and Drop
- Mastering Drag and Drop
- Drag and Drop with Collection and Table View
- Data Delivery with Drag and Drop
最後,這邊提供有關拖放功能的蘋果官方文件,以供參考。
歡迎分享你對本教程的看法,並告訴我你會否希望閱讀拖放功能系列的文章!
FB : https://www.facebook.com/yishen.chen.54
Twitter : https://twitter.com/YeEeEsS