電腦科學中存在著許多問題,而其中,使用優先權佇列 (Priority Queue) 作為底層資料結構,就可以大幅改善演算法 (algorithm) 的時間複雜度。其中一個例子就是 Dijkstra 的最短路徑演算法,該演算法就使用優先權佇列在圖形中搜尋兩個頂點之間的最短路徑。
但不幸的是,Swift 標準函式庫並沒有包含優先權佇列的實作,因此我們將深入了解如何自己實現基於堆積 (heap) 的優先權佇列吧!
為了讓你可以跟著教學操作,你可以從 Github 下載原始程式碼!
甚麼是優先權佇列 (Priority Queue) ?
優先權佇列是一種資料結構,讓物件可以有效率地透過相對優先權來排序,你可以把一堆物件丟到佇列之中,然後佇列會依照物件的重要性一個個排好。
假設你為電腦創建了一堆任務,準備在將來某個特定的時間點執行。如果你將這些任務加到一個優先權佇列之中,你的電腦就會依照優先順序將任務從佇列中取出,以在截止時間前執行。
為了實現我們自己的佇列,我們將會使用堆積的結構!
甚麼是堆積 (Heap) ?
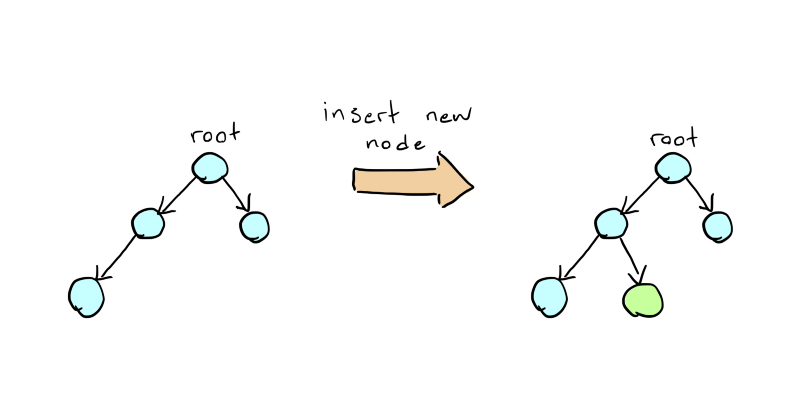
堆積的結構就像是一棵樹,而每個節點 (node) 最多只能擁有兩個子節點。而且堆積有個限制,就是新的節點必須加到結構頂層,並且盡可能在最左邊的位置,可以看看下方的示意圖:

同時,堆積也根據每個節點的大小來維持相對的屬性,最小堆積(Min heap,我們將會用到的那種堆積)會維持每個節點都會小於兩個子節點的相對關係,而最大堆積 (Max heap) 則相反。
為了維持這種特性,我們需要執行一些操作來獲得節點的正確順序。當我們插入一個新節點,我們會將它放到結構頂層從左邊數來第一個空的位置。如果加入新節點之後,違反了最小堆積的特性,我們就會開始將節點與其父節點交換,直到重新符合最小堆積的特性,下圖就展示了將數字 2 插入一個已有的最小堆積會是甚麼情況:

當從佇列中取出(或稱為移除)一個物件時,我們會限制自己只可從佇列的某一端來做這個動作。我們會以一種只能刪除根元素的方式來實現這一點,刪除該元素後,它將被我們樹頂層最右邊的元素取代。由於新元素幾乎肯定會因為太大而無法保留在根中,我們會將它向下移動,與最小的子元素交換,直到我們恢復最小堆積的特性。
關於實作的細節
我們將會使用陣列 (array),以快速又節省空間地實現樹結構。我將不會在這裡探討太多關於數學的細節,若你有興趣的話,可以參考維基百科的說明,網頁詳細解釋了實作的流程和機制。
準備好了嗎?那我們就開始吧!
設計協定 (Protocol)
一如以往,我們需要先定義物件該向外部使用者展現甚麼樣的功能,要達到這個目的,我們要宣告類別之後會遵循的一個協定。對於我們的佇列,我會宣告下列的 Queue 協定:
protocol Queue {
    associatedtype DataType: Comparable


    /// Inserts a new item into the queue.
    /// - parameter item: The item to add.
    /// - returns: Whether or not the insert was successful.

    @discardableResult func add(_ item: DataType) -> Bool


    /// Removes the first item in line.
    /// - returns: The removed item.
    /// - throws: An error of type QueueError.

    @discardableResult func remove() throws -> DataType


    /// Gets the first item in line and removes it from the queue.
    /// - returns: An Optional containing the first item in the queue.

    func dequeue() -> DataType?


    /// Gets the first item in line, without removing it from the queue.
    /// - returns: An Optional containing the first item in the queue.

    func peek() -> DataType?


    /// Clears the queue.

    func clear() -> Void
}
這個協定明確的指出我們將要實現的佇列中,外部使用者所預期會有甚麼功能。協定同時也顯示了其中一個方法會拋出錯誤,並且有標註出這個錯誤是屬於 QueueError 型別,所以我們也需要實現它!
enum QueueError: Error {
  case noSuchItem(String)
}
這個錯誤的定義很簡潔,當使用者嘗試從空的佇列中移除一個項目時,我們就會拋出這個錯誤。
現在準備工作都完成了,讓我們回到佇列本身吧!
實作優先權佇列
我們首先要宣告 PriorityQueue 類別,並實作初始化器 (initializer)、後端儲存 (backing storage)、以及一些實用的方法。程式碼看起來會是這樣子的:
/// A PriorityQueue implementation based on a Heap data structure.

class PriorityQueue {

  /// The backing storage for our queue.

  private var queue: Array<DataType>


  /// The current size of the queue.

  public var size: Int {
    return self.queue.count
  }

  public init() {
    self.queue = Array<DataType>()
  }
}
你可能會注意到,在這裡我們還沒有將 Queue 協定加進來。通常在規劃程式碼的時候,我們會希望每個部份能夠保持獨立,保持綜觀的架構,以便瞭解所要找尋的部分在哪裡。當一個類別越來越大,其中一個解決方法就是透過擴展的方式來實現類別。如此一來,每個擴展都能夠專注在一個任務上(像是遵循一個協定、處理後端儲存與初始化、或是宣告巢狀類別 (nested class)),這樣你就能夠輕易找到想要的部份。讓我們現在就來試試吧!首先,實作一個私有的 Int 擴展,為我們執行一些預先定義好的索引值計算 (index calculation):
private extension Int {
  var leftChild: Int {
    return (2 * self) + 1
  }

  var rightChild: Int {
    return (2 * self) + 2
  }

  var parent: Int {
    return (self - 1) / 2
  }
}
由於前面加上了 private 存取控制關鍵字,這個擴展只能夠在我們的 PriorityQueue 檔案內部做使用。這個擴展主要的功能就是收集一些計算,以用於在特定節點獲取其子節點、父節點。這樣一來,我們就不必在實作中做一堆數學運算,而是可以透過呼叫 .leftChild 屬性來回傳左子節點的對應索引值,如此類推。
讓我們繼續加入遵循 Queue 協定的部分吧!這看起來會是這樣:
extension PriorityQueue: Queue {
    @discardableResult
    public func add(_ item: DataType) -> Bool {
        self.queue.append(item)
        self.heapifyUp(from: self.queue.count - 1)
        return true
    }

    @discardableResult
    public func remove() throws -> DataType {
        guard self.queue.count > 0 else {
            throw QueueError.noSuchItem("Attempt to remove item from an empty queue.")
        }
        return self.popAndHeapifyDown()
    }

    public func dequeue() -> DataType? {
        guard self.queue.count > 0 else {
            return nil
        }
        return self.popAndHeapifyDown()
    }

    public func peek() -> DataType? {
        return self.queue.first
    }

    public func clear() {
        self.queue.removeAll()
    }


    /// Pops the first item in the queue and restores the min heap order of the queue by moving the root item towards the end of the queue.
    /// returns: The first item in the queue.

    private func popAndHeapifyDown() -> DataType {
        let firstItem = self.queue[0]

        if self.queue.count == 1 {
            self.queue.remove(at: 0)
            return firstItem
        }

        self.queue[0] = self.queue.remove(at: self.queue.count - 1)

        self.heapifyDown()

        return firstItem


    }


    /// Restores the min heap order of the queue by moving an item towards the beginning of the queue.
    /// - parameter index: The index of the item to move.

    private func heapifyUp(from index: Int) {
        var child = index
        var parent = child.parent

        while parent >= 0 && self.queue[parent] > self.queue[child] {
            swap(parent, with: child)
            child = parent
            parent = child.parent
        }


    }

    /// Restores the min heap order of the queue by moving the root item towards the end of the queue.

    private func heapifyDown() {
        var parent = 0

        while true {
            let leftChild = parent.leftChild
            if leftChild >= self.queue.count {
                break
            }

            let rightChild = parent.rightChild
            var minChild = leftChild
            if rightChild < self.queue.count && self.queue[minChild] > self.queue[rightChild] {
                minChild = rightChild
            }

            if self.queue[parent] > self.queue[minChild] {
                self.swap(parent, with: minChild)
                parent = minChild
            } else {
                break
            }
        }


    }

    /// Swaps the items located at two different indices in our backing storage.
    /// - parameter firstIndex: The index of the first item to swap.
    /// - parameter secondIndex: The index of the second item to swap.

    private func swap(_ firstIndex: Int, with secondIndex: Int) {
        let firstItem = self.queue[firstIndex]
        self.queue[firstIndex] = self.queue[secondIndex]
        self.queue[secondIndex] = firstItem
    }
}
這個部份的程式碼比較多,所以你可能要多看幾次。最上面的,就是我們一開始定義的所有協定方法,而下方就是一些私有幫助方法,而它們只能在這個特定的類別中使用。我在註解中說明了每個方法,讓你閱讀時更了解它們的作用。另外,你也可以看看我們如何使用 Int 擴展,這是一個相當簡潔的功能。
總結
好了,以上這些就是 PriorityQueue 所需要的全部功能。我們可以額外再讓類別遵循 CustomStringConvertible 協定,這樣一來佇列就可以傳入 print 函式,並回傳一些可閱讀的資訊:
extension PriorityQueue: CustomStringConvertible {
  public var description: String {
    return self.queue.description
  }
}
完成了!這次的教學就到這裡,現在你已經瞭解如何實作基於堆積結構的優先權佇列!如果有任何問題或意見,歡迎在下面留言。
如果想看更多關於 iOS 開發的文章,可以看看我的其他文章:

