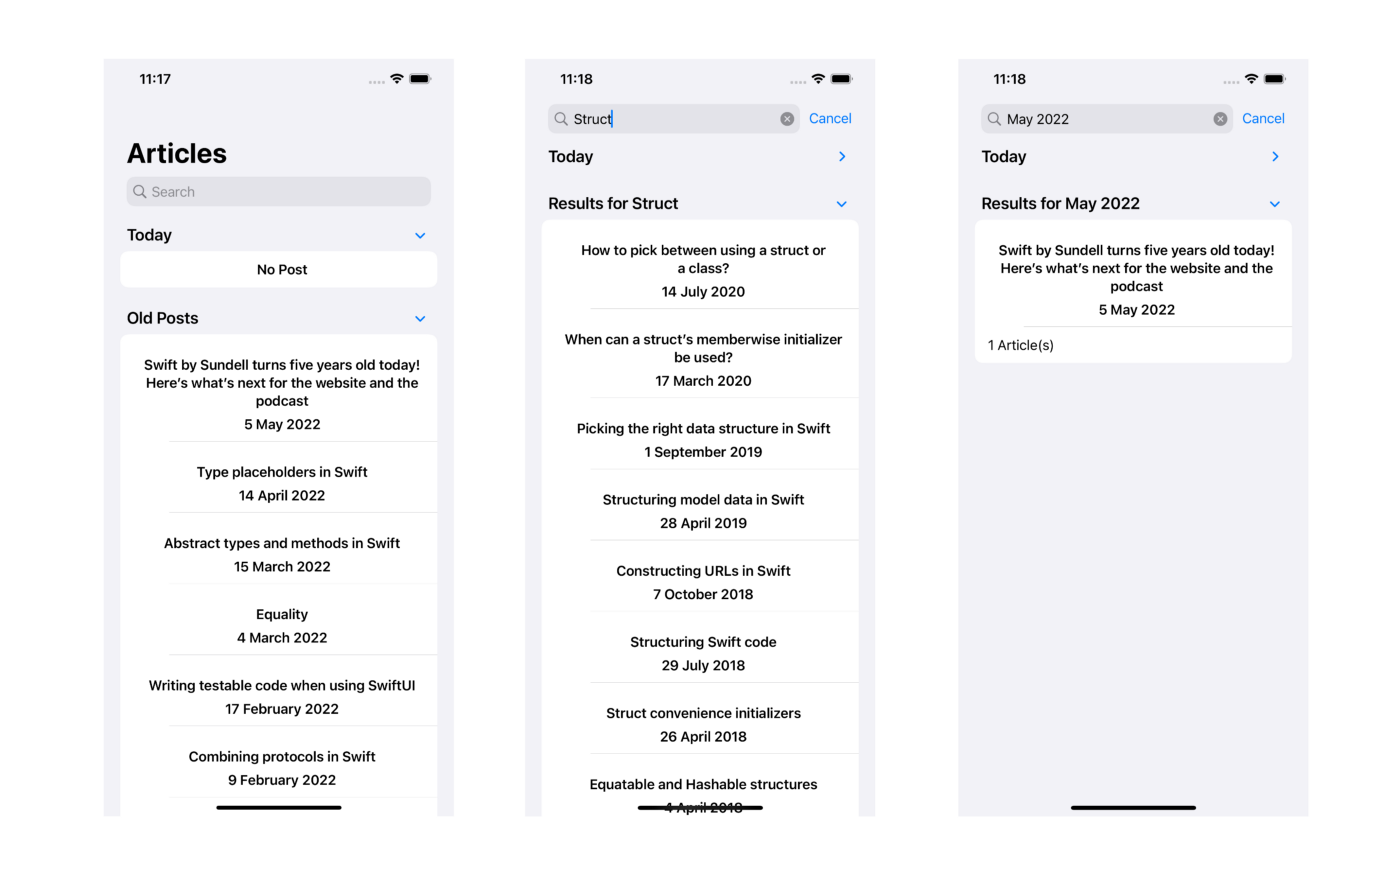
在我們這個世紀,API 的使用非常普遍。我們作為手機程式開發者,已經習慣對 JSON 資料進行編碼和解碼,來在伺服器運行我們的 App。遺憾的是,不是所有網站/Service 都提供 API。有時候,我們需要讀取網站資料才能獲得需要的內容,我們稱這個步驟為資料抓取 (Data Scraping)。這個步驟包括過濾 CSS 選擇器,以獲取頁面上的資料。那我們如何在 SwiftUI App 中獲取資料呢?
程式庫
為此,我們需要一個能夠正確解析和讀取 HTML body 的工具。在這篇文章的範例中,我會使用 SwiftSoup 這個 100% Swift 的程式庫。我們可以將其添加為 CocoaPods pod 或 Swift Package。
專案
在今天的範例中,我希望構建一個簡單的 Blog Reader app,來解析 swiftbysundell.com 上的文章。讓我們右擊查看這個網頁的程式碼,研究一下它的 HTML scheme 吧。
<html>
   <body>
      <ul class="item-list">
         <li>
            <article class="special">
               <h1><a href="/special/five-years" aria-label="Swift by Sundell turns five years old today! Here’s what’s next for the website and the podcast">Swift by Sundell turns five years old today! Here’s what’s next for the website and the podcast</a></h1>
               <div class="metadata date-only"><span class="date">Published on 05 May 2022</span></div>
               <a href="/special/five-years" aria-label="Swift by Sundell turns five years old today! Here’s what’s next for the website and the podcast">
                  <p>Celebrating the fifth birthday of this website, while also sharing some important announcements about its future.</p>
               </a>
            </article>
         </li>
         <li>
            <article class="article">
               <h1><a href="/articles/type-placeholders-in-swift" aria-label="Type placeholders in Swift">Type placeholders in Swift</a></h1>
               <div class="metadata">
                  <ul class="tags">
                     <li class="variant-c"><a href="/tags/language-features">language features</a></li>
                     <li class="variant-b"><a href="/tags/generics">generics</a></li>
                  </ul>
                  <span class="date">Published on 14 Apr 2022</span>
               </div>
               <a href="/articles/type-placeholders-in-swift" aria-label="Type placeholders in Swift">
                  <p>New in Swift 5.6: We can now use type placeholders to select what generic types that we want the compiler to infer. Let’s take a look at how those placeholders work, and what kinds of situations that they could be really useful in.</p>
               </a>
            </article>
         </li>
   </body>
</html>
在以上程式碼中,我們留意到所有文章都在 <ul class=”item-list> 中,而它們全都有 <article> 的 body。在每一篇文章中,我們都有一個 <H1> 為標題、一個在 <span class=”date”> 中的日期、和一個帶有 <a href=””> 的文章 URL。我們需要抓取這些資料來創建文章模型。
建立 App 的結構
首先,讓我們來建立一個簡單的結構,來保存我們的資料。我會把它定義為 identifiable 和 hashable,讓它可以與 SwiftUI 的 List 和 ForEach 視圖一起使用。
struct Article: Identifiable, Hashable{
    let id = UUID().uuidString
    var title: String
    var url : URL?
    var publishDate: Date
}
創建視圖
接著,讓我們來創建視圖。我們要建立一個可搜索 (searchable) 的列表,以在點擊 cell 時導航到 Safari 的文章頁面。
首先,讓我們創建一個結果陣列 (array),來按搜索詞保存我們的文章。搜索不僅會查找文章的標題,還會查找其日期。
之後,我們會創建一個 Section 結構來顯示頁首 (header) 和頁尾 (footer)。今天的文章和以前的文章結構是不一樣的。
接下來,我們會建立一個簡單的擷取 (fetch) 函式,來從 dataModel 擷取資料。
struct ArticleListView: View {

    @ObservedObject var data = DataService()
    @State private var searchText = ""
    let today = Calendar.current.startOfDay(for: .now)

    var body: some View {
        NavigationView {
            List{
                Section {
                    if todaysResults().count == 0{
                        HStack{
                            Spacer()
                            Text("No Post")
                                .bold()
                            Spacer()
                        }
                    } else {
                        ForEach(todaysResults()) { article in
                            ArticleCell(article: article, isDateToday: true)
                        }
                    }
                } header: {
                    Text("Today")
                } footer: {
                    if searchResults.filter({$0.publishDate.isInToday(date: today)}).count > 0{
                        Text("\(todaysResults().count) Article(s)")
                            .background(.clear)
                    }
                }

                Section {
                    if previousResults().count == 0{
                        Text("No Results")
                    } else {
                        ForEach(previousResults()) { article in
                            ArticleCell(article: article, isDateToday: false)
                        }
                    }
                } header: {
                    Text(oldPostsHeader)
                } footer: {
                    if previousResults().count == 0{

                    } else {
                        Text("\(previousResults().count) Article(s)")
                    }
                }
            }
            .searchable(text: $searchText, placement: .navigationBarDrawer(displayMode: .always))
            .refreshable {
                fetchData()
            }
            .disableAutocorrection(true)
            .onAppear(perform: fetchData)
            .navigationTitle(Text("Articles"))
        }
    }

    func todaysResults() -> [Article]{
        return searchResults.filter({ $0.publishDate.isInToday(date: today) })
    }

    func previousResults() -> [Article]{
        return searchResults.filter({ $0.publishDate.isOlderThanToday(date: today) })
    }

    var searchResults : [Article] {
        if searchText.isEmpty{
            return data.articleList
        } else {
            return data.articleList.filter({
                $0.title.lowercased().localizedStandardContains(searchText.lowercased())
                ||
                $0.publishDate.esDate().localizedStandardContains(searchText.lowercased())
            })
        }
    }

    var oldPostsHeader : String{
        if searchText.isEmpty{
            return "Old Posts"
        } else {
            return "Results for " + searchText
        }
    }

    func fetchData(){
        data.fetchArticles()
    }
}
ArticleCell 是一個簡單的子視圖,我們會在裡面顯示資料。
struct ArticleCell: View {

    var article: Article
    var isDateToday: Bool

    var body: some View {
        HStack {
            Spacer()
            VStack{
                Text(article.title)
                    .bold()
                    .padding(.top)
                    .minimumScaleFactor(0.5)
                    .multilineTextAlignment(.center)
                if !isDateToday{
                    Spacer()
                    Text(article.publishDate.esDate())
                        .bold()
                }
            }
            .onTapGesture {
                if let url = article.url{
                    UIApplication.shared.open(url)
                }


            }
            Spacer()
        }
    }
}
我們也會編寫一些 Date extension,讓我們可以過濾出今天的文章,並把日子轉換成我們想要的格式。
extension Date{
    func isInToday(date: Date) -> Bool{
        return self == date
    }

    func esDate() -> String{
        return self.formatted(.dateTime.day().month(.wide).year().locale(.init(identifier:"en_GB")))
    }

    func isOlderThanToday(date: Date) -> Bool {
        return self < date
    }
}
編寫 Data Service
接下來,我們需要實作 Data Service。我會建立一個 ObservableObject,當中有一個名為 articleList 的 Published 變數,和一個 baseURL。
我們會編寫一個 fetchArticles 函式,用來:
- 清空陣列,因為陣列現時被填滿了。
- 以字串 (string) 擷取整個網站。
- 搭配 Swiftsoup 來把字串解析為 HTML。
我們會用一個 do catch block 來達成第二和第三點,因為這些操作可能會回傳一個錯誤。
let articles = try document.getElementsByClass(“item-list”).select(“article”)之後,我們就會被引導到網站的文章陣列。當中的陣列會有一個 document.getElementsByClass call,因此我們就要分別為每個資料執行一個 for loop。
let title = try article.select(“a”).first()?.text(trimAndNormaliseWhitespace: true) ?? “”這樣我們就會選擇 tag,並獲取當中的文本。原有文本如果有空格的話,獲取的文本就會是沒有空格的。
let url = try baseURL.appendingPathComponent(article.select(“a”).attr(“href”))接著,我們就會取得需要的 URL。
let dateString = try article.select(“div”).select(“span”).text().replacingOccurrences(of: “Published on “, with: “”).replacingOccurrences(of: “Remastered on “, with: “”).replacingOccurrences(of: “Answered on “, with: “”).trimmingCharacters(in: .whitespacesAndNewlines)這段長長的程式碼會把資料擷取為字串。因為當中可能有一些文本,我們需要把它們分離,並清除所有不可見的空格。
我們還會把這個字串轉換成日期,因此要應用 DateFormatter。
let formatter = DateFormatter(dateFormat: “dd MMM yyyy”)
let date = Calendar.current.startOfDay(for: formatter.date(from: dateString) ?? Date.now)
extension DateFormatter {
convenience init(dateFormat: String) {
self.init()
self.locale = Locale(identifier: "en_US_POSIX")
self.timeZone = TimeZone(secondsFromGMT: 0)
self.dateFormat = dateFormat
}
}最後,我們會建立自己的資料,並附加到模型中。
let post = Article(title: title, url: url, publishDate: date)
self.articleList.append(post)
Service 的類別應該是這樣的:
import Foundation
import SwiftSoup

class DataService: ObservableObject{

    @Published var articleList = [Article]()
    let baseURL = URL(string: "https://www.swiftbysundell.com")

    func fetchArticles(){
        articleList.removeAll()
        let articleURL = baseURL?.appendingPathComponent("articles")

        if let articleURL = articleURL{
            do {
                let websiteString = try String(contentsOf: articleURL)
                let document = try SwiftSoup.parse(websiteString)

                let articles = try document.getElementsByClass("item-list").select("article")

                for article in articles{
                    let title = try article.select("a").first()?.text(trimAndNormaliseWhitespace: true) ?? ""
                    guard let baseURL = baseURL else {
                        return
                    }
                    let url = try baseURL.appendingPathComponent(article.select("a").attr("href"))
                    let dateString = try article.select("div").select("span").text()
                        .replacingOccurrences(of: "Published on ", with: "")
                        .replacingOccurrences(of: "Remastered on ", with: "")
                        .replacingOccurrences(of: "Answered on ", with: "")
                        .trimmingCharacters(in: .whitespacesAndNewlines)

                    let formatter = DateFormatter(dateFormat: "dd MMM yyyy")
                    let date = Calendar.current.startOfDay(for: formatter.date(from: dateString) ?? Date.now)

                    let post = Article(title: title, url: url, publishDate: date)
                    self.articleList.append(post)
                }

            } catch let error {
                print(error)
            }
        }

    }

}
完成了!我們的 App 可以正常運作。你可以在 GitHub 儲存庫上參考完整專案。

看完這篇文章後,你應該學會了如何從一個資料源抓取資料。你可以應用這個技巧,來在網站或為你的 Blog 建立 App 時擷取資料。如果你有任何問題,歡迎在下方留言。再見!


