導航 (navigation) 是所有應用程式中最重要的一個部分,選擇如何將用戶導向不同頁面,正正就決定了你的應用程式能否成功。
從 AppStore 觀察使用者資訊,我們很清楚哪種導航方式最多人使用,你可以叫它們做漢堡選單 (Hamburger menus)、或是滑動選單 (Sliding menus)、又或是側邊欄 (Sidebars),這種導航形式幾乎成為各種應用程式的首選。就我個人而言,就發現 Sidebar 有很多缺陷,但我不是 UX 設計師,因此你在本文中會讀到更多設計面向 (design-oriented) 的評論。
你可能已經從文章的標題中看出,我最喜歡的應用程式導航方式是 UITabBar。看看我們親愛的蘋果公司的應用程式,大多數都會使用 UITabBar,例如:App Store、Watch、Clock 和 Music ── 全部都是使用 UITabBar 進行導航的。要詳細了解使用它的 UX 優勢,請參閱這篇教程。
為何要創建一個框架 (framework)?
在 Swift 中使用 UIKit 實現 UITabBar 非常容易,那麼為什麼我們要創建整個框架呢?因為標準的 UITabBar 對我來說有點無聊,我想替這個組件添加更多的功能。加上,創建一些可重用的物件是好事,將來不用改變太多程式碼就可以進行樣式化和動畫化。
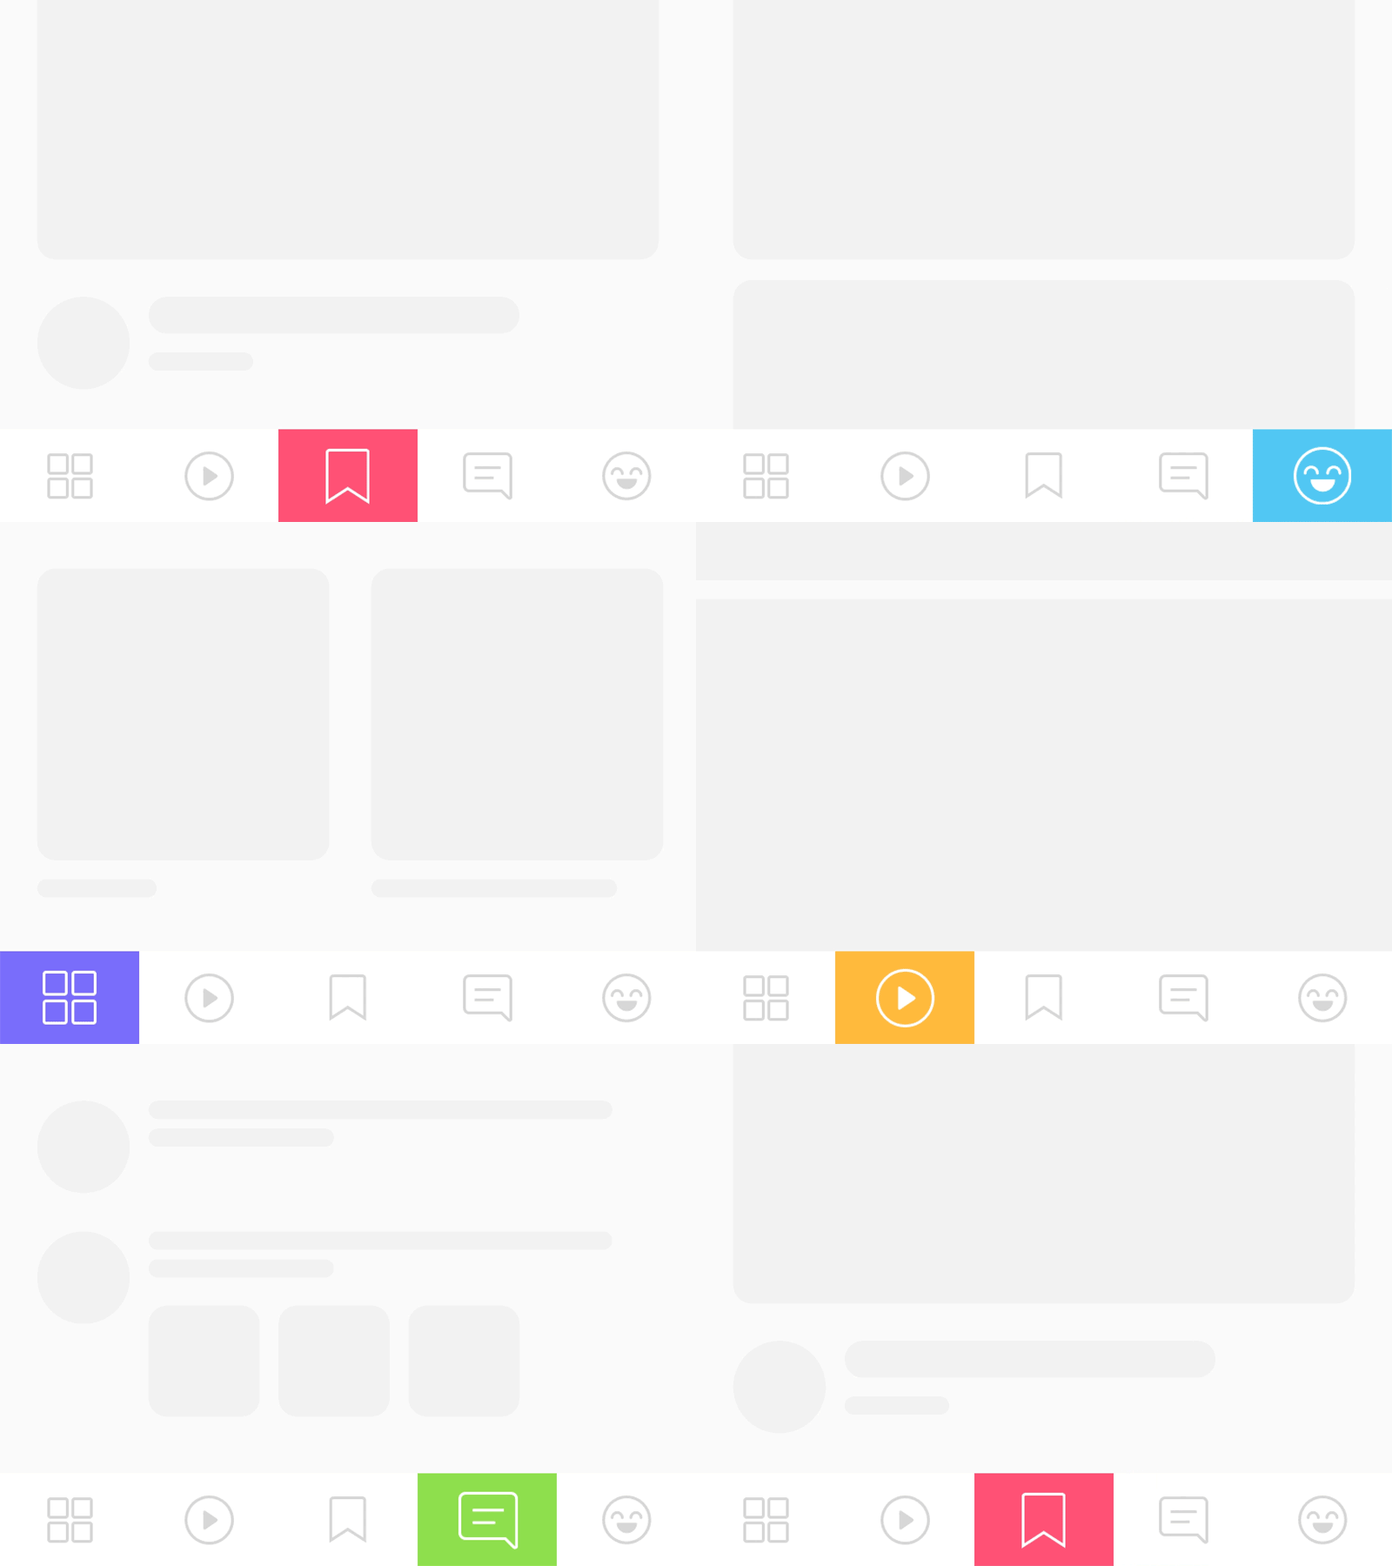
在這篇文章中,我不會介紹創建 CocoaTouch 框架的步驟。要從創建可重用框架開始,請閱讀由 Alec O’Connor 所著的這篇精彩文章。
程式碼
現在,我們已經知道創建框架的原因,亦闡述了想要實現的內容,接下來看看程式碼吧!我們希望框架遵守一些原則 (Principles) 和概念 (Concepts)。
原則與概念
- SOLID
- Protocol Oriented(協定導向)
先決條件
在開始之前,建議你先了解以下幾個原則:
- Access modifiers
- DataSource & Delegation
- Programmatic constraints
這些核心原則,我們在設計和開發框架架構時必須記住。在下文,我說到相關程式碼範例時,將會進一步解釋每個概念。
結構
在此時,你已經創建了自己的框架專案,並為它取名如 MDVTabBarController。第一步,讓我們說說基本的組織結構。
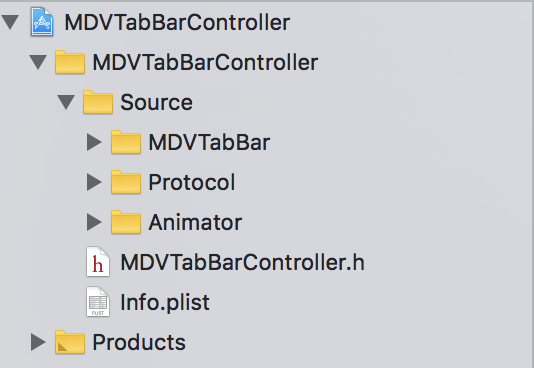
MDVTabBarController
TabBarController 基本上由三種元件組合而成,包括:用來呈現每個 tab 的 TabBarItems、置放各個 item 的 TabBar、以及一個 TabBarController,TabBarController 顧名思義就是用來控制前面提到的元件。我們會從最小的元件開始構建框架,而在最後,我們希望框架可以使用插件動畫 (plugin animations)。
MDVTabBarItem
創建一個名為 MDVTabBarItemable 的檔案,將其放置在 Protocol 檔案夾中。然後,創建一個名為 MDVTabBarItem 的檔案並將其放入 MDVTabBar 檔案夾中。

MDVTabBarItemable 是我們希望所有 TabBarItems 遵循的協定,我們將用一個 UIView 來代替標準的 UITabBar 和 UITabBarItem 來提高靈活性。這個協定定義了兩種配置方法,用於設置 TabBarItem 和 setState。最後一行程式碼則設置 TabBarItem 為選取 (selected) 或未選取 (unselected) 狀態。類型別名 (typealias) MDVTabBarContainer 定義了 Animator 將使用的介面。
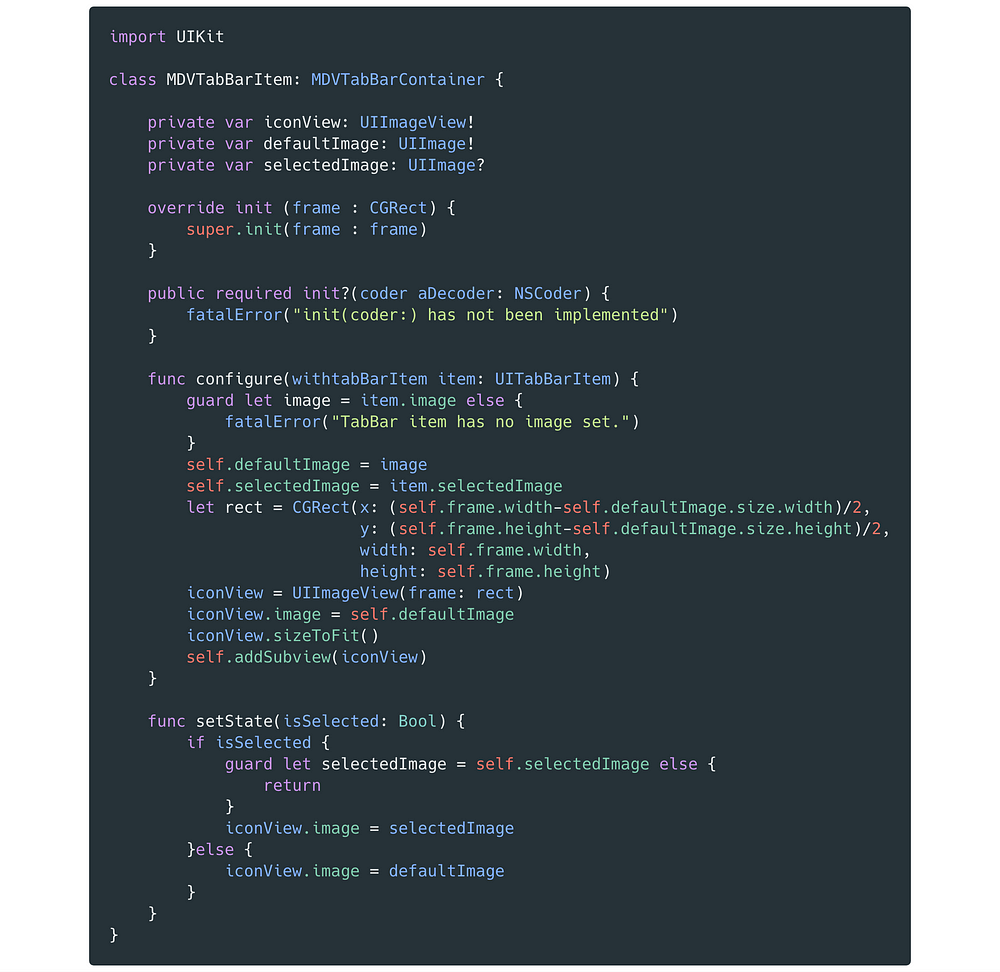
MDVTabBarItem 需要一個有圖象的 UITabBar 物件,來創建一個中心放置圖片的 UIView。到目前為止,MDVTabBarItem 仍不會處理 title label,但這要添加起來非常容易,只要創建 UILabel 並將其放入 UIView 中即可。你會看到 required init 尚未實作,這是 Storyboard 用於初始化元件的 initialiser,我們不會使用 Storyboard,所以不需要實作它。
MDVTabBar
MDVTabBar 是一個相當複雜的類別,所以我們將分段研究它,首先讓我們看看屬性 (properties) 和初始化的部分。創建一個名為 MDVTabBar 的檔案,並將其放入 MDVTabBar 檔案夾中。
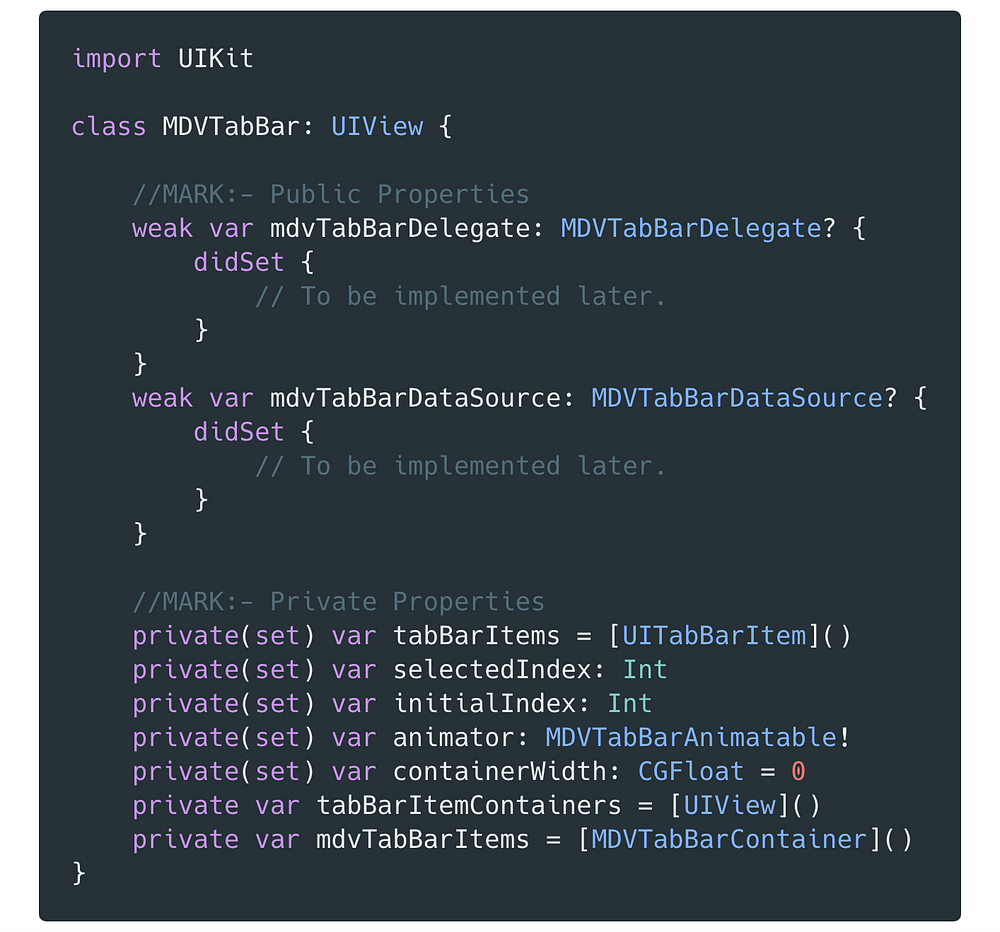
MDVTaBarDelegate 和 MDVTabBarDataSource 是我們稍後將定義的協定。在創建可重用框架時,請記住可訪問性修飾符 (accessibility modifiers) 的使用。首先將變量盡可能設置為私有 (private),如果需要在其定義類別以外的地方修改變量,請在類別內創建一個 public setter 方法來處理修改需求。在 Swift中,private(set) 使我們能夠將屬性保持私有,同時亦擁有一個 internal scope getter。
Animator
我已經介紹過 Animator,所以讓我們直接深入實作。創建一個名為 MDVTabBarAnimatable 的檔案,將其放置在 Protocol 檔案夾中。

我們有兩個方法:
prepareForAnimation── 這個方法在 TabBar 初始化時調用,將為 TabBar 提供任何你想要的樣式或動畫所需的所有元件。performAnimation── 這個方法在用戶點擊 TabBar 上的按鈕時調用,以在 index 切換間執行動畫。
這個協定用來定義所有 Animator 應遵循的 interface,任何人都可以透過實作這個協定來簡單創建動畫,這意味著我們的框架無需改動程式碼,就可以輕鬆擴展支持更多的 Animator。
In object-oriented programming, the open/closed principle states “software entities (classes, modules, functions, etc.) should be open for extension, but closed for modification”; that is, such an entity can allow its behaviour to be extended without modifying its source code. (reference)
MDVTabBarDataSource+Delegate
創建一個名為 MDVTabBarDataSource+Delegate 的檔案,並將其放置在 Protocol 檔案夾中。
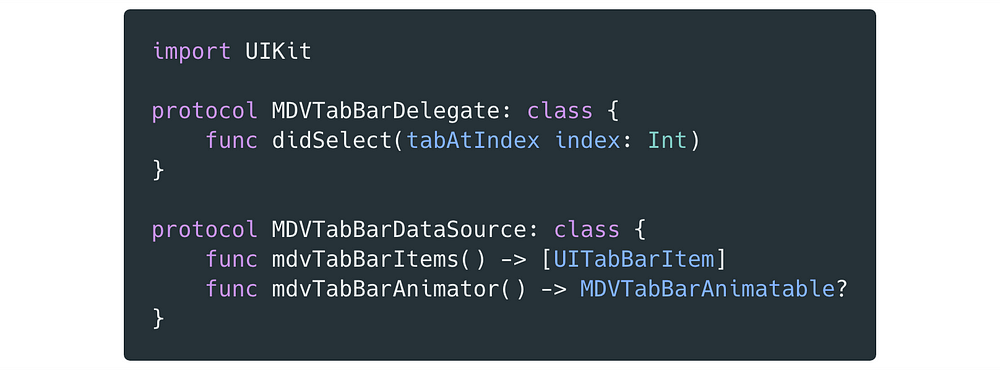
現在回到 MDVTabBar,並完成該類別的實作。從 delegate 和 datasource didSet 方法開始。

每次調整 DataSource 之後,我們要再次進行配置,這可能是由於 Animator 改變、又或是由於某種原因讓 tabBarItems 改變了。同時,每當 delegate 被調整時,我們也希望將 icon 設置為初始狀態,這將使我們的 TabBar 處於正確的狀態,並選擇初始索引。現在讓我們替 MDVTabBar 實作缺少了的方法。
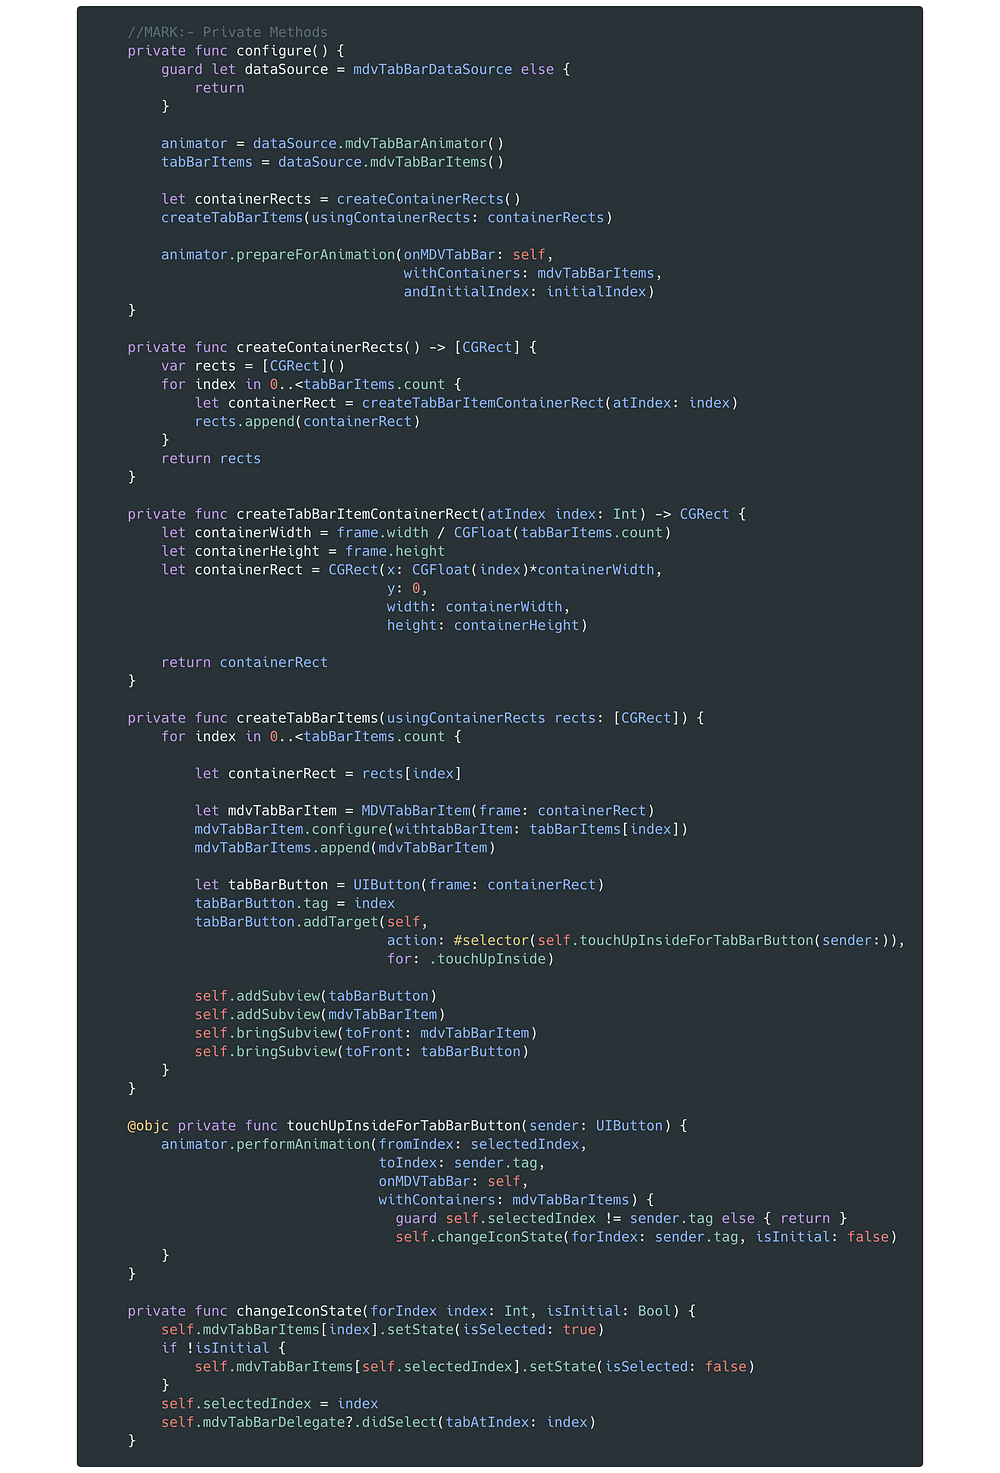
configure── 此方法確保我們的 DataSource 不是 nil,雖然這情況在此範例不可能發生。然後,從 DataSource 設置 tabBarItems 和 Animator 。createContainerRects── 此方法負責為每個 tabBarItem 創建框架。createTabBarItemContainerRect── 從 createContainerRects 創建的框架會被傳遞給此方法,以創建一個 UIView,它將為 tabBarItem 提供 container/holder view 的用途。createTabBarItems── 接下來,我們使用上述 containerRects 創建 MDVTabBarItems。touchUpInsideForTabBarButton── 現在我們需要為每個 tabBarButton 提供一個觸控事件 (touch event),所有 tabBarButton 調用相同的方法,但我們使用 tag 來標識正在點擊哪個按鈕。changeIconState── 最後,我們需要一種方法在來切換 icon 的選取和預設狀態。
上述這些方法結合在一起就可以創建一個 UITabBarItem,設定所在位置並給它一個 selector,每種方法至多只會執行一項工作。
The single responsibility principle is a computer programming principle that states that every module or class should have responsibility over a single part of the functionality provided by the software, and that responsibility should be entirely encapsulated by the class.(reference)
MDVTabBarController
這個類別也是相當重要的,所以我們來看看如何創建它。創建一個名為 MDVTabBarController 的檔案,並將其放在 MDVTabBar 檔案夾中。
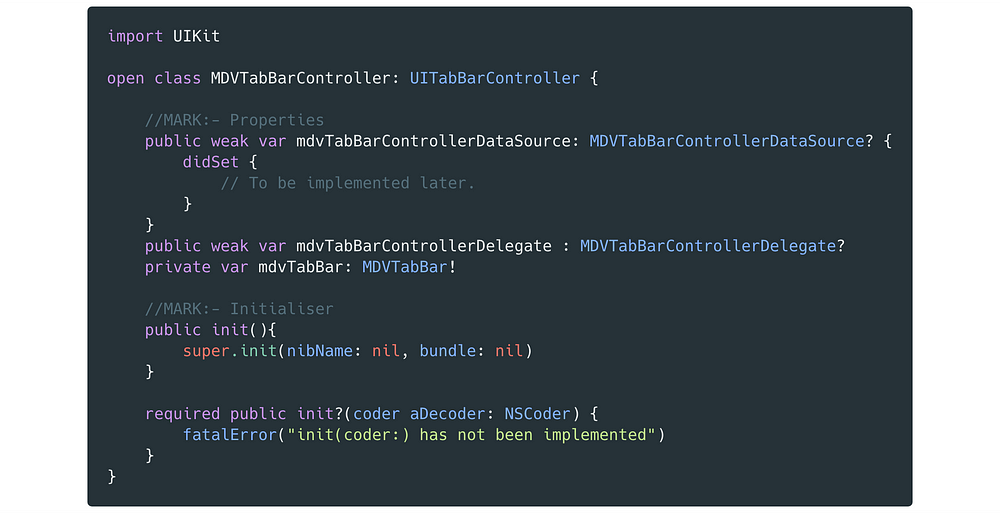
除了尚未定義的 DataSource 和 Delegate 之外,應該沒有什麼不尋常的地方。請注意這個類別被宣告為 open。
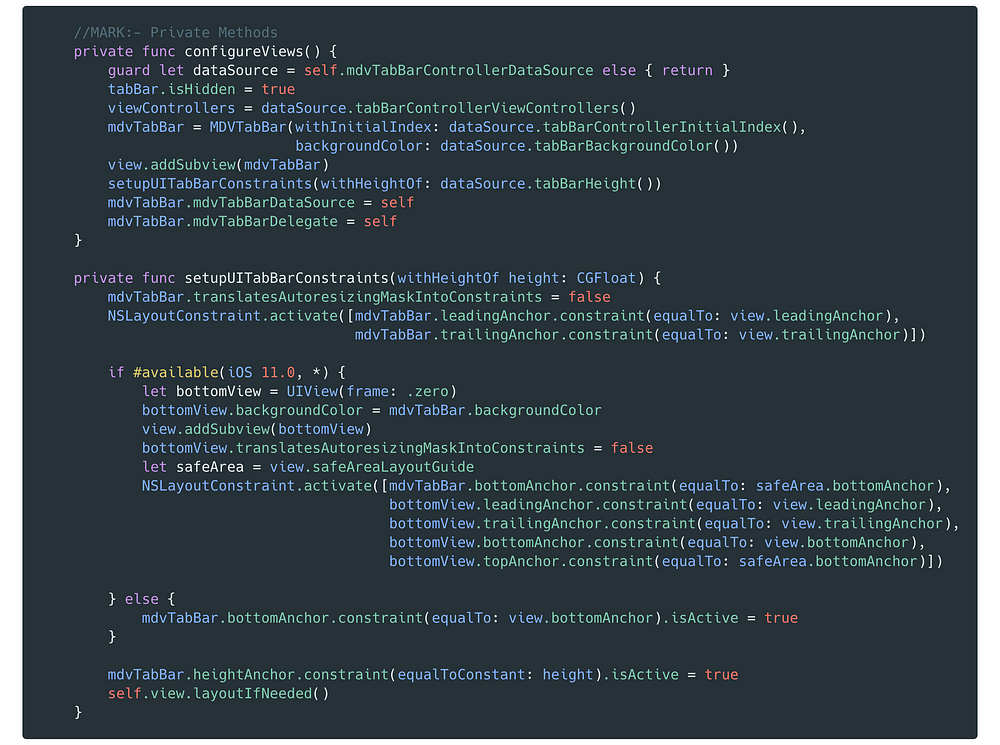
我們只需要用兩個方法就可以創建 tabBarController。
configureViews── 我們將 DataSource 解包,隱藏標準規格 tabBar,因為要將客製的置放在這裡。從 DataSource 中設置視圖控制器 (viewControllers),初始化 MDVTabBar 並使用 constraint 設置它。最後,我們將 tabBarController 設為 MDVTabbar 的 Delegate 和 DataSource。setupTabBarConstraints── 我們使用 constraint 來設定 tabBar 的 Layout。
現在返回 mdvTabBarControllerDataSource 並如下實作 didSet 方法:
didSet {
    self.configureViews()
}
實作 MDVTabBarDelegate 和 MDVTabBarDataSource
創建一個名為 MDVTabBarControllerDataSource+Delegate 的檔案,並將其放置在 Protocol 檔案夾中。

這些是我們想要公開的 API 方法,可供任何人實作我們的框架。由於 MDVTabBarController 屬性為 open,因此可以被繼承。這個類別將會是我們的 Delegate 和 Datasource 來實作這些方法。我們來看一下如何使用這些方法。
tabBarControllerInitialIndex── 用於設置 tabBar 的初始索引。tabBarControllerViewControllers── 為 tabBar 提供視圖控制器。tabBarHeight── 為 tabBar 提供所需的高度。對!我們可以使 tabBar 比標準 UIKit 更小或更高。請時常關注 Apple 的 HIG。tabBarBackgroundColor── 用於設置 tabBar 的背景顏色。tabBarAnimator── 提供 Animator 來控制動畫。didSelectIndex── 這是選取 tabBarItem 時調用的委任方法。當 Tab 被選取時,就可以使用此方法來執行自定義操作。例如,打開一個 share-sheet、或是使用相機觸發權限的視圖。
MDVTabbableViewController
在上述第二點方法中有用到 MDVTabbableViewController,它是我們尚未定義的類別。創建一個名為 MDVTabbableViewController 的檔案,並將其放置在 Protocol 檔案夾中,這是我們最後一個協定和類別。

這個協定和類型別名的組合是用來做我們 TabBarControllerDataSource 的保護機制,確保任何視圖控制器顯示在 tabBarController 時,都應該提供一個 tabBarItem,否則它無法編譯。
完成了
我們的框架終於完成了!剩下來要做的就是創建一個專案來試用框架,並實作一個很酷的動畫。我不想再延長這篇文章,所以在此將提供一個 Github 連結,舉例說明如何使用框架。
Animator 範例
import UIKit

public class MDVUnderlineAnimator: MDVTabBarAnimatable {

    private var underlineColor: UIColor = .clear
    private var underlineHeight: CGFloat = 0
    private var xPosition: CGFloat = 0
    private var yPositionOffset: CGFloat = 0
    private var containerWidth: CGFloat = 0
    private var underlineView: UIView = UIView(frame: .zero)

    private let duration: Double
    private let delay: Double
    private let damping: CGFloat
    private let velocity: CGFloat


    public init(withUnderlineColor underlineColor: UIColor = .red,
         underlineHeight: CGFloat = 8,
         yPositionOffset: CGFloat = 0,
         duration: Double = 0.3,
         delay: Double = 0,
         damping: CGFloat = 0.5,
         velocity: CGFloat = 0.6){
        self.underlineColor = underlineColor
        self.underlineHeight = underlineHeight
        self.yPositionOffset = yPositionOffset

        self.damping = damping
        self.duration = duration
        self.delay = delay
        self.velocity = velocity
    }

    public func prepareForAnimation(onMDVTabBar tabBar: UIView, withContainers containers: [MDVTabBarContainer], andInitialIndex initialIndex: Int) {
        xPosition = CGFloat(containers[initialIndex].frame.origin.x)
        let yPosition = CGFloat(tabBar.frame.height - underlineHeight)
        containerWidth = containers[initialIndex].frame.width
        self.underlineView = UIView(frame: CGRect(x: xPosition,
                                                  y: yPosition,
                                                  width: containerWidth,
                                                  height: self.underlineHeight))
        self.underlineView.backgroundColor = self.underlineColor
        tabBar.insertSubview(self.underlineView, at: 0)
    }

    public func performAnimation(fromIndex: Int,
                          toIndex: Int,
                          onMDVTabBar tabBar: UIView,
                          withContainers containers: [MDVTabBarContainer],
                          completion: @escaping () -> Void) {

        UIView.animate(withDuration: duration,
                       delay: delay,
                       usingSpringWithDamping: damping,
                       initialSpringVelocity: velocity,
                       options: .curveLinear,
                       animations: {
                        self.xPosition = CGFloat(containers[toIndex].frame.origin.x)
                        self.underlineView.frame.origin.x = self.xPosition
                        completion()
        })
    }
}
總結
我們建立了一個 tabBarController,它具有即插即用的動畫和樣式。我不會說這個框架是完整的,相較於 ESTabBarController 或 RAMAnimatedTabBarController 這種 tabBarController libraries 的完整解決方案,這個專案還差很還。
我建議讀者去看看這個 repository,可以參考它來創建你自己的動畫,看到你們提出不同想法定必更加有趣。在接下來的幾周,我會發佈更多 Animator 的範例,例如本文開頭的動畫,以及如何實現它們。
感謝您的閱讀,歡迎留下你們對本框架的意見。
資源
ESTabBarController
RAMAnimatedTabBarController
How To Create A Custom Tab Bar
FB : https://www.facebook.com/yishen.chen.54
Twitter : https://twitter.com/YeEeEsS

