今天,我們會客製由一個視圖控制器 (ViewController) 轉場到另一個的轉場動畫。
為什麼會想要寫這個主題呢?過去,我花了很多時間去了解視圖控制器之間的轉換。遺憾的是,目前線上鮮有能簡單說明視圖控制器動畫轉場的教程。
因此,我決定寫幾篇文章,教大家用最簡單的方法,創建令人驚艷的轉場動畫。
讓我們開始來創建客製化的 UINavigationController 轉場動畫吧!
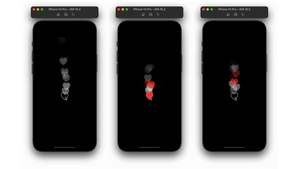
先看一下我們最後的成果:
專案
讓我們先花點時間來了解這個專案和以下元素:
- MainViewController.swift:主視圖控制器,你將會在這裡呈現 CollectionView,並推向 PushedViewController。
- MainViewController+DataSource.swift:我們在這檔案放置 CollectionView DataSource 方法。
- MainViewController+ProtocolTransitions.swift:在這裡,我們可以看到要製作動畫的每個物件的協定 (Protocol),包括 CellImageView、BackgroundColor View、和 Cell Background View。
- PushedViewController.swift:專案中的第二個視圖控制器,它就是動畫的最終狀態。
- AnimationCollectionViewLayout.swift:這是用在 MainViewController CollectionView 的 CollectionView Layout。
- CardCell.swift:這是 UICollectionViewCell,我們將在專案中 MainViewController 的 CollectionView 上用到它。
- Helpers.swift:我們會在這裡定義在 MainViewController 和 PushedViewController 上使用的協定,以獲取要進行動畫處理的物件的參考。
- PushAnimator.swift: 此類別將繼承自 NSObject,並將實作 UIViewControllerAnimatedTransitioning 協定,以從 MainViewController 轉換到 PushedViewController。
- PopAnimator.swift: 此類別將繼承自 NSObject ,並將實作 UIViewControllerAnimatedTransitioning 協定,以從 PushedViewController 轉換到 MainViewController。
- TransitionCoordinator.swift: 此類別將繼承自 NSObject,並將實作 UINavigationControllerDelegate 協定。 在此類別中,我們定義 push 時使用 PushAnimator 的轉場,以及在 pop 時使用的 PopAnimator 轉場效果。
實現動畫的步驟
1. 正常狀態
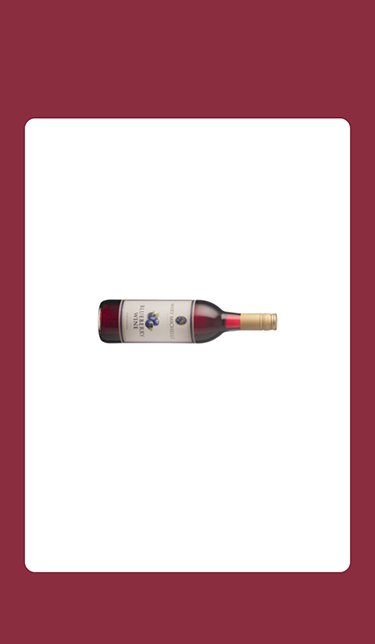
2. CollectionView Background Cell 縮小
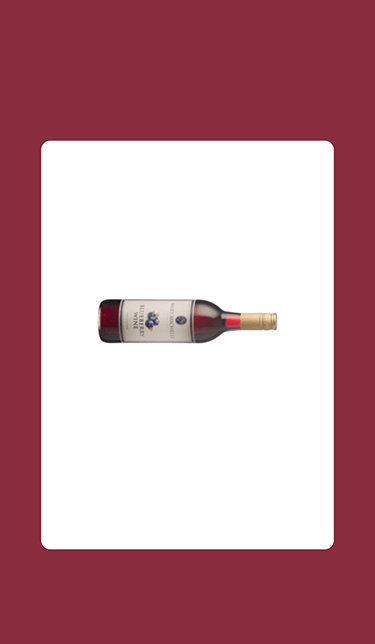
3. CollectionView Background 擴展到容器的寬度,並刪除圓形的邊框
4. CollectionView Background 會擴展至這個視圖控制器背景的底部和頂部,並將瓶子移動到頂部
讓我們進入動畫控制器!
在這邊,我們將提供 2 個客製化的轉場動畫:一個用來 push,一個用在 pop。現在讓我們專注在 push 動畫,首先,我們需要準備什麼?
一個動畫控制器 (Animation Controller) !
該控制器需要實作下列兩種方法,以符合 UIViewControllerAnimatedTransitioning() 協定。
1. transitionDuration:整個動畫的持續時間
transitionDuration(using transitionContext: UIViewControllerContextTransitioning?) -> TimeInterval2. animateTransition(using:): 這是動畫邏輯所在
animateTransition(using transitionContext: UIViewControllerContextTransitioning)讓我們開始第一個動畫吧。
- PushAnimator:
class PushAnimator: NSObject, UIViewControllerAnimatedTransitioning {

    func transitionDuration(using transitionContext: UIViewControllerContextTransitioning?) -> TimeInterval {
        return 2.0
    }

    func animateTransition(using transitionContext: UIViewControllerContextTransitioning) {
    }

}
在轉場期間,我們需要提供一個容器視圖 (container view),讓轉場動畫在裡面運行。
- 以下是需要添加到控制器視圖的 transitionContext 視圖:
class PushAnimator: NSObject, UIViewControllerAnimatedTransitioning {

    func transitionDuration(using transitionContext: UIViewControllerContextTransitioning?) -> TimeInterval {
        return 2.0
    }

    func animateTransition(using transitionContext: UIViewControllerContextTransitioning) {

        let containerView = transitionContext.containerView

        guard let fromVC = transitionContext.viewController(forKey: .from) as? animTransitionable,
            let toVC = transitionContext.viewController(forKey: .to) as? animTransitionable else {
                transitionContext.completeTransition(false)
                return
        }

        let fromViewController = transitionContext.viewController(forKey: .from)!
        fromViewController.view.backgroundColor = UIColor.clear

        let toViewController = transitionContext.viewController(forKey: .to)!

    }

}
我們將會新增一個協定,用來獲取要執行動畫的視圖單元格的參考。該協定可用於 MainViewController 和 PushedViewController。
protocol animTransitionable {
    var cellImageView: UIImageView { get }
    var backgroundColor: UIView { get }
    var cellBackground: UIView { get }
}
所以⋯⋯ 我們要如何透過動畫使物件從一個視圖控制器移動到另一個呢?我們需要創建每個視圖,將它們添加到容器視圖中,並設置動畫。
來看一下如何實作程式碼吧:
class PushAnimator: NSObject, UIViewControllerAnimatedTransitioning {

    func transitionDuration(using transitionContext: UIViewControllerContextTransitioning?) -> TimeInterval {
        return 2.0
    }

    func animateTransition(using transitionContext: UIViewControllerContextTransitioning) {

        let containerView = transitionContext.containerView

        guard let fromVC = transitionContext.viewController(forKey: .from) as? animTransitionable,
            let toVC = transitionContext.viewController(forKey: .to) as? animTransitionable else {
                transitionContext.completeTransition(false)
                return
        }

        let fromViewController = transitionContext.viewController(forKey: .from)!
        fromViewController.view.backgroundColor = UIColor.clear

        let toViewController = transitionContext.viewController(forKey: .to)!

        let imageViewSnapshot = UIImageView(image: fromVC.cellImageView.image)
        imageViewSnapshot.contentMode = .scaleAspectFit


        // Background View With Correct Color
        let backgroundView = UIView()
        backgroundView.frame = fromVC.backgroundColor.frame
        backgroundView.backgroundColor = fromVC.backgroundColor.backgroundColor
        containerView.addSubview(backgroundView)


        // Cell Background
        let cellBackground = UIView()
        cellBackground.frame = containerView.convert(fromVC.cellBackground.frame, from: fromVC.cellBackground.superview)
        cellBackground.backgroundColor = fromVC.cellBackground.backgroundColor
        cellBackground.layer.cornerRadius = fromVC.cellBackground.layer.cornerRadius
        cellBackground.layer.masksToBounds = fromVC.cellBackground.layer.masksToBounds


        containerView.addSubview(fromViewController.view)
        containerView.addSubview(toViewController.view)

        containerView.addSubview(cellBackground)
        containerView.addSubview(imageViewSnapshot)

        fromViewController.view.isHidden = true
        toViewController.view.isHidden = true


        imageViewSnapshot.frame = containerView.convert(fromVC.cellImageView.frame, from: fromVC.cellImageView.superview)
    }

}
來到這一步,我們得到:
- ImageView(瓶子)
- BackgroundView(背景色)
- CellBackground View(CollectionView 的 Card View,它將在 PushedViewController 中展開成大背景)
現在讓我們看一下動畫:
class PushAnimator: NSObject, UIViewControllerAnimatedTransitioning {

    func transitionDuration(using transitionContext: UIViewControllerContextTransitioning?) -> TimeInterval {
        return 2.0
    }

    func animateTransition(using transitionContext: UIViewControllerContextTransitioning) {

        let containerView = transitionContext.containerView

        guard let fromVC = transitionContext.viewController(forKey: .from) as? animTransitionable,
            let toVC = transitionContext.viewController(forKey: .to) as? animTransitionable else {
                transitionContext.completeTransition(false)
                return
        }

        let fromViewController = transitionContext.viewController(forKey: .from)!
        fromViewController.view.backgroundColor = UIColor.clear

        let toViewController = transitionContext.viewController(forKey: .to)!

        let imageViewSnapshot = UIImageView(image: fromVC.cellImageView.image)
        imageViewSnapshot.contentMode = .scaleAspectFit


        // Background View With Correct Color
        let backgroundView = UIView()
        backgroundView.frame = fromVC.backgroundColor.frame
        backgroundView.backgroundColor = fromVC.backgroundColor.backgroundColor
        containerView.addSubview(backgroundView)


        // Cell Background
        let cellBackground = UIView()
        cellBackground.frame =  containerView.convert(fromVC.cellBackground.frame, from: fromVC.cellBackground.superview)
        cellBackground.backgroundColor = fromVC.cellBackground.backgroundColor
        cellBackground.layer.cornerRadius = fromVC.cellBackground.layer.cornerRadius
        cellBackground.layer.masksToBounds = fromVC.cellBackground.layer.masksToBounds


        containerView.addSubview(fromViewController.view)
        containerView.addSubview(toViewController.view)

        containerView.addSubview(cellBackground)
        containerView.addSubview(imageViewSnapshot)

        fromViewController.view.isHidden = true
        toViewController.view.isHidden = true


        imageViewSnapshot.frame = containerView.convert(fromVC.cellImageView.frame, from: fromVC.cellImageView.superview)


        let frameAnim1 = CGRect(x: 0, y: cellBackground.frame.minY, width: UIScreen.main.bounds.width, height: cellBackground.frame.height)
        let frameAnim2 = CGRect(x: 0, y: toVC.cellBackground.frame.minY, width: UIScreen.main.bounds.width, height: UIScreen.main.bounds.height - toVC.cellBackground.frame.minY)


        let animator1 = {
            UIViewPropertyAnimator(duration: 0.4, dampingRatio: 1.3) {
                cellBackground.transform = CGAffineTransform(scaleX: 0.9, y: 0.9)
            }
        }()

        let animator2 = {
            UIViewPropertyAnimator(duration: 0.3, dampingRatio: 0.9) {
                cellBackground.layer.cornerRadius = 0
                cellBackground.frame = frameAnim1
            }
        }()

        let animator3 = {
            UIViewPropertyAnimator(duration: 0.2, dampingRatio: 1.4) {
                cellBackground.frame = frameAnim2
                imageViewSnapshot.frame = containerView.convert(toVC.cellImageView.frame, from: toVC.cellImageView.superview)
            }
        }()


        animator1.addCompletion { _ in
            animator2.startAnimation()
        }

        animator2.addCompletion {  _ in
            animator3.startAnimation(afterDelay: 0.1)
        }


        animator3.addCompletion {  _ in

            imageViewSnapshot.removeFromSuperview()
            cellBackground.removeFromSuperview()
            fromViewController.view.removeFromSuperview()

            toViewController.view.isHidden = false

            transitionContext.completeTransition(true)


        }

        animator1.startAnimation()

    }
}
以下是動畫的簡要說明:
Animator 1:我們將 CellBackground 視圖縮減為原本的 0.9 倍大
Animator 2:我們將它擴展到主視圖的寬度
Animator 3:我們將 CellBackground 的寬拉滿主視圖,高度則是根據 toVC (PushedViewController) 的 CellBackground,再加上我們為瓶子添加的動畫而定。
而 Pop animator 的製作方法是一樣的,只是順序相反。讓我們看看程式碼:
class PopAnimator: NSObject, UIViewControllerAnimatedTransitioning {


    func transitionDuration(using transitionContext: UIViewControllerContextTransitioning?) -> TimeInterval {
        return 2.0
    }

    func animateTransition(using transitionContext: UIViewControllerContextTransitioning) {

        let containerView = transitionContext.containerView

         guard let fromVC = transitionContext.viewController(forKey: .from) as? animTransitionable,
         let toVC = transitionContext.viewController(forKey: .to) as? animTransitionable else {
         transitionContext.completeTransition(false)
         return
         }

        let fromViewController = transitionContext.viewController(forKey: .from)!
        fromViewController.view.backgroundColor = UIColor.clear

        let toViewController = transitionContext.viewController(forKey: .to)!

        let imageViewSnapshot = UIImageView(image: fromVC.cellImageView.image)
        imageViewSnapshot.contentMode = .scaleAspectFit
        imageViewSnapshot.frame = containerView.convert(fromVC.cellImageView.frame, from: fromVC.cellImageView.superview)


        //Background View Correct Color
        let backgroundView = UIView()
        backgroundView.frame = fromVC.backgroundColor.frame
        backgroundView.backgroundColor = fromVC.backgroundColor.backgroundColor

        // Cell Background
        let cellBackground = UIView()
        cellBackground.frame =  containerView.convert(fromVC.cellBackground.frame, from: fromVC.cellBackground.superview)
        cellBackground.backgroundColor = fromVC.cellBackground.backgroundColor

        let cellBackgroundToVC = containerView.convert(toVC.cellBackground.frame, from: toVC.cellBackground.superview)
        let imageViewToVC = containerView.convert(toVC.cellImageView.frame, from: toVC.cellImageView.superview)


        containerView.addSubview(toViewController.view)
        containerView.addSubview(cellBackground)
        containerView.addSubview(imageViewSnapshot)

        fromViewController.view.isHidden = true
        toViewController.view.isHidden = true


        let frameAnim1 = CGRect(x: fromVC.cellBackground.frame.minX, y: cellBackgroundToVC.minY , width: UIScreen.main.bounds.width, height: cellBackgroundToVC.height)
        let frameAnim2 = CGRect(x: cellBackgroundToVC.minX, y: cellBackgroundToVC.minY, width: cellBackgroundToVC.width, height: cellBackgroundToVC.height )
        let frameImageToVC = containerView.convert(toVC.cellImageView.frame, from: toVC.cellImageView.superview)


        let animator1 = {
            UIViewPropertyAnimator(duration: 0.3, curve: .easeOut) {
                cellBackground.frame = frameAnim1
            }
        }()

        let animator2 = {
            UIViewPropertyAnimator(duration: 0.3, curve: .easeOut) {
                imageViewSnapshot.frame = CGRect(x: frameImageToVC.minX, y: cellBackgroundToVC.minY - (toVC.cellImageView.frame.height / 2) , width: imageViewToVC.width, height: imageViewToVC.height)
            }
        }()

        let animator3 = {
            UIViewPropertyAnimator(duration: 0.35, dampingRatio: 0.6) {
                cellBackground.frame = frameAnim2
                cellBackground.layer.cornerRadius = 10

                imageViewSnapshot.frame = frameImageToVC

            }
        }()


        // Animations Completion Handler
        animator1.addCompletion {  _ in
             animator3.startAnimation()
        }

        animator3.addCompletion { _ in

            imageViewSnapshot.removeFromSuperview()
            cellBackground.removeFromSuperview()

            toViewController.view.isHidden = false

            transitionContext.completeTransition(true)
        }

        animator1.startAnimation()
        animator2.startAnimation()


    }
}
所以,這裡要做的最後一件事,就是製作 CollectionView Cell(單元格)滑動時,背景色的動畫處理。
     func scrollViewDidEndDecelerating(_ scrollView: UIScrollView) {

        var visibleRect = CGRect()

        visibleRect.origin = collectionView.contentOffset
        visibleRect.size = collectionView.bounds.size

        let visiblePoint = CGPoint(x: visibleRect.midX, y: visibleRect.midY)

        guard let indexPath = collectionView.indexPathForItem(at: visiblePoint) else { return }

        UIView.animate(withDuration: 0.3) {
            self.backgroundView.backgroundColor  =  self.dictionaryDataArray[indexPath.row]["hexBackgroundColor"]!.hexColor
        }

    }
來到這一步,我們已經製作好所需的一切了,只需要在兩個視圖控制器之間添加 TransitionCoordinator。
請在 MainViewController 添加以下程式碼:
let transition = TransitionCoordinator()
當單元格被點擊後,我們會將這個 transition 物件添加到 NavigationController delegate 中。
func collectionView(_ collectionView: UICollectionView, didSelectItemAt indexPath: IndexPath) {

        if (collectionView.cellForItem(at: indexPath) as? CardCell) != nil {

            // Reference for the selected Cell
            self.selectedIndexPath = indexPath

            let finalVC = PushedViewController()
            finalVC.selectedImage = dictionaryDataArray[indexPath.row]["bottleName"]!
            finalVC.topHexColor = dictionaryDataArray[indexPath.row]["hexBackgroundColor"]!

            navigationController?.delegate = transition
            navigationController?.pushViewController(finalVC, animated: true)

        }
    }
讓我們看一下 TransitionCoordinator 的程式碼:
// NavigationController Delegate for Transition Coordinator
class TransitionCoordinator: NSObject, UINavigationControllerDelegate {
    func navigationController(_ navigationController: UINavigationController,
                              animationControllerFor operation: UINavigationControllerOperation,
                              from fromVC: UIViewController,
                              to toVC: UIViewController) -> UIViewControllerAnimatedTransitioning? {

        switch operation {
        case .push:
            return PushAnimator()
        case .pop:
            return PopAnimator()
        default:
            return nil
        }

    }

}
此類別設置 NavigationController delegate,並檢查我們正在執行哪種類型的操作:如果正在執行 push,它就會回傳一個 PushAnimator() 物件;而如果是 pop,它就會回傳一個 PopAnimator() 物件。
總結
這個轉場效果剛開始接觸可能有點困難,但請相信我,這實作起來很簡單! 希望你喜歡這篇文章!
如果你有任何評論、問題或建議,請隨時在下面留言!
你可以在這裡下載 Github 原始碼。
聯絡方式:電郵:[email protected]
FB : https://www.facebook.com/yishen.chen.54
Twitter : https://twitter.com/YeEeEsS